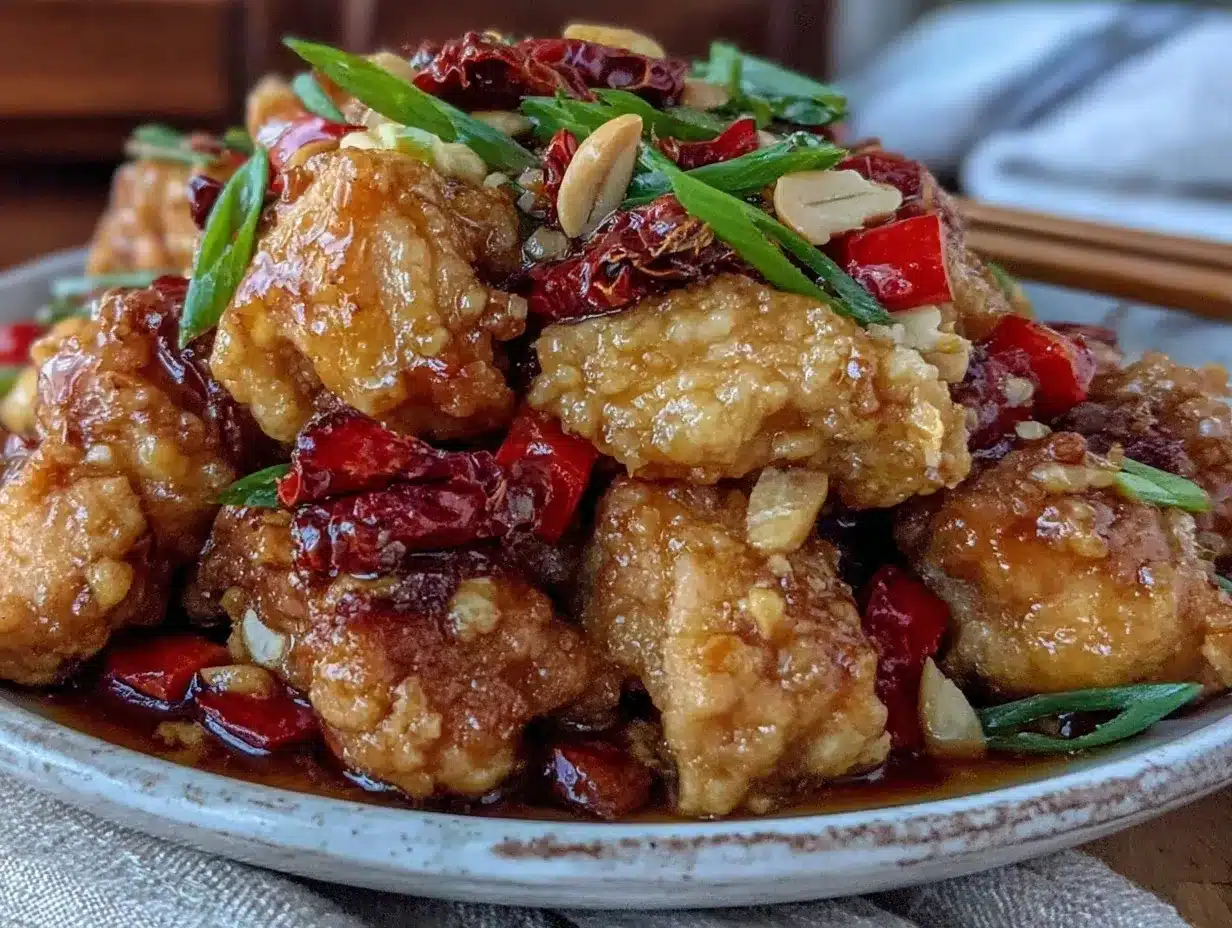
Let me paint you a picture—imagine the sizzle and pop as diced chicken hits a hot wok, the aroma of toasted Sichuan peppercorns filling your kitchen, and glossy, caramelized sauce bubbling around crimson chilies. That’s the magic of this easy homemade Kung Pao Chicken recipe (with crispy peanuts and just the right kick of heat). The first time I cooked this, I was standing barefoot in my tiny apartment, rain tapping at the window, craving something bold and comforting. One bite, and I was hooked—the tangy, savory sauce clinging to juicy chicken, the crunch of roasted peanuts, and a fiery tickle at the back of my throat. It was the kind of moment where you pause, take a deep breath, and just smile because you know you’re onto something truly special.
There’s a reason this dish has become a staple at my family gatherings. It’s the recipe that makes people sneak second helpings straight from the pan (I caught my dad red-handed more than once). My kids, who usually shy away from anything “spicy,” can’t resist picking out the peanuts. And honestly, Kung Pao Chicken is dangerously easy to whip up on a busy weeknight—no takeout menu required. I stumbled upon the original version years ago at a bustling Chinese restaurant, but it wasn’t until I started tinkering in my own kitchen that I realized how approachable and flexible this stir fry is. If only I’d known sooner, right?
Now, it’s my go-to for potlucks, a surefire way to impress friends at dinner parties, or just a bright, mouthwatering highlight for my Pinterest board. Whether you’re looking for a sweet and spicy pick-me-up after a long day or want to jazz up your meal prep routine, this Kung Pao Chicken recipe (easy, homemade, and loaded with crisp peanuts) is pure, nostalgic comfort—like a warm hug with a chili kick. I’ve tested it more times than I can count (in the name of research, of course), and every time, it feels like coming home. Bookmark this one. You’re going to want to make it again and again.
Why You’ll Love This Kung Pao Chicken Recipe
Let me tell you, this isn’t just any Kung Pao Chicken recipe—it’s the one that finally got my picky cousin to eat something with chilies, and the one I perfected after a dozen late-night “taste tests” (my family’s complaint: it disappears too fast). Years of home-cooking and restaurant kitchen experience have taught me what makes a stir fry unforgettable. Here’s why you’ll love this one:
- Quick & Easy: Comes together in under 30 minutes—honestly, you’ll spend more time waiting for takeout to arrive.
- Simple Ingredients: You probably have most of these in your pantry; no hunting for hard-to-find stuff (I’ve got substitution tips below, too).
- Perfect for Any Occasion: Great for weeknight dinners, weekend meal prep, or even serving at a casual party.
- Crowd-Pleaser: Kids love the sweet-savory sauce, adults love the punchy heat, and everyone fights over the crispy peanuts.
- Unbelievably Delicious: The contrast of tender chicken, crunchy nuts, and spicy, tangy sauce is pure comfort food magic.
This recipe stands out because I use a simple velveting technique for the chicken (more on that later), which keeps it juicy and never dry. The sauce isn’t gloopy or overly sweet—just the right balance of soy, vinegar, and a touch of sugar. And those peanuts? Toasted to perfection, adding a satisfying crunch in every bite. I’ve tested everything from the oil temperature to the order of adding ingredients so you don’t end up with burned garlic or soggy veggies.
Let’s face it—Kung Pao Chicken is one of those dishes that just makes you happy. It’s not just a meal; it’s a mood booster. The way the flavors play together, the way you can dial the spice up or down…it’s comfort food with heart. And, if you’re like me, you’ll love how this recipe turns a handful of everyday ingredients into something truly memorable. Whether you’re impressing guests or just treating yourself, this is the Kung Pao Chicken you’ll crave.
Ingredients Needed for Easy Homemade Kung Pao Chicken
This Kung Pao Chicken recipe uses simple, wholesome ingredients to deliver bold flavor and that classic texture—without any fuss. Most of what you need is probably already on your spice rack or in your fridge. Here’s the full rundown:
- For the Chicken:
- 1 pound (450g) boneless, skinless chicken thighs, cut into 3/4-inch cubes (thighs stay juicier—breast works in a pinch)
- 2 teaspoons soy sauce (for marinating; I like Kikkoman)
- 1 teaspoon Shaoxing wine or dry sherry (adds depth—skip if you don’t have it)
- 1 teaspoon cornstarch (helps the chicken get that silky, restaurant-style texture)
- 1/2 teaspoon toasted sesame oil
- For the Sauce:
- 2 tablespoons light soy sauce
- 1 tablespoon dark soy sauce (brings color and flavor; use more light soy if needed)
- 1 tablespoon Chinese black vinegar or rice vinegar (I use Chinkiang brand)
- 1 tablespoon sugar (balances the heat—coconut sugar works too)
- 1 teaspoon cornstarch (for thickening)
- 2 tablespoons water
- For Stir Frying:
- 2 tablespoons vegetable oil (peanut or canola oil both work well)
- 8-10 dried red chilies (Sichuan or Thai, seeds removed for less heat; keep a few seeds in for a fiery kick)
- 1 teaspoon Sichuan peppercorns (optional but traditional—gives that signature tingle)
- 3 cloves garlic, minced
- 1-inch (2.5cm) piece fresh ginger, minced
- 1/2 cup unsalted roasted peanuts (or cashews for a twist)
- 3 scallions, white and green parts separated, sliced on the bias
Ingredient Tips:
- Chicken thighs are more forgiving and stay moist, but chicken breast works if you prefer leaner meat.
- No Shaoxing wine? Substitute dry sherry or just skip—don’t sweat it.
- If you can’t find Sichuan peppercorns, a tiny pinch of ground black pepper adds a little bite (but the numbing tingle is unique).
- Allergic to peanuts? Toasted cashews or sunflower seeds are a great swap.
- For a gluten-free version, use tamari instead of soy sauce and check your cornstarch.
- Chilies can be adjusted—use fewer for mild, leave the seeds for more heat.
Honestly, the best part is how flexible this list is. You can use what you have, and it’ll still hit all the right flavor notes. I’ve even made it with leftover rotisserie chicken—works like a charm.
Equipment Needed
- Wok or Large Skillet: Authentic flavor comes from high heat and quick cooking; a good wok is unbeatable, but a heavy skillet or nonstick pan works great if you don’t have one.
- Sharp Chef’s Knife and Cutting Board: For prepping chicken and veggies—nothing fancy, just sharp and sturdy.
- Mixing Bowls: You’ll need two—one for marinating the chicken, one for the sauce (I use glass so I can see when everything’s mixed evenly).
- Measuring Spoons and Cups: Precision helps, especially for the sauce—though I’ll admit to eyeballing sometimes!
- Spatula or Wooden Spoon: For tossing and stir frying; a wok spatula (wok chuan) is handy, but any sturdy spatula will do.
- Small Strainer or Fine Mesh Sieve (optional): For removing seeds from dried chilies if you want to control the heat.
If you’re just starting out, don’t worry about buying special gear. I’ve made Kung Pao Chicken with just a large frying pan and a spoon. For nonstick pans, use silicone or wood utensils to avoid scratching the surface. And if you do invest in a wok, a quick rub of oil after each wash keeps it seasoned and happy. Budget-friendly, easy, and no stress.
How to Make Kung Pao Chicken (Step-by-Step Preparation)
-
Marinate the Chicken (5 minutes + 10 minutes rest)
In a medium bowl, combine 1 pound (450g) diced chicken thighs with 2 teaspoons soy sauce, 1 teaspoon Shaoxing wine, 1 teaspoon cornstarch, and 1/2 teaspoon sesame oil. Mix well with your hand or a spoon until each piece is coated. Let it rest at room temperature for at least 10 minutes.
Prep note: Don’t skip the marinating—it keeps the chicken tender and flavorful. If you’re short on time, even 5 minutes is better than none. -
Mix the Sauce (2 minutes)
In a small bowl, stir together 2 tablespoons light soy sauce, 1 tablespoon dark soy sauce, 1 tablespoon vinegar, 1 tablespoon sugar, 1 teaspoon cornstarch, and 2 tablespoons water. Mix until the sugar and cornstarch dissolve.
Troubleshooting tip: If the cornstarch clumps, whisk with a fork or shake in a small jar. -
Prep Aromatics and Chilies (3 minutes)
Slice 3 scallions (separating white and green parts), mince 3 garlic cloves, and mince 1-inch ginger. Remove seeds from 8-10 dried chilies for a milder dish.
Sensory cue: The chilies should be bright red and slightly flexible, not brittle. -
Heat the Wok (2 minutes)
Place your wok or skillet over high heat until just smoking. Add 2 tablespoons oil and swirl to coat.
Personal tip: A hot pan is key—if the oil doesn’t shimmer, wait a few more seconds. -
Cook the Chicken (4-5 minutes)
Add marinated chicken in a single layer. Let it sear undisturbed for 1 minute, then stir fry for 2-3 minutes until browned and just cooked through. Transfer to a plate.
Warning: Don’t crowd the pan—work in batches if necessary, or the chicken will steam instead of sear. -
Stir Fry Peppers, Peanuts, and Aromatics (2-3 minutes)
Add dried chilies and Sichuan peppercorns to the hot oil. Stir fry for 30 seconds until fragrant and the chilies darken slightly (don’t burn them!). Add garlic, ginger, white scallion slices, and peanuts. Toss for 1 minute.
Sensory cue: You should smell a toasty, nutty fragrance. -
Combine Everything and Sauce (2-3 minutes)
Return chicken to the wok. Stir the sauce to re-mix the cornstarch and pour it in. Toss quickly, scraping up any browned bits, until the sauce thickens and everything is glossy and coated (about 1-2 minutes).
Troubleshooting: If the sauce gets too thick, add a splash of water; if it’s thin, cook 30 seconds longer. -
Finish and Serve (1 minute)
Add green scallion tops, toss one last time, and remove from heat.
Personal tip: Taste and adjust—add a pinch of sugar if you want it sweeter, or another dash of vinegar for more tang. -
Plate and Enjoy!
Serve hot over steamed jasmine rice or with your favorite stir fry veggies.
And that’s it! Once you’ve made this a couple of times, it’ll be second nature. You’ll know by the shiny sauce, the aroma, and the way your family hovers in the kitchen that it’s ready.
Cooking Tips & Techniques for the Perfect Kung Pao Chicken
- Velveting the chicken: That quick marinade with cornstarch and soy sauce gives the chicken its signature tenderness. I used to skip it—big mistake. It really makes a difference.
- High heat is your friend: Don’t be afraid to crank up the burner. Stir fries are all about quick cooking, so make sure your pan is hot before anything goes in.
- Don’t overcrowd the pan: I’ve learned the hard way—too much chicken at once means you’ll steam instead of sear. Cook in batches if necessary.
- Prepping ahead: Have all your ingredients measured and ready before you start. Stir frying goes fast and there’s no time to chop once you begin.
- Timing is everything: Add peanuts and chilies just before the sauce so they stay crunchy and fragrant.
- Balance the flavors: Taste the sauce before you add it—adjust with a splash more vinegar or a pinch more sugar to hit your sweet spot.
- Fixing mistakes: If the sauce turns gloppy, add a bit of water and toss again. If you burn the garlic (we’ve all been there), start over with fresh oil—burnt garlic will overpower everything.
- Consistency tip: Use the same brands of soy sauce and vinegar each time for predictable results. I once switched brands and my sauce tasted way saltier—lesson learned.
- Multitasking: While the chicken marinates, measure your sauce and prep veggies so everything’s ready to go.
Kung Pao Chicken rewards confidence, but not recklessness—keep an eye on the heat and trust your senses. The sizzling, the glossy look, that nutty aroma—those are your clues!
Variations & Adaptations
- Low-Carb/Keto Version: Swap sugar for a keto-friendly sweetener and use tamari or coconut aminos instead of soy sauce. Serve it over steamed cauliflower rice.
- Vegetarian/Vegan Kung Pao: Replace chicken with firm tofu (press and cube), tempeh, or even cauliflower florets. Use plant-based protein and vegan oyster sauce if you like.
- Nut-Free Adaptation: If peanuts are off the menu, use roasted sunflower seeds or pumpkin seeds. You still get crunch and flavor.
- Extra Veggies: Add chopped bell peppers, zucchini, or snap peas for color and nutrition. Stir fry with the aromatics before adding the chicken back in.
- Oven Method: If you want to skip the stir fry, toss chicken with marinade and bake on a sheet pan at 425°F (220°C) for 15-18 minutes, then toss with sauce and peanuts.
- Personal twist: I sometimes add a spoonful of chili crisp oil for extra punch or sprinkle sesame seeds on top for a little crunch and eye appeal.
This Kung Pao Chicken recipe is endlessly adaptable. Make it spicy or mild, gluten-free or nut-free—just follow the main technique and make it your own. That’s the beauty of home cooking!
Serving & Storage Suggestions
You’ll want to serve Kung Pao Chicken hot and fresh, right out of the pan. I love piling it over fluffy jasmine rice, but brown rice or even quinoa works well too. For a light meal, spoon it onto steamed broccoli or a bed of stir-fried veggies.
For a full meal, serve with quick cucumber salad or a side of garlicky sautéed greens. Cold leftovers are surprisingly tasty, but you can reheat gently in a skillet over medium heat, adding a splash of water to loosen the sauce if needed (microwave works too, but watch for hot spots).
- Storage: Keep leftovers in an airtight container in the fridge for up to 3 days. The flavors deepen overnight, so tomorrow’s lunch will be even tastier.
- Freezer Friendly: Freeze cooled portions in freezer-safe containers for up to 2 months. Thaw overnight in the fridge, then reheat in a skillet for best texture.
- Tip: If you want the peanuts super crunchy, store them separately and sprinkle on just before serving.
This dish is a hit at potlucks and makes great meal prep—just portion into containers with rice or veggies for grab-and-go lunches. Trust me, it never lasts long in my house!
Nutritional Information & Benefits
Each serving of homemade Kung Pao Chicken (about 1 1/2 cups, not counting rice) provides approximately:
- Calories: 370
- Protein: 29g
- Carbohydrates: 18g
- Fat: 19g
- Fiber: 2g
- Sugar: 7g
Chicken thighs provide lean protein and iron, while peanuts add healthy fats, fiber, and a bit of plant-based protein. Using less oil and sugar than restaurant versions keeps things lighter. You can make it gluten-free or low-carb with easy swaps. Possible allergens include soy and peanuts—see above for substitution suggestions. From a wellness perspective, this recipe strikes a balance between satisfying comfort and sensible nutrition. I feel good serving it to my family, knowing exactly what’s in every bite.
Conclusion
If you’re craving bold flavor, easy prep, and something that brings everyone to the table (and keeps them coming back for seconds), this Kung Pao Chicken recipe is it. You get the restaurant-style crunch and punchy sauce with none of the mystery ingredients. Don’t be afraid to put your own spin on it—swap the veggies, dial the heat up or down, and make it fit your tastes and pantry.
Honestly, this dish reminds me of why I love home cooking: it’s fast, flexible, and just plain delicious. I hope it becomes a regular in your meal rotation the way it has in mine. Now, go ahead and give it a try! If you make it, I’d love to hear how it goes—leave a comment, share your tweaks, and let me know if your family fought over the last peanut too. Here’s to many happy, spicy, crunchy dinners ahead!
Frequently Asked Questions about Kung Pao Chicken
Can I make Kung Pao Chicken less spicy?
Absolutely! Use fewer dried chilies and remove the seeds for a milder dish. You can also skip the Sichuan peppercorns if you want zero heat.
What can I substitute for peanuts?
Roasted cashews, sunflower seeds, or pumpkin seeds all work well and keep the crunch. For nut allergies, try crunchy roasted chickpeas.
Can I use chicken breast instead of thighs?
Yes! Chicken breast works great, just be careful not to overcook it—marinate as directed and stir fry quickly to keep it juicy.
Is Kung Pao Chicken gluten-free?
It can be! Use tamari or certified gluten-free soy sauce, and make sure your cornstarch is gluten-free. Always check labels if you have celiac or gluten sensitivity.
How do I store and reheat leftovers?
Store in an airtight container in the fridge for up to 3 days or freeze for 2 months. Reheat in a skillet with a splash of water to keep the sauce glossy, or microwave in short bursts, stirring in between.
Pin This Recipe!
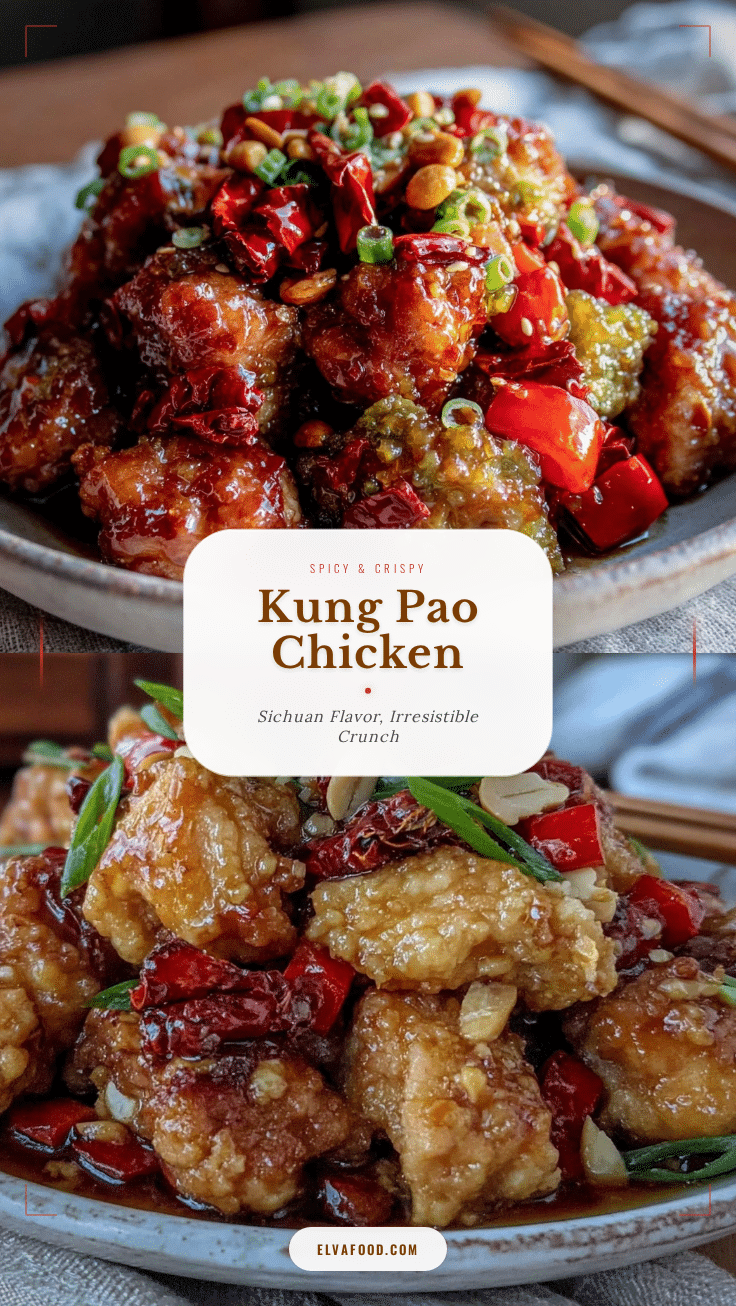
Kung Pao Chicken Recipe Easy Homemade Stir Fry with Crispy Peanuts
This easy homemade Kung Pao Chicken features juicy chicken stir-fried with crunchy peanuts, dried chilies, and a tangy, savory sauce. Quick to make and packed with bold flavor, it’s a comforting Chinese classic perfect for weeknights or entertaining.
- Prep Time: 15 minutes
- Cook Time: 10 minutes
- Total Time: 25 minutes
- Yield: 4 servings 1x
- Category: Main Course
- Cuisine: Chinese
Ingredients
- 1 pound boneless, skinless chicken thighs, cut into 3/4-inch cubes
- 2 teaspoons soy sauce (for marinating)
- 1 teaspoon Shaoxing wine or dry sherry
- 1 teaspoon cornstarch (for marinating)
- 1/2 teaspoon toasted sesame oil
- 2 tablespoons light soy sauce
- 1 tablespoon dark soy sauce
- 1 tablespoon Chinese black vinegar or rice vinegar
- 1 tablespoon sugar
- 1 teaspoon cornstarch (for sauce)
- 2 tablespoons water
- 2 tablespoons vegetable oil (peanut or canola oil)
- 8–10 dried red chilies, seeds removed for less heat
- 1 teaspoon Sichuan peppercorns (optional)
- 3 cloves garlic, minced
- 1-inch piece fresh ginger, minced
- 1/2 cup unsalted roasted peanuts
- 3 scallions, white and green parts separated, sliced on the bias
Instructions
- In a medium bowl, combine chicken thighs with soy sauce, Shaoxing wine, cornstarch, and sesame oil. Mix well and let rest at room temperature for at least 10 minutes.
- In a small bowl, stir together light soy sauce, dark soy sauce, vinegar, sugar, cornstarch, and water until sugar and cornstarch dissolve.
- Slice scallions (separating white and green parts), mince garlic and ginger, and remove seeds from dried chilies.
- Heat wok or large skillet over high heat until just smoking. Add vegetable oil and swirl to coat.
- Add marinated chicken in a single layer. Sear undisturbed for 1 minute, then stir fry for 2-3 minutes until browned and just cooked through. Transfer to a plate.
- Add dried chilies and Sichuan peppercorns to hot oil. Stir fry for 30 seconds until fragrant and chilies darken slightly. Add garlic, ginger, white scallion slices, and peanuts. Toss for 1 minute.
- Return chicken to wok. Stir sauce to re-mix cornstarch and pour in. Toss quickly, scraping up any browned bits, until sauce thickens and everything is glossy and coated (about 1-2 minutes).
- Add green scallion tops, toss one last time, and remove from heat.
- Serve hot over steamed jasmine rice or with your favorite stir fry veggies.
Notes
Marinate chicken for best texture. Adjust chilies for desired spice level. Substitute cashews or sunflower seeds for peanuts if needed. For gluten-free, use tamari and check cornstarch. Prep all ingredients before cooking for smooth stir fry. Store leftovers in airtight container up to 3 days or freeze for 2 months. Reheat gently with a splash of water.
Nutrition
- Serving Size: About 1 1/2 cups per
- Calories: 370
- Sugar: 7
- Sodium: 850
- Fat: 19
- Saturated Fat: 3
- Carbohydrates: 18
- Fiber: 2
- Protein: 29
Keywords: Kung Pao Chicken, Chinese stir fry, easy chicken recipe, spicy chicken, peanuts, weeknight dinner, homemade takeout, Sichuan, gluten-free option, meal prep