It was one of those chilly, quiet evenings when I found myself rummaging through the pantry, craving something rich but without the fuss of a full dessert spread. Honestly, I wasn’t expecting much—just a quick treat to chase away the lingering stress of the day. Then, tucked behind the usual baking staples, I spotted a forgotten block of cream cheese and a box of red velvet cake mix. It hit me: why not try making red velvet lava cakes with a cream cheese center? I was skeptical at first, thinking lava cakes were tricky and reserved for fancy restaurants, but the idea of that warm, gooey cream cheese inside a moist, cocoa-tinged cake seemed too good to pass up.
After a couple of attempts (and a few slightly overcooked cakes), I finally nailed down a version that felt downright indulgent without being overly complicated. The crumb is tender, the red velvet flavor deep and comforting, and that molten cream cheese center? It just melts in your mouth and makes you close your eyes, you know? What started as a last-minute experiment turned into a favorite recipe I found myself making multiple times a week—especially when I wanted to impress friends or just treat myself without much effort.
It’s funny how recipes like this stick around—not because they’re perfect on the first try, but because they feel like a little celebration in your own kitchen. This decadent red velvet lava cake with cream cheese center is one of those treats that quietly became my go-to, a sweet pause in hectic days, and once you try it, I’m pretty sure you’ll get it too.
Why You’ll Love This Recipe
Let me share why these decadent red velvet lava cakes with cream cheese center have earned a permanent spot in my dessert repertoire:
- Quick & Easy: The whole recipe comes together in about 30 minutes, perfect when you want a fancy dessert without the wait.
- Simple Ingredients: You probably have most of these in your kitchen already—no need for specialty stores or obscure items.
- Perfect for Special Occasions: Whether it’s a cozy date night, holiday dessert, or an elegant ending to a casual dinner, these cakes impress effortlessly.
- Crowd-Pleaser: The rich red velvet flavor combined with that melty cream cheese center always gets rave reviews from both kids and adults.
- Unbelievably Delicious: The texture balance is spot on—moist cake with a luscious, slightly tangy cream cheese core that oozes out with every bite.
What sets this recipe apart? It’s not just a red velvet cake or a simple lava cake. The trick is blending the cream cheese filling with a hint of vanilla and powdered sugar for that perfect sweet-tart surprise inside. Plus, the batter uses a touch of cocoa powder to deepen the flavor without overpowering the signature velvety taste. This isn’t your average boxed cake hack—it’s a carefully tested version that results in that dreamy molten center every time.
Honestly, this recipe isn’t just about dessert; it’s about that little moment of joy that comes from warm, gooey flavors and comforting textures. It’s the kind of dessert that makes you pause, savor, and maybe even share with someone special. That’s why it’s stuck around in my kitchen (and heart).
What Ingredients You Will Need
This recipe calls for straightforward ingredients that work together to create bold flavor and a satisfying molten texture without complicated steps. Most are pantry staples or easy to find, and substitutions are simple if you need a tweak here or there.
- For the Cake Batter:
- All-purpose flour – ½ cup (60g), sifted (for tender crumb)
- Cocoa powder – 1 tablespoon (unsweetened, high-quality like Valrhona for best depth)
- Granulated sugar – ¾ cup (150g)
- Unsalted butter – 6 tablespoons (85g), melted and slightly cooled
- Egg – 1 large, room temperature (helps with structure)
- Buttermilk – ½ cup (120ml), or use milk with 1 teaspoon vinegar as a substitute
- Vanilla extract – 1 teaspoon (adds warmth)
- Red food coloring – 1 tablespoon (gel type for vibrant color without thinning batter)
- Baking powder – ¼ teaspoon (for light lift)
- Salt – a pinch (to balance sweetness)
- For the Cream Cheese Center:
- Cream cheese – 4 ounces (115g), softened (I prefer Philadelphia for smoothness)
- Powdered sugar – 2 tablespoons (adds sweetness without graininess)
- Vanilla extract – ½ teaspoon
Ingredient Notes: If you want to make this gluten-free, you can swap the all-purpose flour with an equal amount of almond flour or a gluten-free baking blend. For dairy-free, try coconut cream cheese and use a nondairy milk like almond or oat milk with a splash of lemon juice as buttermilk substitute. The red food coloring is key to that classic red velvet appeal—gel color works best here since it won’t affect the batter’s consistency.
Equipment Needed
- Ramekins or muffin tins (4 to 6-ounce size) – ideal for perfect lava cakes
- Mixing bowls – at least two: one for batter and one for cream cheese filling
- Electric mixer or handheld whisk – for smooth cream cheese mixture
- Measuring cups and spoons – for accurate ingredient ratios
- Spatula – flexible for folding batter gently
- Oven – preheated and reliable, essential for even baking
- Cooling rack – helps cakes set briefly after baking without sogginess
If you don’t have ramekins, muffin tins lined with paper cups work just fine, but keep an eye on baking times as they might change slightly. I once tried silicone molds; they release easily but sometimes cause the cakes to spread more. For best results, greasing ramekins well (or dusting with cocoa powder) helps the lava cakes slide out cleanly. A small offset spatula or butter knife can be handy to loosen edges if needed.
Preparation Method
- Preheat your oven to 425°F (220°C). Grease 4 to 6 ramekins generously with butter and dust with cocoa powder to prevent sticking. Set aside.
- Prepare the cream cheese filling: In a small bowl, beat together 4 ounces (115g) softened cream cheese, 2 tablespoons powdered sugar, and ½ teaspoon vanilla extract until smooth and creamy. Refrigerate this while you prepare the batter to keep it firm and easier to handle.
- Make the cake batter: In a medium bowl, whisk together ½ cup (60g) sifted flour, 1 tablespoon cocoa powder, ¼ teaspoon baking powder, and a pinch of salt. In a separate large bowl, combine ¾ cup (150g) granulated sugar, 6 tablespoons (85g) melted butter, 1 large room-temperature egg, ½ cup (120ml) buttermilk, 1 teaspoon vanilla extract, and 1 tablespoon red gel food coloring. Whisk until smooth and well mixed.
- Gently fold the dry ingredients into the wet mixture. Use a spatula to combine just until no streaks remain; overmixing can toughen the cake. The batter will be thick and vibrant red.
- Assemble the cakes: Spoon about 2 tablespoons of batter into each ramekin, spreading it evenly across the bottom. Add a heaping teaspoon of the chilled cream cheese filling in the center of each. Top with another 2 tablespoons of batter, covering the cream cheese completely.
- Bake immediately for 12 to 14 minutes. The edges should be set and firm but the center will look slightly soft and jiggly. Avoid overbaking to keep that molten center intact.
- Remove from oven and let cool for 3 minutes. Run a knife around the edges to loosen the cakes, then invert onto plates. If cakes don’t release easily, gently tap the ramekin or use a small spatula.
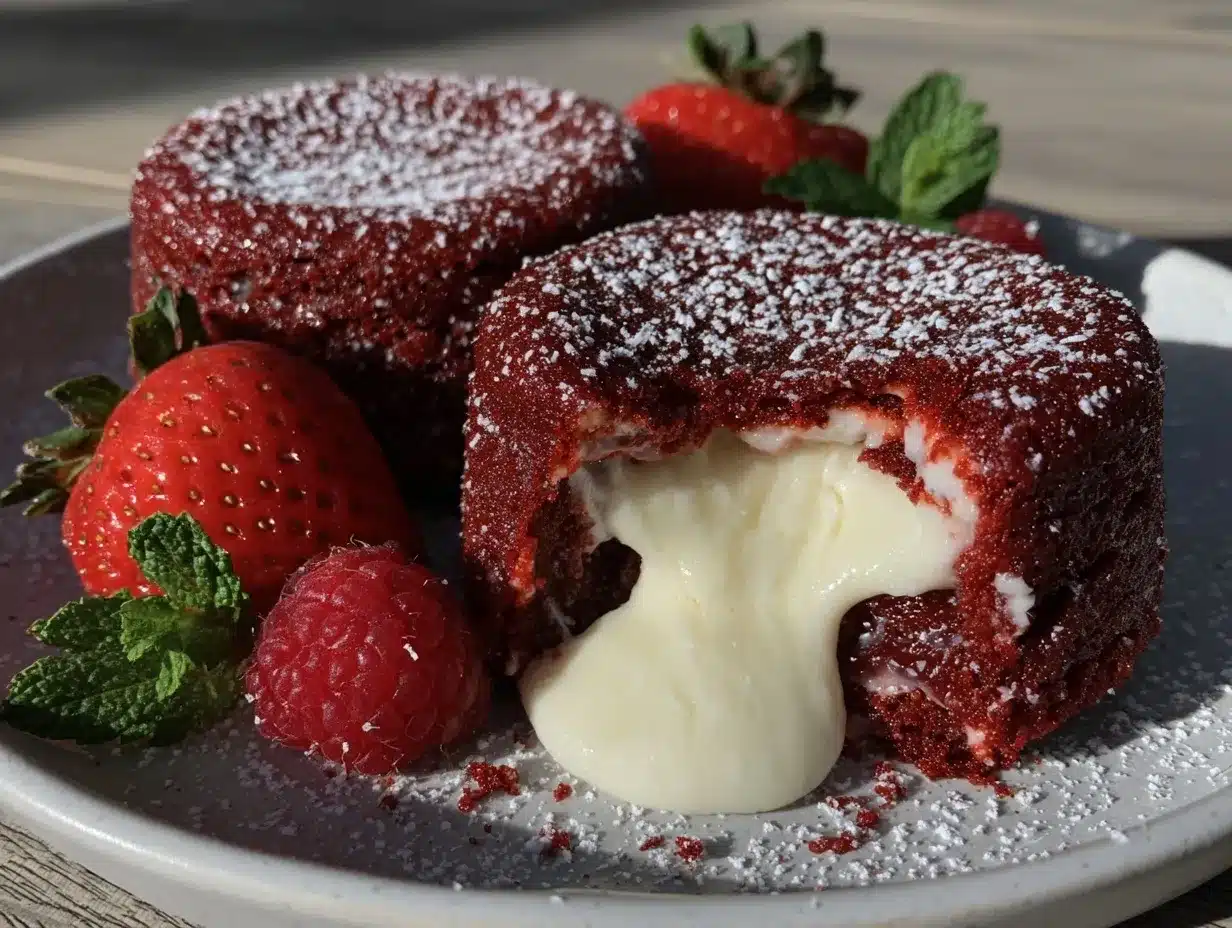
- Serve warm. The cream cheese center should ooze out beautifully when cut into. For extra flair, dust with powdered sugar or add a dollop of whipped cream.
Tips: When folding the dry ingredients, patience is key. I learned the hard way that rushing this step leads to dense cakes. Also, baking time can vary slightly depending on your oven, so keep a close eye starting at 12 minutes. If you notice the center is too runny after cooling, a minute or two longer in the oven helps firm it up without losing that lava effect.
Cooking Tips & Techniques
Getting that perfect lava cake texture can be tricky, but here’s what I’ve picked up over the years:
- Use room temperature ingredients. This helps the batter come together smoothly and bake evenly.
- Don’t overmix the batter. Fold just until combined to keep cakes tender and avoid a gummy texture.
- Chill the cream cheese filling. Keeping the filling cold before baking prevents it from melting away completely and helps it stay gooey but intact inside.
- Grease and dust ramekins well. This simple step saves you from frustrating sticking and broken cakes.
- Watch your oven temperature. Too hot and the cake will set too quickly outside but remain raw inside; too cool and you won’t get that molten center.
- Test your baking time. Every oven is different, so I recommend testing one cake first to find your sweet spot.
- Multitasking tip: While the cakes bake, prep your toppings or set the table so you’re ready to serve immediately for best taste.
Honestly, I’ve had my share of cracked tops and dry centers, but keeping track of these tips made all the difference. One time, I forgot to chill the cream cheese filling and ended up with a sad, runny mess. Lesson learned!
Variations & Adaptations
This decadent red velvet lava cake recipe is surprisingly versatile. Here are a few ways to make it your own:
- Dietary swaps: Use almond flour or gluten-free baking blend to make it gluten-free. Replace dairy with coconut cream cheese and plant-based milk for a vegan-friendly version.
- Flavor twists: Add a pinch of cinnamon or espresso powder to the batter for an extra depth of flavor. Swap vanilla in the cream cheese filling for orange zest for a citrusy surprise.
- Seasonal toppings: Serve with fresh raspberries or strawberries in summer, or a drizzle of caramel sauce during colder months.
- Cooking methods: If you don’t have an oven, try using an air fryer at 375°F (190°C) for about 10 minutes, checking at the 8-minute mark to avoid overbaking.
- Personal favorite: I sometimes add mini chocolate chips to the batter for little pockets of melted chocolate that pair beautifully with the cream cheese center.
Serving & Storage Suggestions
These lava cakes are best enjoyed warm, straight from the oven when the cream cheese center is at its gooey peak. For a simple presentation, dust with powdered sugar and add a spoonful of whipped cream or a scoop of vanilla ice cream—because why not? Fresh berries or a drizzle of chocolate sauce also make excellent companions.
If you have leftovers (rare, but it happens), store them in an airtight container in the refrigerator for up to 2 days. To reheat, microwave for about 20-30 seconds or warm gently in a low oven (300°F/150°C) for 5-7 minutes. Just be careful not to overheat or the lava effect will disappear.
Flavors actually deepen a bit after resting, so if you bake them ahead, allow them to reach room temperature before warming. This recipe also freezes well—wrap individual cakes tightly in plastic wrap and foil, then thaw overnight in the fridge before reheating.
Nutritional Information & Benefits
Each decadent red velvet lava cake with cream cheese center clocks in at approximately 320 calories, with about 18 grams of fat, 35 grams of carbohydrates, and 5 grams of protein per serving (based on 6 cakes). The cream cheese adds a dose of calcium and protein, while the cocoa powder contributes antioxidants.
This dessert is gluten-containing unless you swap the flour, and dairy is present in the butter and cream cheese, so keep that in mind for allergies. I appreciate that despite being indulgent, the recipe uses real ingredients without artificial preservatives or fillers.
From a wellness perspective, treating yourself to a homemade dessert like this feels balanced—it’s satisfying and made with care, which honestly beats processed sweets any day.
Conclusion
These decadent red velvet lava cakes with cream cheese center are a little slice of cozy luxury you can whip up anytime. They strike the perfect balance between rich flavor and simple preparation, making them a reliable choice whether you’re hosting guests or just craving something special for yourself. I love how forgiving this recipe is to tweaks and how it always delivers that comforting molten surprise that feels like a warm hug.
Give it a try, make it your own, and don’t hesitate to share how you adapted it—I’m always curious about new spins! Remember, the best desserts come from a bit of experimentation and a lot of love.
Enjoy every gooey bite.
FAQs
Can I prepare the cream cheese filling ahead of time?
Yes! You can make the filling a day ahead and keep it refrigerated until ready to use. Just give it a quick stir before assembling the cakes.
What if I don’t have red gel food coloring?
You can use liquid food coloring, but you may need to add a bit less to avoid thinning the batter. Natural options like beet powder work too but will give a milder color.
How do I know when the lava cakes are done baking?
The edges should look set and firm, but the center will still appear slightly soft and jiggly. Overbaking will result in a cakey texture without the molten center.
Can I make these lava cakes dairy-free?
Absolutely! Swap butter and cream cheese for their dairy-free alternatives, and use plant-based milk with lemon juice or vinegar as buttermilk substitute.
Is it possible to double the recipe?
Yes, just double all ingredients and bake in additional ramekins. Baking time should remain about the same, but keep an eye on individual cakes for doneness.
Pin This Recipe!

Decadent Red Velvet Lava Cakes Recipe with Cream Cheese Center

These decadent red velvet lava cakes feature a moist, cocoa-tinged cake with a warm, gooey cream cheese center, perfect for a quick and impressive dessert.
- Prep Time: 15 minutes
- Cook Time: 14 minutes
- Total Time: 29 minutes
- Yield: 6 servings 1x
- Category: Dessert
- Cuisine: American
Ingredients
- ½ cup (60g) all-purpose flour, sifted
- 1 tablespoon unsweetened cocoa powder
- ¾ cup (150g) granulated sugar
- 6 tablespoons (85g) unsalted butter, melted and slightly cooled
- 1 large egg, room temperature
- ½ cup (120ml) buttermilk (or milk with 1 teaspoon vinegar as substitute)
- 1 teaspoon vanilla extract
- 1 tablespoon red gel food coloring
- ¼ teaspoon baking powder
- Pinch of salt
- 4 ounces (115g) cream cheese, softened
- 2 tablespoons powdered sugar
- ½ teaspoon vanilla extract
Instructions
- Preheat your oven to 425°F (220°C). Grease 4 to 6 ramekins generously with butter and dust with cocoa powder to prevent sticking. Set aside.
- Prepare the cream cheese filling: In a small bowl, beat together 4 ounces (115g) softened cream cheese, 2 tablespoons powdered sugar, and ½ teaspoon vanilla extract until smooth and creamy. Refrigerate this while you prepare the batter.
- Make the cake batter: In a medium bowl, whisk together ½ cup (60g) sifted flour, 1 tablespoon cocoa powder, ¼ teaspoon baking powder, and a pinch of salt.
- In a separate large bowl, combine ¾ cup (150g) granulated sugar, 6 tablespoons (85g) melted butter, 1 large room-temperature egg, ½ cup (120ml) buttermilk, 1 teaspoon vanilla extract, and 1 tablespoon red gel food coloring. Whisk until smooth and well mixed.
- Gently fold the dry ingredients into the wet mixture using a spatula until no streaks remain; do not overmix.
- Assemble the cakes: Spoon about 2 tablespoons of batter into each ramekin, spreading it evenly across the bottom. Add a heaping teaspoon of the chilled cream cheese filling in the center of each. Top with another 2 tablespoons of batter, covering the cream cheese completely.
- Bake immediately for 12 to 14 minutes. The edges should be set and firm but the center will look slightly soft and jiggly.
- Remove from oven and let cool for 3 minutes. Run a knife around the edges to loosen the cakes, then invert onto plates. If cakes don’t release easily, gently tap the ramekin or use a small spatula.
- Serve warm. The cream cheese center should ooze out beautifully when cut into. Optionally dust with powdered sugar or add a dollop of whipped cream.
Notes
Use room temperature ingredients for best results. Do not overmix the batter to keep cakes tender. Chill the cream cheese filling before assembling to maintain a gooey center. Grease and dust ramekins well to prevent sticking. Baking time may vary by oven; start checking at 12 minutes. For dairy-free or gluten-free versions, substitute ingredients as noted in the recipe.
Nutrition
- Serving Size: 1 lava cake
- Calories: 320
- Fat: 18
- Carbohydrates: 35
- Protein: 5
Keywords: red velvet lava cake, cream cheese lava cake, molten cake, easy dessert, quick dessert, red velvet dessert, lava cake recipe