Let me paint a little picture for you: it’s a sunny spring afternoon, the house is filled with the irresistible scent of rich chocolate mingling with sweet, nutty peanut butter. The kitchen counter is lined with glossy, egg-shaped candies – some of them not even cooled yet, but already disappearing (thanks to my kids’ sneaky fingers). The very first time I whipped up these creamy Chocolate Peanut Butter Easter Eggs, I was on a mission to recreate that nostalgic magic of childhood Easter baskets, but with a homemade twist that actually tastes better than anything you’d buy at the store. I remember taking that first bite – the silky chocolate shell giving way to a velvety, melt-in-your-mouth peanut butter center – and just stopping for a second, eyes closed, to savor it. You know those moments when you just know you’ve stumbled onto something truly special? This was one of those.
Years ago, when I was knee-high to a grasshopper, my grandma would tuck peanut butter eggs into our baskets, and I thought nothing could ever taste so perfect. Fast forward to me, standing in my own kitchen, trying to replicate that feeling for my own family (and, let’s be honest, for myself after bedtime). The joy on my kids’ faces – chocolatey grins and all – said it all. Honestly, these eggs have become a family tradition, and I wish I’d discovered how dangerously easy they are to make years ago. They’re the kind of treat that makes people hover around the kitchen, waiting for that “okay, you can have one now” moment.
Whether you’re looking for a sweet addition to your Easter brunch, a homemade gift for friends, or just a way to brighten up your Pinterest board with something festive, these creamy chocolate peanut butter Easter eggs check every box. I’ve tested them more times than I can count (in the name of research, of course), and they’ve earned their place as a staple for family gatherings and gifting. They’re pure comfort, a little bit messy, and totally irresistible – the kind of recipe that feels like a warm hug in candy form. Trust me, you’re going to want to bookmark this one for every spring from now on.
Why You’ll Love This Creamy Chocolate Peanut Butter Easter Eggs Recipe
There’s a reason these homemade Easter eggs keep popping up on our table year after year. Let’s face it – everyone loves that combo of chocolate and peanut butter, and this recipe takes it to the next level with a texture that’s somehow both rich and light. After many rounds of taste-testing (someone had to do it), I’ve picked up a few tricks and tweaks to make these eggs truly stand out. Here’s why you’re about to fall in love with them too:
- Quick & Easy: Comes together in under an hour, making it perfect for last-minute dessert cravings or spontaneous holiday baking with the kids.
- Simple Ingredients: You probably have everything on hand already – no weird specialty items or extra grocery trips required.
- Perfect for Celebrations: These eggs are a showstopper at Easter brunches, basket fillers, or even as a sweet “just because” surprise for friends and neighbors.
- Crowd-Pleaser: I’ve never seen a batch last more than a day in my house. They’re a hit with both chocolate lovers and peanut butter fans (and yes, even those picky eaters who “don’t really like sweets” – ha!).
- Irresistibly Delicious: The creamy peanut butter filling is soft but not sticky, and the chocolate shell adds the perfect snap. Each bite is a little moment of happiness.
What really makes this recipe special is the method – blending the peanut butter mixture until super smooth, then chilling before shaping. It’s a step I borrowed from a pastry chef friend, and it makes all the difference. No gritty, crumbly centers here! You can even tweak the chocolate – use dark, milk, or white – for a new twist each year. These aren’t just any homemade eggs; they’re my family’s best version, refined over holiday after holiday.
Honestly, these eggs are more than just a treat. They’re a tradition, a memory-maker, and a way to bring people together over something sweet. Whether you’re baking with little helpers or making a late-night batch for yourself, this recipe is pure comfort and joy, wrapped in chocolate. If you only try one new Easter recipe this year, let it be this one.
What Ingredients You Will Need for Creamy Chocolate Peanut Butter Easter Eggs
This chocolate peanut butter Easter eggs recipe is refreshingly simple, using pantry staples to create that classic candy shop flavor. You won’t need any fancy or hard-to-find ingredients – just the basics, with a couple optional add-ins if you want to get creative. Here’s what you’ll need:
- For the Peanut Butter Filling:
- 1 cup (240g) creamy peanut butter (I like Jif or Skippy for the best texture; avoid “natural” peanut butter as it’s too oily)
- 1/4 cup (56g) unsalted butter, softened (adds richness; you can use vegan butter for dairy-free)
- 2 tablespoons (30ml) milk (any type – dairy, almond, oat all work fine)
- 1 teaspoon vanilla extract (adds warmth and depth; pure or imitation is fine)
- 2 1/2 cups (300g) powdered sugar (sifted, for a smooth filling; add more if your mixture is too sticky)
- 1/4 teaspoon salt (balances the sweetness)
- For the Chocolate Coating:
- 2 cups (340g) semisweet or milk chocolate chips (your favorite brand – Ghirardelli and Guittard melt beautifully)
- 2 teaspoons (10g) coconut oil or shortening (helps the chocolate set with a glossy finish)
- Optional Decorations:
- Sprinkles, colored sugar, or mini candies (for a festive look – my kids love pastel sprinkles!)
- White chocolate drizzle (simply melt 1/4 cup/40g white chocolate chips and drizzle with a fork)
Ingredient Tips: For the creamiest filling, make sure your peanut butter is at room temperature. If you want a less sweet egg, reduce the powdered sugar by 1/4 cup (30g) and add a tablespoon of oat flour or almond flour to help bind. For a nut-free version, sunflower seed butter works in a pinch – just know the flavor will be a bit different. If you’re making these eggs in warm weather, stash them in the fridge as soon as they’re coated to keep the chocolate shell snappy.
Honestly, once you’ve got these basics, the rest is pure fun. You can personalize your eggs with different decorations or fillings (see below for ideas!).
Equipment Needed for Homemade Chocolate Peanut Butter Easter Eggs
You don’t need a fancy candy-making setup to pull off these festive treats. In fact, I’ve made them with nothing more than the basics. Here’s what I recommend:
- Mixing bowls: At least two medium/large ones (glass or metal work great – and are easier to clean!)
- Hand mixer or stand mixer: For the smoothest, fluffiest filling (though a sturdy wooden spoon and some elbow grease will do in a pinch)
- Measuring cups and spoons: Accuracy helps keep the filling from getting too sticky or dry
- Baking sheet(s): Lined with parchment or wax paper for easy egg shaping and chocolate dipping
- Microwave-safe bowl or double boiler: For melting chocolate smoothly and evenly
- Forks or dipping tools: Regular dinner forks work just fine for dipping the eggs in chocolate
- Egg-shaped candy molds (optional): If you want a perfect shape, but honestly, hand-shaping works and gives them that homemade charm
If you don’t have a mixer, just make sure your butter is super soft. The kids love helping with the shaping, so don’t worry if the eggs come out a little wonky – that’s part of the fun! For easy clean-up, I recommend using silicone spatulas (they make scraping bowls a breeze). And if you’ve got a small kitchen, you can totally make these in stages – filling one day, dipping the next. Budget-wise, you really just need the basics, so don’t let the equipment list intimidate you.
How to Make Creamy Chocolate Peanut Butter Easter Eggs

-
Make the Peanut Butter Filling:
- In a large mixing bowl, combine 1 cup (240g) creamy peanut butter, 1/4 cup (56g) unsalted butter (softened), and 1 teaspoon vanilla extract. Use a hand mixer (or wooden spoon) to blend until smooth – about 1 minute. (You’re aiming for a thick, creamy mixture. It should smell nutty and sweet!)
- Add 2 tablespoons (30ml) milk and 1/4 teaspoon salt. Beat again to incorporate.
- Gradually add 2 1/2 cups (300g) powdered sugar, mixing on low after each addition. The mixture will start out sticky but should become a soft, moldable dough. If it’s too sticky, add more powdered sugar, 1 tablespoon at a time. If too dry, add a splash of milk.
- Scrape down the sides of the bowl and use your hands to bring the dough together. It should hold its shape and feel a bit like playdough.
-
Shape the Eggs:
- Line a baking sheet with parchment or wax paper. Scoop out tablespoon-sized portions (about 20g each) and roll between your palms, then gently pinch one end to form an egg shape. Repeat with all the filling. (You should get about 18-22 eggs, depending on size.)
- Place the shaped eggs on the prepared baking sheet. Chill in the freezer for 15-20 minutes (this helps them hold their shape for dipping).
-
Melt the Chocolate:
- While the eggs chill, add 2 cups (340g) chocolate chips and 2 teaspoons (10g) coconut oil or shortening to a microwave-safe bowl.
- Microwave in 30-second intervals, stirring after each, until smooth and glossy (about 1.5-2 minutes total). Or, melt gently over a double boiler on the stove. Don’t overheat or the chocolate can seize!
-
Dip the Eggs:
- Using a fork, lower each chilled egg into the melted chocolate, turning to coat. Lift out, letting excess chocolate drip off, and return to the lined baking sheet. (Tip: Tap the fork against the bowl edge for a smooth finish.)
- If decorating, add sprinkles, crushed candies, or drizzle with white chocolate while the coating is still wet.
- Work in batches if the eggs start to soften – keep extras in the fridge until ready to dip.
-
Set and Serve:
- Let the eggs set at room temperature for about 30 minutes, or pop them in the fridge for 10-15 minutes to speed things up.
- Once the chocolate is firm, transfer eggs to a serving plate or airtight container. Enjoy immediately or store for later!
Troubleshooting: If your filling is too sticky to shape, chill it for 10 minutes or add a bit more powdered sugar. If the chocolate starts to seize or gets thick, add a half teaspoon of coconut oil and stir gently. Don’t worry if the eggs aren’t perfectly smooth – they’ll still taste amazing! And honestly, the little imperfections are what make homemade treats special.
Cooking Tips & Techniques for Perfect Peanut Butter Easter Eggs
Getting the texture and finish just right is easier than you think, especially with these tried-and-true tips from my kitchen:
- Chill the filling: Always freeze or refrigerate the shaped eggs before dipping in chocolate. This keeps them firm and makes the dipping process less messy.
- Work in batches: If you notice the eggs melting or getting too soft as you dip, only take 4 or 5 out of the fridge at a time. The rest can stay cold until you’re ready.
- Melt chocolate gently: Overheating causes chocolate to seize or become grainy. Always microwave in short bursts and stir often, or use a double boiler for more control.
- Use parchment or wax paper: This is a lifesaver for easy clean-up and prevents sticking. Trust me, I’ve tried skipping this step and regretted it every time.
- Customize your chocolate: Dark, milk, or white chocolate all work. You can even use colored candy melts for a pastel look.
- Decorate right away: Add sprinkles, candies, or drizzles while the coating is wet so they stick. Once the chocolate sets, nothing will stick!
- Fix mistakes: If your chocolate shell cracks, just patch with a little more melted chocolate. No one will know.
Personal tip: I once tried making these eggs on a warm day, and they melted all over my hands. Now, I always keep a bowl of ice water nearby to dip my fingers if things get sticky. And if you want a super-smooth chocolate shell, tap the fork on the bowl a few times to knock off extra chocolate before setting the egg down. It’s the little tricks that make all the difference!
Variations & Adaptations for Chocolate Peanut Butter Easter Eggs
One of the best things about this recipe is how flexible it is. You can easily adapt these Easter eggs for different tastes, dietary needs, or just to use up what’s in your pantry. Here are some tasty twists to try:
- Allergy-Friendly: Swap peanut butter for sunflower seed butter or soy nut butter if you need a nut-free version. Use gluten-free powdered sugar if you’re avoiding gluten.
- Vegan Option: Use vegan butter and plant-based milk in the filling, and melt dairy-free chocolate chips for the coating. (I’ve made this way for friends, and nobody could tell the difference!)
- Flavor Twists: Stir 1/4 cup mini chocolate chips or crushed pretzels into the filling for crunch. Add a pinch of cinnamon or espresso powder for a grown-up flavor boost. Try white chocolate or even ruby chocolate for a colorful shell.
- Seasonal Fun: In the fall, add a dash of pumpkin pie spice to the filling. For Christmas, stir in crushed peppermint candies.
- Shape it Up: Don’t limit yourself to eggs! Roll the filling into balls for “truffles” or press into silicone molds for other festive shapes.
My personal favorite? Adding a thin layer of raspberry jam between the peanut butter and chocolate for a “PB&J” egg. It’s a tiny extra step, but wow, the flavor is next-level.
Serving & Storage Suggestions
These creamy chocolate peanut butter Easter eggs taste amazing at room temperature, but they’re just as good chilled straight from the fridge (especially on a warm spring day). Here’s how to serve and keep them fresh:
- Serving: Arrange the eggs on a pretty plate or in mini cupcake liners for a festive look. They make a delightful centerpiece for brunch or dessert tables – and they’re fun for kids to “hunt” on Easter morning!
- Beverage Pairings: Pair with a glass of cold milk, a cup of coffee, or even a fruity herbal tea for a sweet afternoon treat.
- Storage: Store the eggs in an airtight container, layered between sheets of parchment or wax paper, in the refrigerator for up to 2 weeks.
- Freezer Friendly: Freeze the eggs for up to 3 months. Thaw in the fridge overnight before serving. The texture stays creamy, and the chocolate shell doesn’t get chalky.
- Reheating: No need to reheat, but if the eggs get too firm in the fridge, let them sit at room temp for 10 minutes to soften up a bit.
- Flavor Note: I find the flavors deepen after a day or two in the fridge – the peanut butter gets a little more intense, and the chocolate shell gets that perfect snap. If you can wait that long, it’s worth it!
Nutritional Information & Benefits
Each creamy chocolate peanut butter Easter egg (about 1 ounce/28g) contains approximately:
- Calories: 140
- Fat: 8g (mostly from peanut butter and chocolate)
- Carbohydrates: 16g
- Protein: 2g
- Sugar: 13g
Peanut butter provides healthy fats, protein, and a little fiber, making these eggs more satisfying than most store-bought candies. Using dark chocolate? You’ll get a dose of antioxidants, too. For lower sugar, try using sugar-free chocolate and powdered erythritol. Potential allergens include peanuts, dairy, and (depending on chocolate brand) soy. Personally, I love that these eggs allow me to control the ingredients and avoid artificial additives found in some commercial treats.
Conclusion
There’s just something about homemade treats like these creamy chocolate peanut butter Easter eggs that brings people together – they’re festive, nostalgic, and, let’s be honest, downright delicious. I love this recipe because it’s simple, adaptable, and always a crowd-pleaser, whether you’re making them for family, friends, or just to enjoy with a cup of tea on a quiet afternoon. Don’t be afraid to put your own spin on them with fun decorations or flavor twists – after all, the best recipes are the ones we make our own.
If you try these eggs, let me know in the comments – I want to hear about your creative adaptations, funny kitchen stories, or even the epic chocolate messes. Share this post with your fellow peanut butter lovers, pin it to your favorite board, and most of all, have fun. Here’s to sweet traditions, sticky fingers, and treats that feel like a warm hug. Happy Easter and happy making!
Frequently Asked Questions About Creamy Chocolate Peanut Butter Easter Eggs
Can I use crunchy peanut butter instead of creamy?
Absolutely! Crunchy peanut butter gives the eggs a little texture. Just be aware the filling might be a bit harder to shape, but it still tastes great.
What’s the best way to melt chocolate without burning it?
I recommend microwaving in short bursts (30 seconds at a time), stirring after each, or using a double boiler on the stove. Low and slow is the trick – chocolate burns fast!
How do I make these eggs nut-free for allergies?
Try sunflower seed butter or soy nut butter in place of peanut butter. The flavor changes slightly, but the creamy texture is still there.
Can I make these eggs ahead of time for gifting?
Yes, these eggs keep well in the fridge for up to two weeks or can be frozen for up to three months. Just layer them between parchment in an airtight container.
Why is my peanut butter filling too sticky to shape?
If your filling is sticky, add a bit more powdered sugar or chill it in the fridge for 15 minutes. Humidity can affect the texture, so don’t stress – just adjust as needed!
Pin This Recipe!
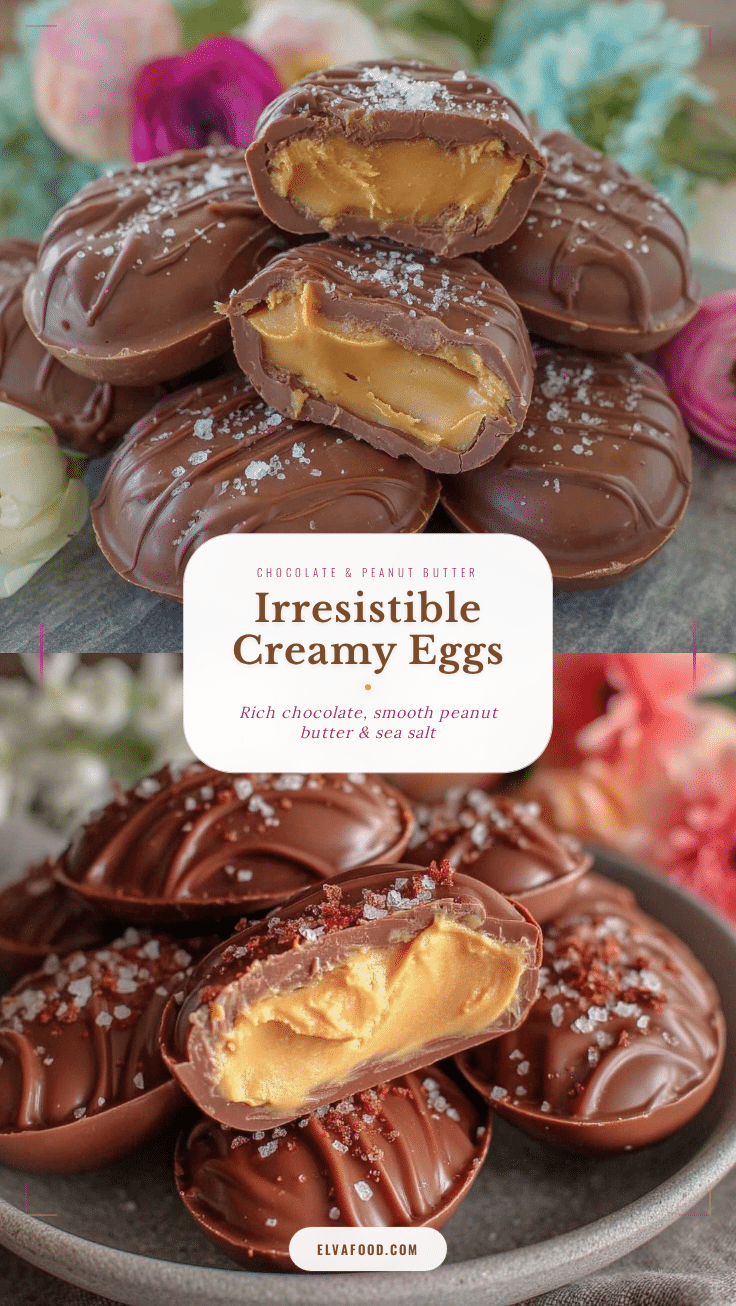
Creamy Chocolate Peanut Butter Easter Eggs

These homemade Easter eggs feature a silky chocolate shell and a creamy peanut butter center, making them a nostalgic, crowd-pleasing treat for spring celebrations. Quick and easy to prepare, they’re perfect for gifting, brunch, or a sweet family tradition.
- Prep Time: 25 minutes
- Cook Time: 10 minutes
- Total Time: 50 minutes
- Yield: 18-22 eggs 1x
- Category: Dessert
- Cuisine: American
Ingredients
- 1 cup creamy peanut butter (Jif or Skippy recommended; avoid natural peanut butter)
- 1/4 cup unsalted butter, softened (or vegan butter for dairy-free)
- 2 tablespoons milk (dairy, almond, or oat)
- 1 teaspoon vanilla extract
- 2 1/2 cups powdered sugar, sifted (add more if mixture is too sticky)
- 1/4 teaspoon salt
- 2 cups semisweet or milk chocolate chips
- 2 teaspoons coconut oil or shortening
- Sprinkles, colored sugar, or mini candies (optional, for decoration)
- 1/4 cup white chocolate chips, melted (optional, for drizzle)
Instructions
- In a large mixing bowl, combine peanut butter, softened butter, and vanilla extract. Blend with a hand mixer or wooden spoon until smooth, about 1 minute.
- Add milk and salt; beat again to incorporate.
- Gradually add powdered sugar, mixing on low after each addition, until a soft, moldable dough forms. Adjust with more powdered sugar or milk as needed.
- Scrape down the bowl and bring the dough together with your hands.
- Line a baking sheet with parchment or wax paper. Scoop tablespoon-sized portions and shape into eggs. Place on the sheet.
- Chill shaped eggs in the freezer for 15-20 minutes.
- Meanwhile, melt chocolate chips and coconut oil/shortening in a microwave-safe bowl in 30-second intervals, stirring after each, until smooth and glossy. Alternatively, use a double boiler.
- Using a fork, dip each chilled egg into melted chocolate, turning to coat. Let excess drip off and return to the baking sheet.
- Decorate with sprinkles or drizzle with melted white chocolate while coating is wet.
- Let eggs set at room temperature for 30 minutes or refrigerate for 10-15 minutes.
- Transfer set eggs to a serving plate or airtight container. Enjoy immediately or store for later.
Notes
Chill the filling before dipping for best results. Work in batches to keep eggs firm. Use any chocolate type for coating. For nut-free, use sunflower seed butter. Store in fridge up to 2 weeks or freeze up to 3 months. Decorate immediately after dipping for best adhesion. Imperfections add homemade charm.
Nutrition
- Serving Size: 1 egg (about 1 ounce
- Calories: 140
- Sugar: 13
- Sodium: 60
- Fat: 8
- Saturated Fat: 3
- Carbohydrates: 16
- Fiber: 1
- Protein: 2
Keywords: Easter, chocolate, peanut butter, homemade candy, spring dessert, festive treats, easy recipe, kid-friendly, gluten-free option, vegan option