Imagine this: the bold aroma of freshly brewed espresso swirling through your kitchen, the soft, pillowy layers of mascarpone cream beckoning with every spoonful, and a dusting of cocoa powder that practically begs you to take that first dreamy bite. There’s something positively magical about making a creamy no-bake tiramisu—especially when you know that you won’t be cranking up the oven or fussing over complicated steps.
The first time I made this easy Italian dessert, I was standing barefoot in my kitchen, trying to recreate the taste of the tiramisu I’d fallen in love with during a trip to Rome. I’ll never forget that first spoonful—the kind of moment where you pause, take a deep breath, and just smile because you know you’re onto something truly special. Years ago, my grandma would tell stories about her own version, but honestly, I wish I’d discovered this no-bake method sooner (it would’ve saved her a lot of time—and maybe a few burnt cakes, too)!
Let’s face it: everyone needs a go-to crowd-pleaser in their back pocket, and this creamy no-bake tiramisu recipe is exactly that. My family couldn’t stop sneaking spoonfuls right out of the dish while it chilled, and I can’t really blame them. It’s become a staple for family gatherings, potlucks, and even those nights when you just want a little indulgence that feels like a warm hug.
Whether you’re hoping to impress your book club, brighten up your Pinterest dessert board, or just treat yourself to a little slice of Italian comfort, this recipe delivers pure, nostalgic joy—without any fancy techniques or special equipment. I’ve tested it more times than I care to admit (in the name of research, of course), and every batch disappears faster than you’d believe. Trust me, you’re going to want to bookmark this one for every occasion that calls for effortless, creamy indulgence.
Why You’ll Love This Creamy No-Bake Tiramisu Recipe
After years of tweaking and tasting, I can safely say this creamy no-bake tiramisu recipe is a total game-changer—especially if you love classic Italian desserts but hate the fuss. I’ve made dozens of tiramisus for friends, family, and even a few tough critics (my grandma included), and this version always gets rave reviews. Here’s why you’ll find yourself coming back to this recipe again and again:
- Quick & Easy: Whips together in about 20 minutes (plus chilling), perfect for last-minute cravings or when you need a dessert in a pinch.
- Simple Ingredients: No specialty store runs required—you probably have most of these goodies at home already.
- Perfect for Any Occasion: Looks stunning on a buffet table, fits right in at Sunday dinner, and is always a hit at potlucks.
- Crowd-Pleaser: There’s something about those creamy layers and coffee-soaked ladyfingers that makes everyone go back for seconds (or, let’s be honest, thirds).
- Unbelievably Delicious: It’s all about the contrast—soft, lush layers of mascarpone cream, the slight bitterness of espresso, and that cocoa powder finish. Every bite is pure comfort.
What makes this recipe truly stand out? I blend the mascarpone with just a touch of whipped cream for the silkiest texture (no runny layers here), and I use real espresso for that authentic flavor punch. No watery instant coffee or gritty cream mixtures—just smooth, decadent, and perfectly balanced layers every time. And if you’ve ever worried about using raw eggs, you’ll be happy to know this version skips them altogether (so it’s worry-free for everyone at the table).
This isn’t just another tiramisu recipe—it’s my best version after lots of trial and error, taste testing, and a few hilarious kitchen mishaps. It’s comfort food for the soul—lighter, faster, but still delivering that rich, dreamy experience you crave. Whether you’re hosting a dinner party or just want to spoil yourself, this tiramisu makes it easy to create a memorable moment (with hardly any effort at all).
What Ingredients You Will Need
This creamy no-bake tiramisu recipe uses simple, wholesome ingredients to deliver bold, classic Italian flavor and that signature, melt-in-your-mouth texture. Most of these are pantry staples, and you can easily swap or adjust a few if needed. Here’s what you’ll need:
- For the Coffee Layer:
- 1 1/2 cups (360 ml) strong brewed espresso or very strong coffee, cooled (use decaf if you prefer; I always make a pot of espresso and let it cool while prepping the cream)
- 2-3 tablespoons coffee liqueur (like Kahlúa or Marsala, optional but highly recommended for depth and a little kick)
- For the Creamy Mascarpone Layer:
- 1 cup (240 ml) heavy whipping cream, cold
- 1/2 cup (60 g) powdered sugar, sifted (adds that smooth sweetness)
- 1 teaspoon pure vanilla extract (I love Nielsen-Massey for its bold vanilla notes)
- 16 ounces (450 g) mascarpone cheese, chilled (BelGioioso is my go-to brand, but any good-quality mascarpone works)
- For the Assembly:
- 24-30 ladyfingers (about 200 g, Savoiardi or similar Italian biscuits; they should be crisp, not soft)
- Unsweetened cocoa powder, for dusting (Dutch-process or regular; sifted for the smoothest finish)
- Dark chocolate shavings or curls (totally optional, but a little extra indulgence never hurts!)
Ingredient Notes & Substitutions:
- Mascarpone Cheese: If you can’t find mascarpone, you can blend equal parts cream cheese and heavy cream for a similar (but not identical) texture—just don’t tell my Italian friends!
- Ladyfingers: For gluten-free, try Schär’s gluten-free ladyfingers. Homemade work in a pinch, but store-bought are just fine for no-bake ease.
- Sweetener: Swap powdered sugar for a sugar substitute like Swerve for a lower sugar version. Just sift it well to avoid clumps.
- Liqueur: Skip it for a kid-friendly version, or try almond extract for a nutty twist. (I sometimes use Amaretto when I’m feeling fancy.)
- Coffee: No espresso machine? Use a French press or strong instant coffee granules—just make it double-strength for best results.
In summer, I sometimes add a few fresh berries between the layers (raspberries are a favorite), and for the holidays, a pinch of cinnamon in the cocoa powder adds a cozy twist. This recipe is flexible—don’t be afraid to make it your own!
Equipment Needed
You really don’t need much for this creamy no-bake tiramisu recipe—just a few basics and maybe one or two “nice-to-have” tools. Here’s what I use:
- Mixing Bowls: One large for whipping cream, one medium for mascarpone mixture.
- Electric Hand Mixer or Stand Mixer: Makes whipping cream a breeze, but you can use a good old-fashioned whisk if you’re feeling strong (I’ve done it while streaming my favorite show).
- Rubber Spatula: For folding and assembling the creamy layers gently—no one likes deflated cream!
- Measuring Cups and Spoons: For accuracy, especially with liquids and sugar.
- 9×9-inch (23×23 cm) Baking Dish or Small Casserole: Glass looks pretty for serving, but ceramic works just as well. You can even use individual ramekins for single-serve tiramisu (so cute for parties).
- Sifter or Fine Mesh Strainer: For dusting cocoa powder on top—makes it look elegant and keeps the topping even.
- Sharp Knife or Vegetable Peeler: If you want to add chocolate shavings for that little “wow” factor.
If you don’t have a mixer, just plan for a little arm workout with your whisk. I’ve used a basic plastic spatula and a thrift-store baking dish with great results—no need for fancy gear! Just wash your sifter right away (dried cocoa powder is a pain to clean, trust me).
How to Make Creamy No-Bake Tiramisu Recipe
-
Brew the Coffee:
Brew 1 1/2 cups (360 ml) of strong espresso or coffee. Stir in 2-3 tablespoons of coffee liqueur (if using). Let it cool to room temperature.
Tip: If your coffee is too hot, it’ll make the ladyfingers soggy and the cream runny. -
Whip the Cream:
In a large mixing bowl, add 1 cup (240 ml) cold heavy cream and whip with an electric mixer on medium-high until stiff peaks form (about 2-3 minutes). Don’t over-whip or it’ll turn grainy.
How to tell? Peaks should stand up straight when you lift the beaters. -
Prepare the Mascarpone Mixture:
In a separate bowl, combine 16 ounces (450 g) chilled mascarpone, 1/2 cup (60 g) sifted powdered sugar, and 1 teaspoon vanilla extract. Beat on low just until smooth—don’t overmix or it may loosen.
Personal tip: I sometimes use a spatula for the last few stirs to keep it creamy. -
Fold the Cream and Mascarpone Together:
Gently fold the whipped cream into the mascarpone mixture, using a spatula. Go slow—overmixing will deflate the cream and make the layers runny.
Look for out-of-this-world fluffiness! -
Dip the Ladyfingers:
Pour your cooled coffee mixture into a shallow bowl. Quickly dip each ladyfinger (about 1-2 seconds per side—no soaking!) and lay them in a single layer across the bottom of your 9×9-inch (23×23 cm) dish.
If they’re too wet, the dessert will be mushy. They should feel damp but still hold their shape. -
Layer the Cream:
Spread half the mascarpone cream over the ladyfingers, smoothing it evenly. Repeat with another layer of dipped ladyfingers, then the rest of the cream.
I use an offset spatula for a smooth finish, but the back of a spoon works fine. -
Chill:
Cover with plastic wrap and refrigerate for at least 4 hours (overnight is even better). This helps the flavors meld and the dessert set up just right.
Can’t wait? Trust me, it’s worth the patience. The texture is magical after a good chill. -
Finish & Serve:
Right before serving, use a fine mesh strainer to dust the top with unsweetened cocoa powder. Add chocolate shavings if you’re feeling fancy.
Slice, serve cold, and watch it vanish!
Troubleshooting: If your cream layer seems runny, it’s usually from over-whipping or overmixing ranking. Chill it a bit longer and it should firm up. If the ladyfingers are too soggy, cut the dipping time way back next time—they just need a coffee “kiss,” not a bath.
For individual servings, layer everything in cute glasses or jars—perfect for parties or easy portion control. And if you want to jazz it up, sprinkle a few berries or a swirl of caramel sauce between the layers (I do this for birthday tiramisu sometimes—so fun!).
Cooking Tips & Techniques for Perfect No-Bake Tiramisu
After making this creamy no-bake tiramisu recipe more times than I can count, I’ve picked up a few tricks that make all the difference. Here’s what I’ve learned along the way (sometimes the hard way!):
- Use Cold Ingredients: Keep your mascarpone and cream cold right up until you use them. This keeps the cream mixture thick and fluffy.
- Don’t Overwork the Cream: Overmixing breaks down the whipped cream, making your tiramisu dense instead of cloud-like. Fold gently, and stop as soon as it’s combined.
- Quick Dip, Don’t Soak: Ladyfingers soak up coffee like a sponge. A 1-2 second dip is all you need. If they turn mushy, your layers won’t hold up.
- Patience Pays Off: The flavor and texture really develop after chilling overnight. If you’re short on time, go for at least 4 hours, but overnight is restaurant-quality magic.
- Layer Evenly: Spread the cream and ladyfingers in even layers for the best presentation and consistency. An offset spatula is my secret weapon for smooth tops.
- Test Your Cocoa Powder: Use good-quality unsweetened cocoa. Regular is fine, but Dutch-process has a deeper, less bitter flavor.
- Troubleshooting Runny Cream: If your mascarpone mixture is loose, pop it in the fridge for 20 minutes before assembling. It’ll firm right up.
- Adjust to Taste: Like it boozier? Add an extra splash of liqueur to the coffee. Prefer it sweet? Sprinkle a little extra powdered sugar between layers.
Honestly, I’ve messed up a batch or two by soaking the ladyfingers too long or letting my cream get too warm—but you know what? It’s still delicious, even if it’s a little imperfect. Tiramisu is all about those creamy, coffee-soaked layers, so don’t stress. (And if it’s ugly, just call it “rustic”!)
Variations & Adaptations
This creamy no-bake tiramisu recipe is a classic, but it’s also a blank canvas for your creativity. Here are some fun twists and adaptations I’ve tried (and loved):
- Berry Tiramisu: Layer fresh raspberries or sliced strawberries between the cream and ladyfingers for a fruity summer treat. Swap the coffee for berry juice if you want a caffeine-free, kid-friendly version.
- Chocolate Tiramisu: Add a tablespoon of cocoa powder to the coffee soaking liquid and sprinkle chocolate chips between layers. For a grown-up twist, use chocolate liqueur in place of the coffee liqueur.
- Gluten-Free Tiramisu: Use gluten-free ladyfingers (Schär is a personal favorite). No one will notice the difference!
- Dairy-Free or Vegan: Substitute coconut cream for heavy cream and use a dairy-free cream cheese blend in place of mascarpone. There are some great vegan ladyfingers out there now, too.
- Alcohol-Free: Just skip the liqueur. You can add a touch more vanilla or almond extract for flavor if you like.
- Individual Servings: Layer everything in cute jars or glasses for a picnic-ready treat (the kids love having their own little pots).
- Holiday Spice: Add a pinch of cinnamon or nutmeg to the cocoa powder for a warm, festive note. A little orange zest in the cream is also lovely for Christmas.
One of my favorite personal spins is a “Tiramisu Parfait”—I layer the cream, ladyfingers, and a swirl of Nutella in mason jars, then top with crushed hazelnuts and cocoa. It’s rich, indulgent, and disappears at every party. Don’t be afraid to experiment and make this recipe your own!
Serving & Storage Suggestions
This creamy no-bake tiramisu recipe is best served chilled, straight from the fridge. I love to slice it into neat squares and dust the top with an extra layer of cocoa powder just before serving—it looks beautiful and gives you that classic tiramisu vibe. For a little extra flair, a few dark chocolate curls or fresh berries on top make it Pinterest-perfect.
Tiramisu pairs beautifully with a cup of espresso or a small glass of dessert wine (like Vin Santo or Moscato). For lighter meals, I’ll serve it alongside a simple fruit salad or crisp biscotti.
Storage: Cover the dish tightly with plastic wrap or a lid and refrigerate. It’ll keep for up to 3 days, and honestly, the flavor only gets better as it sits. If you want to make it ahead, prepare everything the night before and dust with cocoa powder right before serving for the freshest look.
You can freeze tiramisu for up to 2 weeks—just wrap it well and thaw overnight in the fridge. The texture might be a little softer after freezing, but the flavor is still dreamy. To reheat (if you like it a tiny bit warmer), let it stand at room temperature for 10-15 minutes before serving.
One final tip: don’t skip the chilling time. The layers settle and the flavors really develop, giving you that signature creamy, dreamy bite that makes tiramisu so irresistible.
Nutritional Information & Benefits
This creamy no-bake tiramisu recipe is definitely a treat, but it has a few hidden perks, too! Here’s a rough estimate per serving (assuming 9 generous servings):
- Calories: 330-370 per serving
- Fat: 20-24 grams
- Carbs: 28-32 grams
- Protein: 4-6 grams
Health Benefits: Mascarpone and cream provide calcium and a little protein. Coffee brings a small antioxidant kick, too. You can lighten it up by using reduced-fat mascarpone, swapping in part-skim ricotta, or using a sugar alternative (like Swerve or monk fruit sweetener).
Dietary Considerations: This recipe can be made gluten-free, alcohol-free, or nut-free with simple swaps. It does contain dairy and eggs (in traditional ladyfingers), so check your brands and use dairy-free substitutes if needed.
My personal wellness take? Enjoying a slice of tiramisu now and then is absolutely worth it—especially when it’s homemade with love. Life’s too short to skip dessert!
Conclusion
There’s just something about a creamy no-bake tiramisu recipe that feels like a little luxury—without any of the stress. It’s quick, easy, and packed with that classic Italian comfort (and a little bit of nostalgia, too). Whether you’re making it for a special occasion or just as a treat for yourself, you can easily tweak it to fit your tastes and dietary needs.
This dessert has been a staple in my family for years, and I love how every batch brings a smile—even if it’s a little messy or not perfectly sliced. Give it your own twist, have fun with the process, and don’t forget to share your results. I’d love to hear your favorite add-ins or see your creations in the comments!
So go ahead, grab those ladyfingers and whip up some creamy, dreamy layers. You (and your tastebuds) won’t regret it. Happy no-bake baking!
Frequently Asked Questions About Creamy No-Bake Tiramisu Recipe
Can I make tiramisu without coffee?
Absolutely! Substitute strong hot chocolate or berry juice for the coffee. The dessert will still be creamy and delicious—just with a different twist.
What can I use instead of mascarpone cheese?
If you can’t find mascarpone, use a blend of equal parts cream cheese and heavy cream. The texture will be a little tangier, but it still works beautifully.
How far in advance can I make tiramisu?
You can prepare tiramisu up to 2 days ahead. Just keep it tightly covered in the fridge and dust with cocoa powder right before serving for best results.
Can I make this recipe gluten-free?
Yes! Use gluten-free ladyfingers (like Schär brand) and check your other ingredients for any hidden gluten. The rest of the recipe is naturally gluten-free.
Why is my tiramisu cream layer runny?
Usually, the cream is runny because the whipped cream was overmixed, the mascarpone got too warm, or the ladyfingers were soaked too long. Chill the mixture, use cold ingredients, and dip the ladyfingers quickly for best results.
Pin This Recipe!
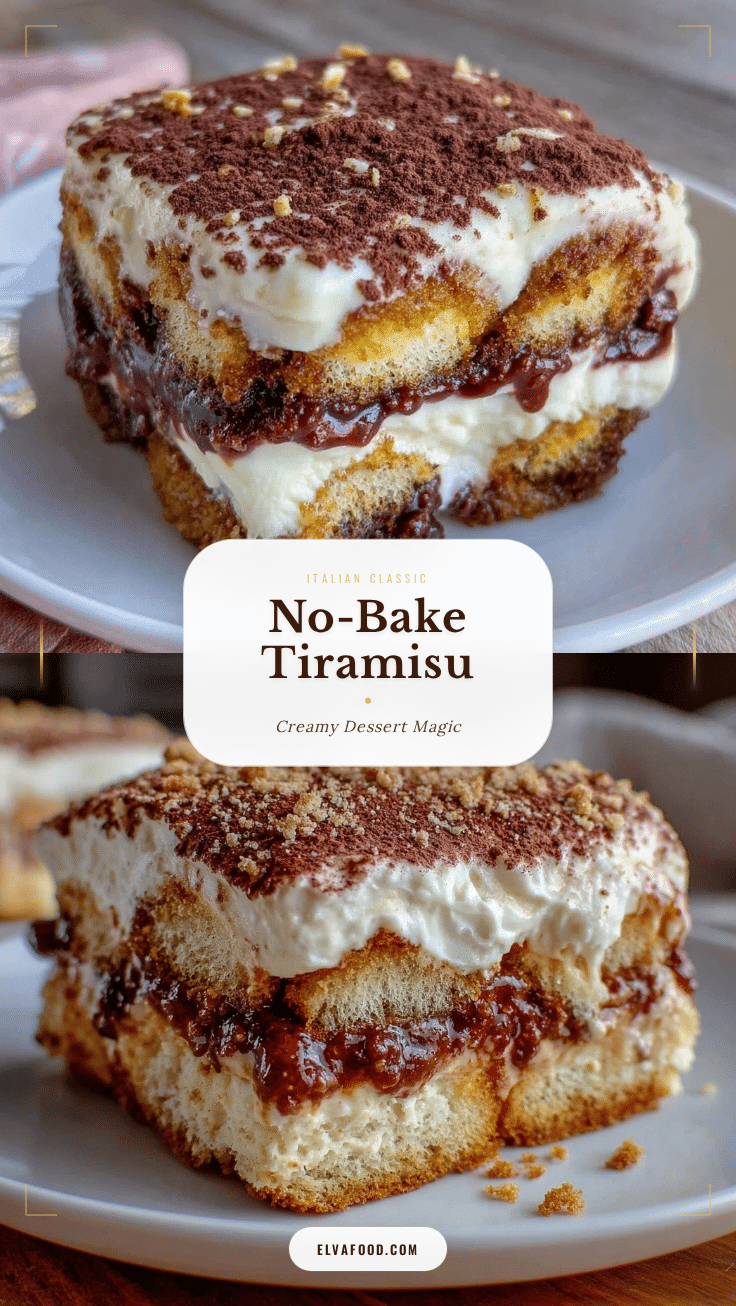
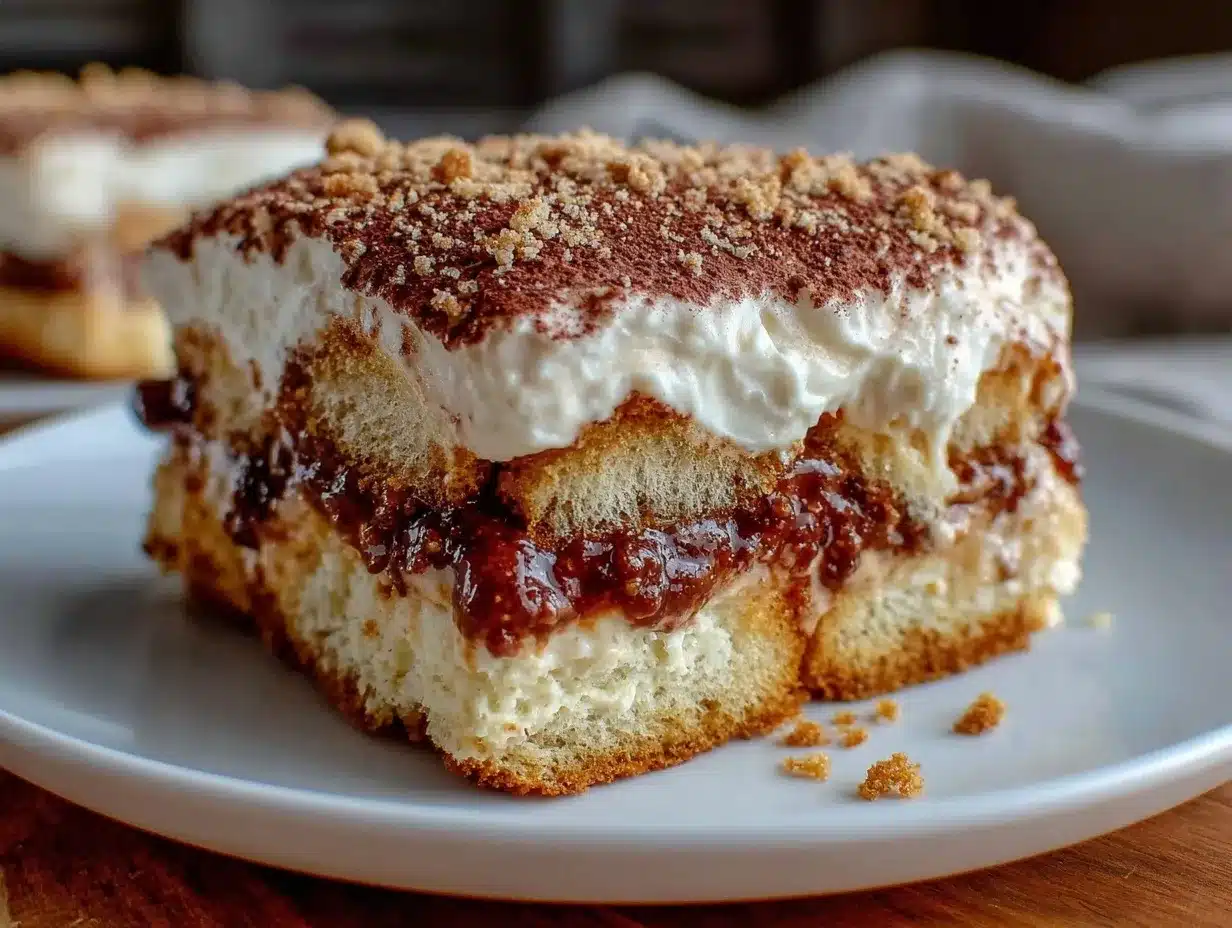
Creamy No-Bake Tiramisu
This easy Italian tiramisu is a creamy, dreamy, no-bake dessert featuring layers of coffee-soaked ladyfingers and mascarpone cream, finished with a dusting of cocoa powder. It’s quick to prepare, crowd-pleasing, and perfect for any occasion.
- Prep Time: 20 minutes
- Cook Time: 0 minutes
- Total Time: 4 hours 20 minutes (including chilling)
- Yield: 9 servings 1x
- Category: Dessert
- Cuisine: Italian
Ingredients
- 1 1/2 cups strong brewed espresso or very strong coffee, cooled
- 2–3 tablespoons coffee liqueur (Kahlúa or Marsala, optional)
- 1 cup heavy whipping cream, cold
- 1/2 cup powdered sugar, sifted
- 1 teaspoon pure vanilla extract
- 16 ounces mascarpone cheese, chilled
- 24–30 ladyfingers (about 7 ounces, Savoiardi or similar Italian biscuits)
- Unsweetened cocoa powder, for dusting
- Dark chocolate shavings or curls (optional)
Instructions
- Brew 1 1/2 cups of strong espresso or coffee. Stir in 2-3 tablespoons of coffee liqueur if using. Let cool to room temperature.
- In a large mixing bowl, whip 1 cup cold heavy cream with an electric mixer on medium-high until stiff peaks form (about 2-3 minutes).
- In a separate bowl, combine 16 ounces chilled mascarpone, 1/2 cup sifted powdered sugar, and 1 teaspoon vanilla extract. Beat on low just until smooth.
- Gently fold the whipped cream into the mascarpone mixture using a spatula until just combined.
- Pour the cooled coffee mixture into a shallow bowl. Quickly dip each ladyfinger (1-2 seconds per side) and lay them in a single layer across the bottom of a 9×9-inch dish.
- Spread half the mascarpone cream over the ladyfingers, smoothing evenly. Repeat with another layer of dipped ladyfingers and the rest of the cream.
- Cover with plastic wrap and refrigerate for at least 4 hours (overnight is best).
- Before serving, dust the top with unsweetened cocoa powder and add chocolate shavings if desired. Slice and serve chilled.
Notes
Use cold ingredients for best texture. Dip ladyfingers quickly to avoid soggy layers. Chill tiramisu overnight for optimal flavor and texture. For gluten-free, use gluten-free ladyfingers. You can substitute mascarpone with equal parts cream cheese and heavy cream if needed. Add berries or a pinch of cinnamon for variations.
Nutrition
- Serving Size: 1/9th of recipe (abo
- Calories: 350
- Sugar: 18
- Sodium: 90
- Fat: 22
- Saturated Fat: 13
- Carbohydrates: 30
- Fiber: 1
- Protein: 5
Keywords: tiramisu, no-bake dessert, Italian dessert, creamy tiramisu, easy tiramisu, mascarpone, ladyfingers, coffee dessert, potluck dessert, crowd-pleaser