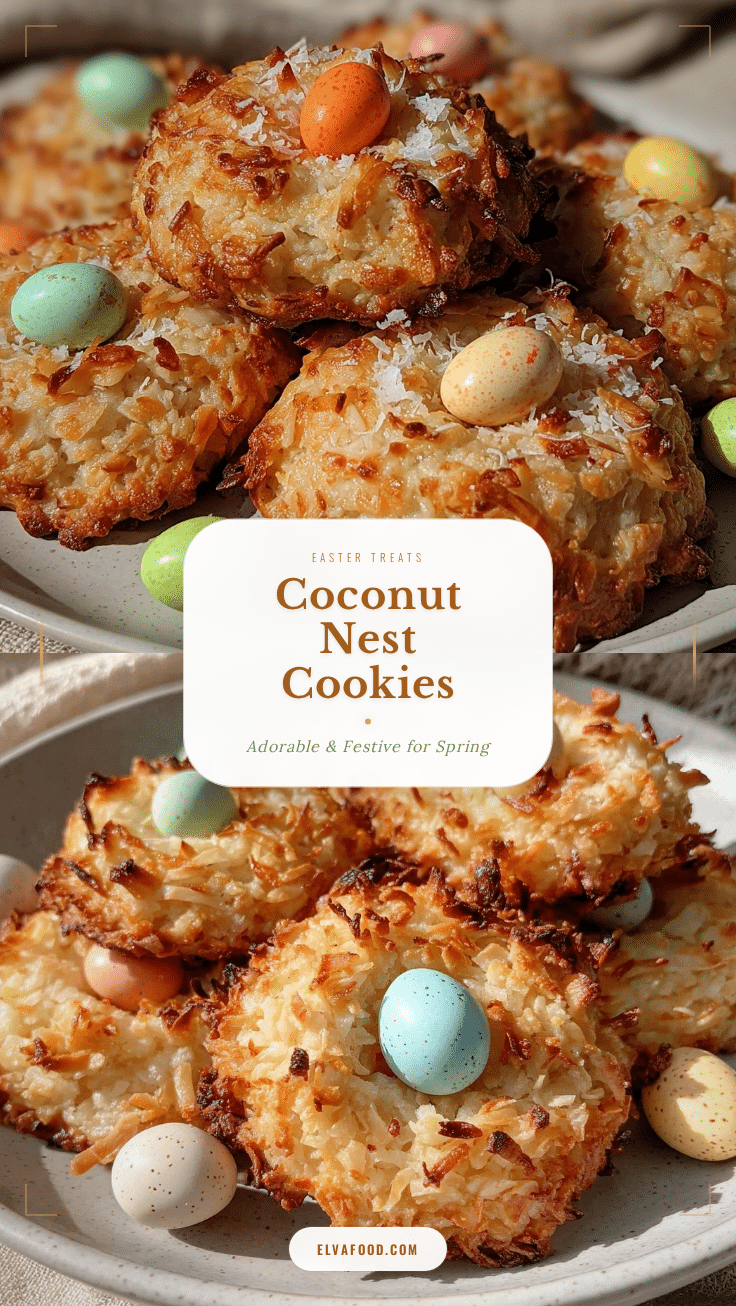
Picture this: the kitchen is filled with the sweet, toasty scent of coconut, and golden little nests sit cooling on the counter—each one cradling brightly colored candy eggs that practically sparkle in the spring sunlight. That’s the magic of Crispy Coconut Nest Cookies with Candy Eggs. The first time I pulled a tray of these treats from the oven, I couldn’t help but grin. The cookies were crisp on the edges, chewy in the middle, and looked like something straight from an old-fashioned Easter basket. I paused, took a deep breath, and realized—sometimes baking really does feel like a little bit of childhood wonder, all over again.
My first batch was inspired by a rainy Saturday when I wanted to create a festive recipe with my kids—something quick, hands-on, and packed with nostalgia. You know, the kind of sweet treat that makes everyone hover around the kitchen, waiting to sneak a taste as soon as they’re cool enough to touch. I remember my grandma making something similar, but she always added her secret ingredient—a dash of almond extract—which I’ve kept as a nod to her. These cookies are dangerously easy to make and bring pure, nostalgic comfort with every bite.
My family couldn’t stop stealing them right off the baking sheet (I had to shoo them away just so I could snap a few photos for Pinterest). And honestly, I can’t blame them. Crispy Coconut Nest Cookies with Candy Eggs are perfect for Easter brunches, classroom parties, or as a sweet, edible craft for your kids. If you’re looking for a recipe that’s both whimsical and utterly irresistible, you’re in the right place. I’ve tested these cookies more times than I care to admit—in the name of research, of course. They’ve quickly become a staple for family gatherings and gift baskets. They feel like a warm hug in cookie form, and you’re going to want to bookmark this one for every spring celebration.
Why You’ll Love These Crispy Coconut Nest Cookies
After years of baking for family, friends, and food blogs, I can say with confidence: these Crispy Coconut Nest Cookies with Candy Eggs check all the boxes for a festive, foolproof treat. Here’s why they’re crowd-pleasers year after year:
- Quick & Easy: You can whip up a batch in under 30 minutes—seriously. No chilling, no complicated steps.
- Simple Ingredients: Everything you need is likely in your pantry or just a short grocery run away. No specialty flours or fancy tools.
- Perfect for Easter: The nest shape and pastel candy eggs make these a hit at brunches, school parties, and egg hunts. They just scream spring!
- Crowd-Pleaser: Kids adore the crunchy, chewy texture and the chocolate eggs on top. Adults? They appreciate the not-too-sweet coconut and buttery base.
- Unbelievably Delicious: The golden coconut gets crispy around the edges, while the middle stays chewy and rich. The candy eggs add a fun pop of color and creamy chocolate surprise.
What sets these cookies apart from all those other coconut cookies? First, I use a combo of sweetened shredded coconut and quick oats to get that perfect crispy-chewy texture—no dry, sawdusty nests here. There’s also a little almond extract (thanks, Grandma!) that adds depth without overpowering the coconut. And, let’s face it, the topping is just plain fun. You can use classic candy-coated chocolate eggs, jelly beans, or even fruit gummies if you want to switch things up.
I’ve baked these for bake sales, neighbor gifts, and, yes, Pinterest-worthy cookie trays. They’re the kind of treat that makes you close your eyes after the first bite, with that cozy, homey feeling that’s better than anything store-bought. If you want a recipe that’s both adorable and truly scrumptious, these Crispy Coconut Nest Cookies with Candy Eggs are your answer. Comfort food, but with a playful, springtime twist—what’s not to love?
What Ingredients You Will Need
This recipe uses simple, wholesome ingredients to deliver bold flavor and a fun, crunchy texture—no fussy steps or hard-to-find items. Here’s what you’ll need for the best Crispy Coconut Nest Cookies with Candy Eggs:
- For the cookie base:
- 2 cups (160 g) sweetened shredded coconut (gives the cookies their signature nest look and chewy texture)
- 1 cup (80 g) quick oats (adds structure and crunch—don’t use old-fashioned oats for this one)
- 1/2 cup (100 g) granulated sugar (for sweetness and a bit of crunch)
- 1/4 tsp kosher salt (balances the sweetness and brings out the coconut flavor)
- 2 large eggs (room temperature; helps bind the ingredients together)
- 1/4 cup (57 g) unsalted butter, melted and slightly cooled (for richness and a golden crisp edge)
- 1/2 tsp vanilla extract (adds warmth—try Nielsen-Massey for a lovely aroma)
- 1/4 tsp almond extract (optional, but it really makes the coconut pop—just like my grandma did)
- For the nest topping:
- 1 cup (160 g) candy-coated chocolate eggs (like Cadbury Mini Eggs or similar; pastel colors look best for Easter)
- Jelly beans or gummy eggs (optional, for a fun twist or if you want a nut-free option)
Ingredient Tips & Substitutions:
- If you want a gluten-free version, swap the oats for certified gluten-free oats.
- For a dairy-free cookie, use melted coconut oil instead of butter.
- You can use unsweetened shredded coconut for a less sweet version—just add an extra tablespoon of sugar if you like things sweeter.
- If you want to avoid almond extract (nut allergies), just leave it out. The cookies are still delicious with only vanilla.
- For a deeper flavor, toast the coconut lightly in a dry skillet before mixing it in. Just watch it closely—it can burn fast!
Honestly, these ingredients are pantry staples in my house, especially during spring. I love grabbing pastel eggs and coconut when they go on sale after Easter—stash them away and you’re set for next year’s batch.
Equipment Needed
One of the best things about Crispy Coconut Nest Cookies with Candy Eggs is that you don’t need any fancy equipment—just the basics and a little creativity. Here’s what you’ll want to have ready:
- Baking sheet(s): Standard half-sheet pans work great. Line with parchment paper for easy cleanup (and to prevent sticking).
- Mixing bowls: At least one large bowl for the cookie dough. I like using a glass bowl so I can see how everything’s coming together.
- Measuring cups and spoons: Accurate measuring makes for consistent cookies, especially with coconut and oats.
- Cookie scoop or tablespoon: For portioning out the dough evenly. If you don’t have a scoop, two spoons work fine—just a bit messier.
- Spatula or wooden spoon: For stirring everything together. Silicone spatulas make cleanup a breeze.
- Cooling rack: Let the cookies cool completely before adding candy eggs so they set up properly.
If you don’t have a cookie scoop, use your hands to form the nests—kids love this part! For a more defined nest shape, the back of a teaspoon or even your thumb works well to make a little well in the center. On a budget? Dollar store bowls and spatulas are just fine here—these cookies don’t need anything fancy to turn out adorable and tasty.
How to Make Crispy Coconut Nest Cookies with Candy Eggs

- Prep your baking sheet: Line a large baking sheet with parchment paper. This prevents sticking and makes cleanup easy—trust me, coconut can be stubborn!
- Preheat your oven: Set to 325°F (163°C). Baking at a slightly lower temp helps the cookies stay chewy in the middle and get crispy on the edges.
- Mix dry ingredients: In a large bowl, combine 2 cups (160 g) sweetened shredded coconut, 1 cup (80 g) quick oats, 1/2 cup (100 g) granulated sugar, and 1/4 tsp kosher salt. Stir until everything is evenly distributed. The coconut should look fluffy and coated with sugar.
- Whisk wet ingredients: In a smaller bowl, whisk together 2 large eggs, 1/4 cup (57 g) melted unsalted butter, 1/2 tsp vanilla extract, and 1/4 tsp almond extract (if using). The mixture should look pale yellow and slightly thick.
- Combine wet and dry: Pour the wet mixture into the coconut mixture. Stir with a spatula or wooden spoon until all the coconut is moistened and you don’t see dry patches. If the dough seems too loose, let it sit for 2–3 minutes—the oats will soak up some moisture.
- Scoop and shape nests: Use a heaping tablespoon or a medium cookie scoop (about 2 tbsp/30 ml) to portion dough onto the baking sheet, spacing each nest about 2 inches (5 cm) apart. With slightly damp fingers, press and shape each mound into a round nest, making a small indent in the center for the eggs.
- Bake: Place in the preheated oven and bake for 14–17 minutes, rotating the pan halfway. The edges should be golden brown, and the cookies should smell nutty and sweet. If your oven runs hot, check at 13 minutes to avoid over-browning.
- Cool: Let cookies cool on the sheet for 5 minutes—they’ll be soft at first, but will firm up as they cool. Transfer to a wire rack to cool completely. If you try to move them too soon, they might break (been there, done that!).
- Add candy eggs: Once cool, gently press 2–3 candy eggs into the center of each nest. If you want the eggs to stick better, brush a teensy bit of honey or melted chocolate into the center first.
- Serve or store: Enjoy right away, or store in an airtight container at room temperature for up to 4 days.
Troubleshooting Tips:
- If the cookies spread too much, chill the dough for 10 minutes before shaping.
- If they’re not holding together, add an extra tablespoon of melted butter or a splash of milk.
- Watch the coconut edges closely—golden is perfect, but burnt happens fast!
These cookies are as hands-on or hands-off as you want—kids love helping with shaping and decorating, and cleanup is minimal. I always keep an extra bag of coconut on hand just in case I need to make a second batch (it happens a lot around here). Happy baking!
Cooking Tips & Techniques for Success
I’ve made these Crispy Coconut Nest Cookies with Candy Eggs dozens of times, and let’s just say, I’ve learned a thing or two along the way. Here’s what will help your cookies turn out picture-perfect every time:
- Watch your coconut: Coconut goes from golden to burnt in a blink, especially around the edges. If you notice uneven browning, rotate your baking sheet halfway through baking. (Ovens can be sneaky!)
- Don’t skip the parchment paper: These cookies love to stick, so parchment or a silicone baking mat is your best friend. Wax paper will not work in the oven—learned that the hard way.
- Let them cool completely: The nests are soft out of the oven but firm up as they cool. If you try to move them too soon, they’ll break apart. Patience pays off here.
- Shaping the nests: Use the back of a spoon or your thumb for the nest well. If it sticks, dampen your finger slightly. Kids love this step!
- Customize texture: If you want a chewier center, underbake by 1–2 minutes. For extra crispiness, add a couple of minutes—but watch closely.
- Batch baking: If you’re doubling the recipe, bake one sheet at a time for even browning. Crowding the oven can lead to soft or pale cookies.
- Efficiency tip: Measure out all your ingredients before you start. It makes assembly super quick, and you won’t forget anything (like I did with the butter once—oops!).
Most importantly, don’t stress about perfection. Each nest has its own personality, and that’s half the charm. Even the “ugly ducklings” taste amazing. I’ve had cookies stick, crumble, or end up a little lopsided—guess what? Not a crumb was left behind. Just have fun, and embrace the little imperfections.
Variations & Adaptations
These Crispy Coconut Nest Cookies with Candy Eggs are as versatile as they are cute. Here are some fun ideas to make them your own (or adjust for dietary needs):
- Gluten-Free: Use certified gluten-free oats and check your candy eggs for gluten-containing ingredients. The cookies turn out just as crispy and chewy.
- Chocolate Lovers: Add 1/4 cup (45 g) mini chocolate chips to the dough, or drizzle the cooled nests with melted dark or white chocolate before adding the eggs.
- Fruit & Nut: Mix in 1/4 cup (30 g) chopped dried cranberries or cherries, or sprinkle the dough with finely chopped almonds before baking. (Make sure to check for nut allergies if sharing with a group.)
- Dairy-Free: Substitute melted coconut oil for butter, and use jelly beans or vegan candy eggs as a topping.
- Spring Flavors: Add a pinch of lemon or orange zest to the dough for a fresh, zippy twist—especially nice with berry-flavored candy eggs.
- Different shapes: Instead of nests, flatten the dough into discs for classic coconut macaroons, or shape into bars and cut after baking for a fun, shareable tray.
Personally, my favorite twist is swapping in pastel chocolate-covered sunflower seeds for the eggs—tiny, colorful, and nutty! The options are endless, so don’t be afraid to get creative with what you have on hand. These cookies are forgiving and welcome a little experimentation.
Serving & Storage Suggestions
Crispy Coconut Nest Cookies with Candy Eggs are best enjoyed at room temperature, so they’re perfect for buffets, dessert platters, or packed into Easter baskets. Arrange them on a pastel plate, or tuck a few into paper cupcake liners for a cute, festive presentation. They look right at home next to carrot cake or lemon bars, too!
If you’re serving a crowd, pair them with a big pot of tea, lemonade, or a creamy hot chocolate for extra springtime cheer. For brunch, they’re adorable alongside fresh fruit and mini quiches.
To store, keep the cookies in an airtight container at room temperature for up to 4 days. (The candy eggs may soften after a couple of days, but they’re still tasty.) For longer storage, freeze the baked, undecorated nests in a single layer for up to 2 months—just thaw and pop the eggs on right before serving.
If you want to make ahead, you can shape and freeze the unbaked nests. Bake straight from frozen, adding 1–2 minutes to the baking time. I’ve found the flavors actually develop a little overnight, making them even more delicious on day two. Just try not to eat them all in one sitting!
Nutritional Information & Benefits
Each Crispy Coconut Nest Cookie (with candy eggs) has approximately 120 calories, 6g fat, 15g carbohydrates, and 2g protein. They’re naturally low in sodium and, if you use gluten-free oats, safe for those avoiding gluten.
Key ingredient perks: Coconut provides a dose of fiber and healthy fats, while oats add a bit of whole grain goodness. If you choose dark chocolate eggs, you’ll get a little antioxidant boost, too.
These cookies do contain eggs, dairy (unless you use a substitution), and may contain nuts if you opt for almond extract or nut toppings. Always check your candy egg labels for allergens—some brands are nut- or gluten-free, others are not.
I love that these feel like an indulgence but aren’t overly sweet or heavy. They’re the kind of treat you can enjoy without a sugar crash—perfect for sharing at spring celebrations or as a special snack with your afternoon coffee.
Conclusion
If you’re searching for a festive, easy, and downright adorable treat for your spring celebrations, these Crispy Coconut Nest Cookies with Candy Eggs are sure to become a favorite. They’re quick to make, a joy to share with kids and friends, and deliver that perfect balance of crispy edges and chewy centers—plus, the pastel eggs add a pop of color that’s impossible to resist.
Don’t be afraid to swap in your favorite candies, change up the flavors, or get creative with what’s in your pantry. Honestly, part of the fun is making each batch a little bit different. These cookies have become a family staple in my house for a reason—they’re easy, reliable, and always bring a smile.
If you try this recipe, I’d love to hear how you made it your own! Share your creations in the comments, pin this post for later, or tag me on social media. From our kitchen to yours, happy baking and happy Easter. May your spring be filled with sweet moments and even sweeter cookies!
Frequently Asked Questions
Can I make these Crispy Coconut Nest Cookies ahead of time?
Absolutely! Bake the cookies and store them in an airtight container for up to 4 days. Add the candy eggs right before serving to keep them looking fresh and festive.
What can I use instead of candy eggs for the topping?
You can use jelly beans, fruit gummies, pastel chocolate chips, or even yogurt-covered raisins. Anything colorful and bite-sized works well!
Are these cookies gluten-free?
They can be made gluten-free by using certified gluten-free oats and checking your candy eggs for hidden gluten. The rest of the ingredients are naturally gluten-free.
Can I freeze these cookies?
Yes! Freeze the undecorated nests in an airtight container for up to 2 months. Thaw at room temperature, then add the candy eggs right before serving.
How do I get the nests to keep their shape?
Use slightly damp fingers to press a well into each cookie before baking. Let the cookies cool completely before moving or adding toppings—they’ll firm up as they cool.
Pin This Recipe!
Crispy Coconut Nest Cookies with Candy Eggs

These festive cookies feature a crispy coconut and oat base shaped into adorable nests, each filled with colorful candy eggs. Perfect for Easter or spring celebrations, they’re quick to make, kid-friendly, and irresistibly chewy and crisp.
- Prep Time: 10 minutes
- Cook Time: 15 minutes
- Total Time: 25 minutes
- Yield: 18 cookies 1x
- Category: Dessert
- Cuisine: American
Ingredients
- 2 cups (160 g) sweetened shredded coconut
- 1 cup (80 g) quick oats
- 1/2 cup (100 g) granulated sugar
- 1/4 tsp kosher salt
- 2 large eggs, room temperature
- 1/4 cup (57 g) unsalted butter, melted and slightly cooled
- 1/2 tsp vanilla extract
- 1/4 tsp almond extract (optional)
- 1 cup (160 g) candy-coated chocolate eggs (e.g., Cadbury Mini Eggs)
- Jelly beans or gummy eggs (optional, for topping)
Instructions
- Line a large baking sheet with parchment paper.
- Preheat oven to 325°F (163°C).
- In a large bowl, combine shredded coconut, quick oats, granulated sugar, and kosher salt. Stir until evenly mixed.
- In a separate bowl, whisk together eggs, melted butter, vanilla extract, and almond extract (if using).
- Pour wet ingredients into dry ingredients and stir until fully combined. Let sit for 2–3 minutes if dough seems loose.
- Using a heaping tablespoon or medium cookie scoop, portion dough onto the baking sheet, spacing nests about 2 inches apart.
- With damp fingers, shape each mound into a round nest and make a small indent in the center.
- Bake for 14–17 minutes, rotating the pan halfway through, until edges are golden brown.
- Let cookies cool on the sheet for 5 minutes, then transfer to a wire rack to cool completely.
- Once cool, gently press 2–3 candy eggs into the center of each nest. Optionally, brush a bit of honey or melted chocolate in the center to help eggs stick.
- Serve immediately or store in an airtight container at room temperature for up to 4 days.
Notes
For gluten-free cookies, use certified gluten-free oats. Substitute coconut oil for butter for a dairy-free version. Watch coconut closely while baking to prevent burning. Let cookies cool completely before adding candy eggs for best results. Shape nests with damp fingers or the back of a spoon. Store undecorated nests in the freezer for up to 2 months.
Nutrition
- Serving Size: 1 cookie
- Calories: 120
- Sugar: 10
- Sodium: 40
- Fat: 6
- Saturated Fat: 4
- Carbohydrates: 15
- Fiber: 2
- Protein: 2
Keywords: coconut nest cookies, Easter cookies, spring dessert, kid-friendly, coconut cookies, candy eggs, easy cookies, chewy cookies, crispy cookies