It was one of those evenings when the fridge was looking pretty bare, and I was just about ready to call for takeout (again). But then, tucked away in the back of the pantry, I spotted a bag of panko breadcrumbs and a lonely chicken breast in the fridge. I figured, why not try making chicken katsu? Honestly, I wasn’t expecting much—just a quick fix to stave off hunger. But as the chicken fried up, golden and crispy, the kitchen filled with this irresistible aroma that somehow felt both comforting and exciting.
When I paired the crispy cutlets with a quick homemade tonkatsu sauce—this tangy, sweet-savory mix—it hit me. This simple, fuss-free combo was way better than any delivery, and the crunch was just perfect. Over the next few weeks, I found myself making this Japanese chicken katsu with tonkatsu sauce more times than I’d like to admit. It’s become my go-to comfort food that’s quick enough for weeknights but special enough when friends pop over unexpectedly.
There’s just something about that crispy crust, the juicy chicken inside, and the punchy sauce that makes this dish stick around in my brain—and on my plate. It’s easy, approachable, and somehow feels like a little celebration every time I bite into it. That’s why I’m sharing this recipe—it’s the kind of meal that makes you slow down and enjoy simple pleasures, no matter how hectic your day was.
Why You’ll Love This Recipe
- Quick & Easy: This crispy Japanese chicken katsu comes together in about 30 minutes, perfect for those busy nights or last-minute dinner plans.
- Simple Ingredients: You likely have everything in your pantry and fridge—chicken, panko, and basic seasonings. No need for specialty stores.
- Perfect for Any Occasion: Whether it’s a casual family dinner, a cozy date night, or an impromptu get-together, this dish fits right in.
- Crowd-Pleaser: Kids and adults alike can’t seem to get enough of the crispy texture paired with that luscious tonkatsu sauce.
- Unbelievably Delicious: The contrast between the crunchy coating and juicy chicken, with the tangy sauce finishing it off, makes this dish irresistible.
- This isn’t just any fried chicken recipe—the secret is in using panko breadcrumbs for that ultra-crisp crust and a quick, homemade tonkatsu sauce that balances sweet, sour, and savory notes perfectly.
- This recipe has won me over because it’s approachable, adaptable, and still delivers that authentic Japanese flavor without the fuss.
What Ingredients You Will Need
This recipe uses simple, wholesome ingredients to deliver bold flavor and satisfying texture without the fuss. Most are pantry staples, which makes it easy to whip up anytime.
- Chicken breasts: Boneless, skinless, and pounded to an even thickness (about 6-8 oz / 170-225 g each) for quick, uniform cooking.
- Salt and pepper: Basic seasoning to bring out the chicken’s flavor.
- All-purpose flour: About ½ cup (60 g) for dredging; helps the panko stick better.
- Large eggs: 2, beaten, room temperature for the egg wash layer.
- Panko breadcrumbs: 1 ½ cups (150 g), Japanese-style breadcrumbs recommended for that signature crunch. Brands like Kikkoman or Nishiki work great.
- Vegetable oil: For frying, about 2 cups (480 ml), something neutral like canola or sunflower oil.
For the Tonkatsu Sauce:
- Ketchup: ¼ cup (60 ml), the base for sweet tanginess.
- Worcestershire sauce: 2 tablespoons (30 ml), adds umami depth.
- Soy sauce: 1 tablespoon (15 ml), for savory saltiness.
- Mirin or honey: 1 tablespoon (15 ml), balances sweetness (honey is a handy substitute).
- Rice vinegar: 1 teaspoon (5 ml), brightens the sauce.
- Optional: A dash of mustard or grated ginger for extra zing.
If you want to make this gluten-free, try swapping all-purpose flour with rice flour and using gluten-free panko breadcrumbs. For dairy-free versions, this recipe is naturally so, so no worries there.
Equipment Needed
- Meat mallet or rolling pin: To pound the chicken breasts evenly. I prefer a flat meat mallet for gentle pounding without tearing the meat.
- Three shallow bowls: For flour, egg wash, and panko breadcrumb dredging setup.
- Large skillet or frying pan: A heavy-bottomed pan helps maintain consistent oil temperature. Cast iron or stainless steel pans work wonders.
- Thermometer: Optional but handy to keep oil at 350°F (175°C) for perfect frying results.
- Wire rack and baking sheet: To drain and keep the chicken crispy after frying. Avoid paper towels if you want to stay crispy longer.
- Tongs or slotted spoon: For safe turning and removing chicken from hot oil.
If you don’t have a meat mallet, a sturdy rolling pin or even the bottom of a heavy pan can do the trick. For oil, a deep-frying thermometer is a good investment but not necessary if you watch the bubbles and adjust heat as needed.
Preparation Method
- Pound the chicken: Place each chicken breast between two sheets of plastic wrap. Gently pound with a meat mallet or rolling pin until about ½ inch (1.3 cm) thick. This helps the chicken cook evenly and stay juicy. (About 5 minutes)
- Season: Lightly sprinkle both sides with salt and pepper. Don’t overdo the salt—you want a balanced flavor.
- Set up dredging stations: In one shallow bowl, place the flour. In the second, beat the eggs. In the third, add the panko breadcrumbs. (2 minutes)
- Dredge the chicken: First, coat a chicken breast in flour, shaking off any excess. Then dip into the beaten eggs, allowing excess to drip off. Finally, press into the panko breadcrumbs, making sure both sides are well coated. (Tip: press firmly but don’t compact the crumbs too much.) Repeat for all pieces.
- Heat the oil: Pour about 2 cups (480 ml) of vegetable oil into a large skillet. Heat over medium-high until the temperature reaches 350°F (175°C) or when a breadcrumb dropped in sizzles immediately. (5 minutes)
- Fry the chicken: Carefully place chicken cutlets into the hot oil without overcrowding the pan. Fry for about 3-4 minutes per side until golden brown and cooked through (internal temp of 165°F / 74°C). Adjust heat as necessary so the crust doesn’t burn. Use tongs to flip gently. (8 minutes)
- Drain and rest: Transfer cooked cutlets to a wire rack set over a baking sheet to drain excess oil and keep crisp. Let rest for a couple of minutes before slicing. (3-5 minutes)
- Make the tonkatsu sauce: While the chicken rests, whisk together ketchup, Worcestershire sauce, soy sauce, mirin (or honey), and rice vinegar in a small bowl until smooth. Taste and adjust sweetness or tanginess to your liking.
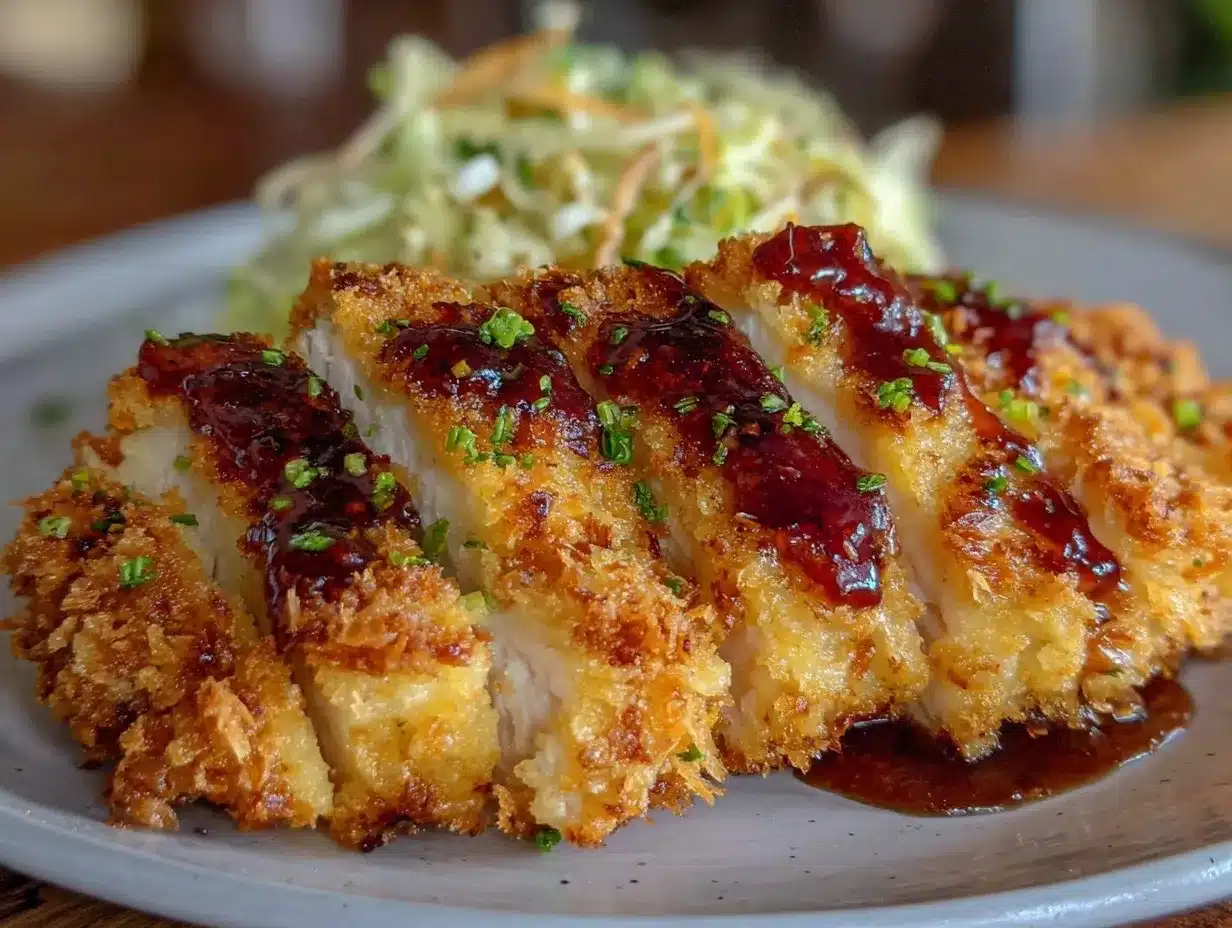
- Serve: Slice the chicken katsu into strips and drizzle or serve with tonkatsu sauce on the side. Add shredded cabbage or steamed rice for a classic touch.
Remember, the key is keeping the oil temperature steady and not rushing the frying. If the oil’s too cool, the crust will get soggy; too hot, and it burns before the inside cooks.
Cooking Tips & Techniques
One thing I learned early on is that even coating with panko is crucial. Uneven crumbs can lead to patchy crispiness. Gently pressing the panko helps form an even crust without turning it into a paste. Also, don’t overcrowd the pan—crowding drops the oil temperature and makes the breading greasy.
Keeping the oil at around 350°F (175°C) is ideal. If you don’t have a thermometer, test by dropping a small piece of bread or panko—if it bubbles and browns in about 30 seconds, you’re good. Don’t flip too often; one flip is enough to get a golden crust on both sides.
For juicy chicken, pounding to an even thickness helps it cook quickly without drying out. Also, letting the chicken rest after frying gives time for juices to redistribute. I’ve made the mistake of cutting right away and losing some of that juiciness.
And don’t skip the wire rack! Paper towels soak oil but can make the crust soggy. The rack lets air circulate and keeps that crunch intact.
Variations & Adaptations
- Gluten-free version: Swap all-purpose flour with rice flour and use gluten-free panko breadcrumbs. The result is just as crispy and delicious.
- Chicken thigh katsu: Use boneless, skinless chicken thighs instead of breasts for a richer, juicier bite. Just adjust cooking time slightly (about 5 minutes per side).
- Spicy twist: Add a pinch of cayenne pepper or chili powder to the flour or panko for a subtle heat kick. You can also mix a bit of Sriracha into the tonkatsu sauce.
- Baked version: For a lighter option, brush the breaded chicken with oil and bake at 425°F (220°C) on a wire rack for 20-25 minutes, flipping halfway through. It won’t be quite as crunchy but still tasty.
- Vegetarian adaptation: Use thick slices of eggplant or firm tofu prepared the same way. Fry until golden and serve with tonkatsu sauce.
Once, I tried swapping mirin with a splash of apple cider vinegar and a touch of sugar when I ran out of mirin—it worked surprisingly well and added a bit of tanginess I enjoyed.
Serving & Storage Suggestions
Serve this chicken katsu hot and crispy, sliced into strips for easy eating. It’s fantastic with a side of steamed white rice or fluffy Japanese short-grain rice. Shredded cabbage tossed lightly in a bit of lemon juice or simple vinaigrette adds a refreshing crunch that cuts through the richness.
For drinks, a cold beer or a cup of green tea pairs beautifully to balance the flavors. You can also serve it as a sandwich filling with soft white bread and mayo for a katsu sando experience.
Leftovers keep well in the fridge for up to 2 days. To reheat, pop the chicken in a 375°F (190°C) oven for about 10 minutes to bring back the crispiness. Avoid microwaving if you want to keep the crunch—it tends to make the crust soggy.
The tonkatsu sauce can be stored separately in an airtight container in the fridge for up to a week. Flavors often deepen over time, so it tastes even better the next day.
Nutritional Information & Benefits
This crispy Japanese chicken katsu recipe is a satisfying source of protein, thanks to the lean chicken breast. Using panko breadcrumbs keeps the coating light and crunchy without being overly greasy. The homemade tonkatsu sauce uses modest amounts of sugar and soy, making it a flavorful but reasonable condiment.
Per serving (one chicken cutlet with sauce), you can expect roughly 350-400 calories, with about 30 grams of protein and moderate fat from the frying oil. Using vegetable oil with a higher smoke point helps avoid unhealthy compounds from burning.
For those mindful of carbs, using almond flour and gluten-free panko can reduce carbohydrate content. Plus, the recipe is naturally dairy-free and can be adapted for gluten-free diets.
From a wellness perspective, this recipe offers a balance of indulgence and nutrition, making it a perfect comfort food that doesn’t feel like a cheat meal.
Conclusion
Crispy Japanese chicken katsu with tonkatsu sauce is one of those dishes that feels like a little reward after a busy day. It’s simple yet special, quick but satisfying, and always hits the spot with its golden crunch and tangy sauce. I’ve come to appreciate how easy it is to make restaurant-quality katsu right in my own kitchen without fuss or fancy ingredients.
Feel free to tweak this recipe to fit your taste—maybe add more spice, swap the chicken, or bake instead of fry. The basics are foolproof, so you can make it your own.
Honestly, it’s become a staple for me because it’s dependable and delicious every single time. Give it a try, and I’d love to hear how you make it your own!
FAQs
What is the best cut of chicken for chicken katsu?
Boneless, skinless chicken breasts are classic for their lean meat and easy pounding to an even thickness, but thigh meat works great too if you prefer juicier bites.
Can I make chicken katsu ahead of time?
You can bread the chicken in advance and refrigerate for a few hours, but it’s best fried fresh for maximum crispiness. Leftovers can be reheated in the oven.
What can I use if I don’t have panko breadcrumbs?
Regular breadcrumbs can work, but panko gives a lighter, crunchier texture. You can also crush cornflakes or rice crackers as a substitute.
How do I store leftover tonkatsu sauce?
Keep it in an airtight container in the fridge for up to one week. The flavors tend to intensify after a day or two.
Is chicken katsu healthy?
While fried, using lean chicken breast and moderate oil keeps it balanced. Baking is a lighter alternative. Pair with fresh veggies to round out the meal.
Pin This Recipe!
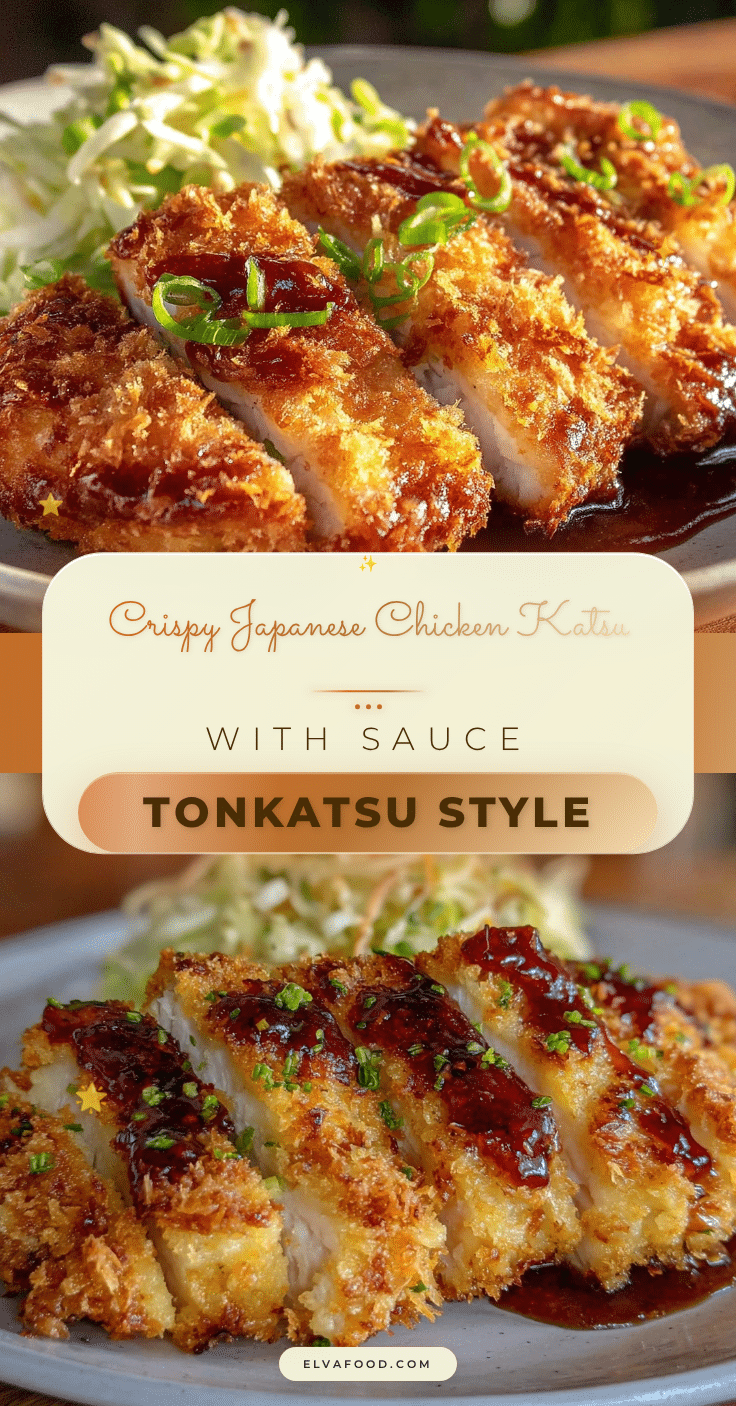
Crispy Japanese Chicken Katsu Recipe with Easy Tonkatsu Sauce Guide

A quick and easy Japanese chicken katsu recipe featuring crispy panko-coated chicken breasts paired with a tangy homemade tonkatsu sauce. Perfect for weeknights or casual gatherings.
- Prep Time: 10 minutes
- Cook Time: 20 minutes
- Total Time: 30 minutes
- Yield: 2 servings 1x
- Category: Main Course
- Cuisine: Japanese
Ingredients
- 2 boneless, skinless chicken breasts (6–8 oz / 170–225 g each), pounded to even thickness
- Salt and pepper, to taste
- ½ cup (60 g) all-purpose flour
- 2 large eggs, beaten, room temperature
- 1 ½ cups (150 g) panko breadcrumbs
- 2 cups (480 ml) vegetable oil (canola or sunflower oil recommended)
- ¼ cup (60 ml) ketchup
- 2 tablespoons (30 ml) Worcestershire sauce
- 1 tablespoon (15 ml) soy sauce
- 1 tablespoon (15 ml) mirin or honey
- 1 teaspoon (5 ml) rice vinegar
- Optional: dash of mustard or grated ginger
Instructions
- Place each chicken breast between two sheets of plastic wrap and gently pound with a meat mallet or rolling pin until about ½ inch (1.3 cm) thick.
- Lightly season both sides of the chicken breasts with salt and pepper.
- Set up three shallow bowls: one with flour, one with beaten eggs, and one with panko breadcrumbs.
- Dredge each chicken breast first in flour, shaking off excess, then dip into the beaten eggs, allowing excess to drip off, and finally press into the panko breadcrumbs to coat both sides evenly.
- Heat vegetable oil in a large skillet over medium-high heat until it reaches 350°F (175°C) or a breadcrumb sizzles immediately when dropped in.
- Carefully place chicken cutlets into the hot oil without overcrowding and fry for 3-4 minutes per side until golden brown and cooked through (internal temperature 165°F / 74°C).
- Transfer cooked chicken to a wire rack set over a baking sheet to drain excess oil and keep crispy. Let rest for 3-5 minutes.
- While the chicken rests, whisk together ketchup, Worcestershire sauce, soy sauce, mirin (or honey), and rice vinegar until smooth. Adjust seasoning to taste.
- Slice the chicken katsu into strips and serve with tonkatsu sauce on the side. Optionally serve with shredded cabbage or steamed rice.
Notes
Maintain oil temperature around 350°F (175°C) for best results. Avoid overcrowding the pan to keep the crust crispy. Use a wire rack to drain excess oil instead of paper towels to prevent sogginess. Let chicken rest after frying to retain juiciness. For gluten-free, substitute all-purpose flour with rice flour and use gluten-free panko breadcrumbs.
Nutrition
- Serving Size: 1 chicken cutlet wit
- Calories: 375
- Sugar: 5
- Sodium: 600
- Fat: 20
- Saturated Fat: 3
- Carbohydrates: 20
- Fiber: 1
- Protein: 30
Keywords: chicken katsu, Japanese chicken, tonkatsu sauce, crispy chicken, panko chicken, fried chicken, easy dinner, comfort food