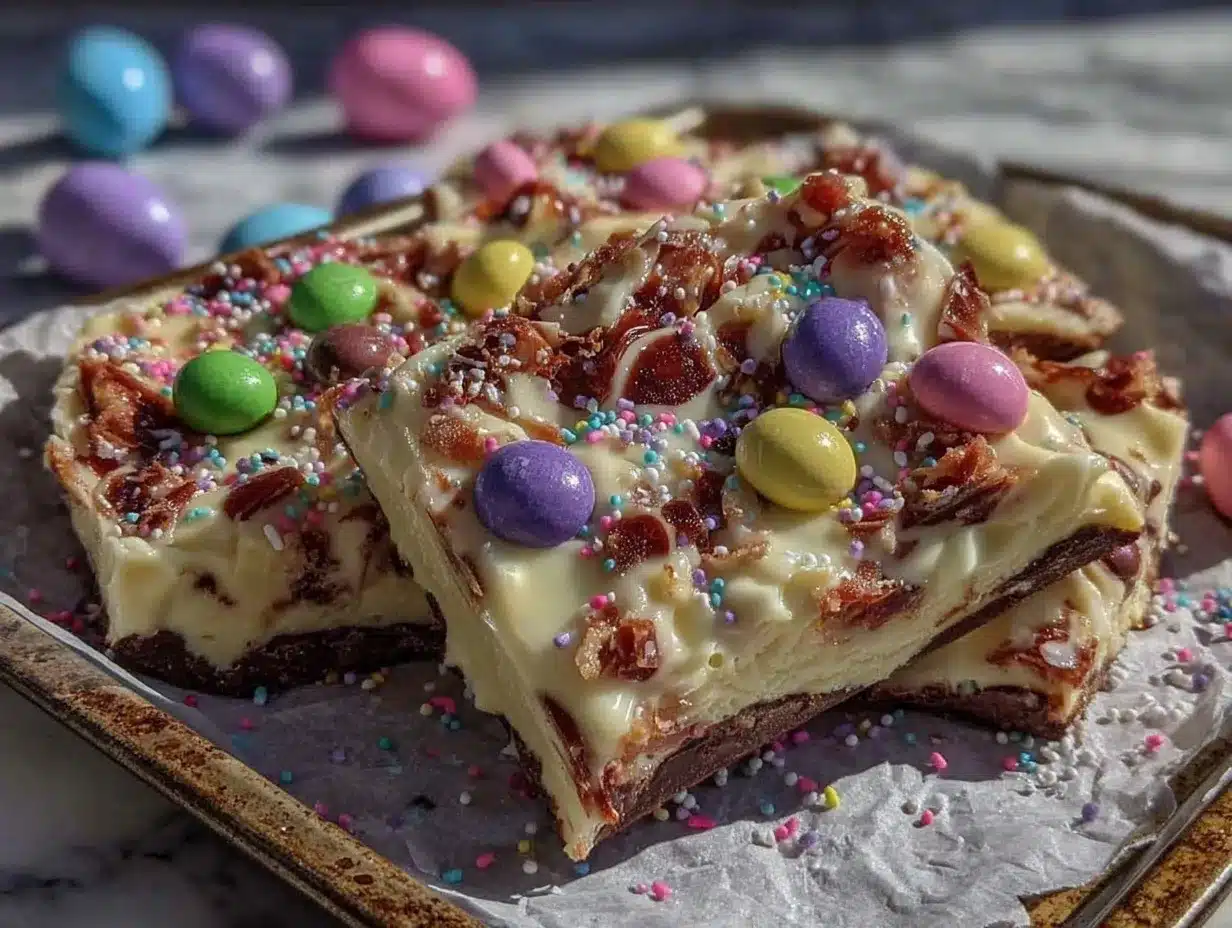
Let me set the scene: the kitchen is filled with the sweet, creamy scent of melting white chocolate, and pastel colors are swirling together in the brightest, happiest hues you can imagine. There’s something about the way Easter candy bark shimmers with M&Ms and vibrant swirls that just makes you giddy, like finding the golden egg on a sunny spring morning. The first time I pulled a tray of this candy bark out of the fridge, I remember pausing—just soaking in the whimsical, almost magical look of it. It was the kind of moment where you can’t help but smile, because you know you’ve made something that will turn any gathering (or random Tuesday) into a celebration.
This recipe for colorful Easter candy bark with M&Ms and pastel swirls has roots in my childhood. Years ago, when I was knee-high to a grasshopper, my grandma used to let me decorate chocolate bark with whatever candies we had on hand. It was always messy, always fun, and, honestly, those memories still taste as sweet as the treats themselves. Fast-forward to today—I’ve tested and tweaked this version more times than I can count (in the name of research, of course). Now, it’s the staple I break out for family Easter brunches and spring potlucks, and the reactions are priceless. My kids can’t resist sneaking pieces right off the parchment paper, and my friends have started requesting it every year, which feels like the ultimate compliment.
Honestly, what I love most is how this recipe brings pure, nostalgic comfort—but with a playful, Pinterest-worthy twist. It’s dangerously easy (a total win if you’re low on time), but it looks like you spent hours crafting edible art. Whether you need a festive dessert for a class party, a sweet treat for your kids, or a fun DIY gift, this Easter candy bark recipe is your ticket to instant springtime joy. You’re going to want to bookmark this one, trust me.
Why You’ll Love This Easter Candy Bark Recipe
When it comes to festive treats, this Easter candy bark recipe with M&Ms and pastel swirls checks all the boxes. I’ve made it for everything from family brunches to classroom parties, and it disappears every single time—no exaggeration. Here’s why you’re about to fall head over heels for this cheerful spring treat:
- Quick & Easy: This bark comes together in under 30 minutes, with most of that time spent waiting for chocolate to set. Perfect for last-minute party prep or unexpected guests.
- Simple Ingredients: You don’t need a specialty baking store or a fancy shopping list. Most of these ingredients are pantry staples, and you can grab the rest in one breezy grocery trip.
- Perfect for All Occasions: Great for Easter baskets, brunches, office parties, or even just a rainy weekend craft with the kids. It’s festive enough for holidays, but easy enough for any day you want a little color.
- Crowd-Pleaser: I’ve watched adults and kids both reach for extra pieces—there’s something so irresistible about creamy chocolate and crunchy M&Ms together. It’s that perfect mix of sweet, creamy, and crunchy.
- Unbelievably Delicious: The combo of rich white chocolate, pastel candy melts, and crunchy M&Ms is pure joy. It’s the kind of treat that makes you close your eyes for a second after the first bite—because it’s just that good.
But what really sets this Easter candy bark apart? It’s the pastel swirls. Instead of just plopping candy on melted chocolate like most recipes, I use a few easy tricks to create a marbled, swirly effect that looks straight out of a bakery window. No two pieces look alike, and each batch is a little work of art. Plus, the technique is so forgiving—even if you’re not a professional baker (which, let’s be honest, most of us aren’t), you’ll end up with a stunning tray every time.
There’s also something comforting about knowing exactly what goes into your treats. You can control the candy mix-ins, add nuts or sprinkles, or keep it all allergy-friendly. It’s creative, hands-on, and just plain fun—especially if you get the kids involved. I love that this bark is just as much about the process as the end result. It’s a sweet memory in the making, and, honestly, that’s the kind of comfort food I crave most.
What Ingredients You Will Need
This Easter candy bark uses simple, accessible ingredients to deliver big color and flavor—no need to hunt down anything fancy or expensive. Most of what you need can be found in the baking aisle or your own pantry, and there’s plenty of room to swap or customize based on what you have on hand. Here’s what you’ll need for the ultimate Easter bark:
- For the Chocolate Base:
- White chocolate chips (12 oz / 340g) – I prefer Ghirardelli or Guittard for super creamy results, but store brands work well too.
- Semisweet chocolate chips (optional, 4 oz / 115g) – For marbling or a two-tone effect. You can skip this if you want pure pastel.
- For the Pastel Swirls:
- Pastel candy melts (3 colors, 1/2 cup / 85g each) – Wilton or Sweet Tooth Fairy brands melt easily and come in fun Easter colors like pink, yellow, and turquoise.
- Vegetable shortening (1-2 tsp / 5-10g) – Makes the melts smooth and pourable. Coconut oil works as a substitute.
- For the Topping:
- Easter M&Ms (1 cup / 170g) – The pastel colors are classic, but feel free to use peanut, crispy, or regular M&Ms.
- Sprinkles (pastel jimmies or nonpareils, about 2 Tbsp / 20g) – Optional, but they add extra sparkle and crunch.
- Mini marshmallows (1/2 cup / 25g, optional) – For a chewy twist. I like to tuck a few in for texture.
Ingredient Tips & Substitutions:
- If you need a dairy-free version, use Enjoy Life white chips and vegan candy melts (they’re out there!).
- No pastel candy melts? Tint white chocolate with oil-based food coloring. Just don’t use water-based dyes—they’ll seize up the chocolate.
- Swap M&Ms for any Easter candy, like robin’s eggs, mini eggs, or chopped chocolate bunnies.
- Gluten-free? Double-check your candy mix-ins; most are naturally gluten-free but read the label to be sure.
Honestly, it’s hard to mess this up. The best part is how easy it is to adapt—if you want to add pretzels, dried fruit, or even crushed cookies, go for it. Every tray is a new adventure.
Equipment Needed
Good news: you don’t need fancy gadgets to make this Easter candy bark. Here’s what I use (and a few handy swaps if you’re working with a minimalist kitchen):
- Baking sheet (13×9-inch or similar) – A rimmed sheet keeps everything contained. If you only have a smaller or larger tray, just adjust the bark thickness accordingly.
- Parchment paper – This is a lifesaver for easy cleanup and perfect bark release. Wax paper works in a pinch, but I’ve found parchment holds up better with melted chocolate.
- Microwave-safe bowls – For melting chocolate and candy melts. If you don’t have a microwave, a double boiler (or a heatproof bowl set over a saucepan) works, too.
- Small spoons or offset spatula – For swirling and spreading the chocolate. A butter knife will do if you don’t have an offset spatula.
- Toothpicks or wooden skewers – The secret to those magical pastel swirls! They let you drag and marble the candy colors with precision.
- Measuring cups and spoons – For accuracy, but honestly, this recipe is pretty forgiving if you’re eyeballing the toppings.
- Fridge space – You’ll need a spot to set your tray while the bark firms up. If fridge space is tight, a cool garage or porch works on chilly spring days.
For easy cleanup, I always line my baking sheet with parchment before I start. And if your microwave runs hot, melt chocolate in short bursts and stir well to prevent scorching. I’ve made every rookie mistake with chocolate bark, but as long as you keep stirring and don’t rush the melting step, you’ll be set!
How to Make Colorful Easter Candy Bark with M&Ms and Pastel Swirls
-
Prep Your Workspace:
Line a rimmed baking sheet (about 13×9 inches) with parchment paper. Leave a little overhang for easy lifting later. Make sure your toppings (Easter M&Ms, sprinkles, mini marshmallows) are ready to go—once the chocolate is melted, you’ll need to work quickly. -
Melt the White Chocolate:
In a microwave-safe bowl, add 12 oz (340g) white chocolate chips. Microwave in 30-second bursts, stirring after each, until smooth and pourable (about 1.5–2 minutes total). Note: If your microwave runs hot, reduce to 20-second intervals after the first minute. Don’t overheat—white chocolate scorches easily. -
Optional: Prepare Semisweet Chocolate (for marbling):
If you want a two-tone effect, melt 4 oz (115g) semisweet chocolate chips in a separate bowl using the same method. (Totally optional—skip this for pure pastel fun.) -
Spread the Base:
Pour the melted white chocolate onto the lined baking sheet. Use an offset spatula or the back of a spoon to spread into an even layer, about 1/4-inch thick (don’t stress about perfect edges).
Tip: If using semisweet chocolate, drizzle it randomly over the white chocolate, then gently swirl with a knife for a marbled base. -
Melt Pastel Candy Melts:
In three separate small bowls, melt 1/2 cup (85g) each of pastel candy melts (pink, yellow, blue) with 1/2–1 tsp (2–5g) vegetable shortening or coconut oil per bowl. Microwave each color for 20-second bursts, stirring until smooth. The shortening helps make the melts pourable.
Warning: Don’t add water-based coloring or liquid—this can seize up the chocolate. -
Add Pastel Swirls:
Working quickly, drizzle each melted pastel color in random lines or blobs over the white chocolate base. Use a toothpick or skewer to gently swirl the colors together, creating a marbled effect. Don’t over-swirl—less is more for bold color separation!
Personal Tip: I like to drag the toothpick in S-shaped curves and little circles for a playful, unpredictable swirl. -
Top with Easter Candy:
While the chocolate is still wet, sprinkle 1 cup (170g) Easter M&Ms evenly over the top. Add sprinkles and mini marshmallows if using. Gently press larger toppings so they stick but don’t sink.
Troubleshooting: If your chocolate starts to set before you finish, just warm the tray for 10 seconds in the microwave (if it fits) or use a hair dryer on low to remelt the surface. -
Set the Bark:
Transfer the tray to the fridge for 20–30 minutes, or until the chocolate is completely firm. If you’re impatient (like me), check after 15 minutes—sometimes it sets faster. -
Break and Serve:
Lift the bark from the tray using the parchment overhang. Break into shards or cut with a sharp knife for neat squares. Each piece will have its own unique swirl pattern!
Note: Store in an airtight container in a cool place or fridge until ready to serve.
If your kitchen is warm, work quickly so the chocolate doesn’t seize. And if you end up with a few “imperfect” pieces (cracked or extra swirly), those are the chef’s treat—snack away!
Cooking Tips & Techniques
Making Easter candy bark with M&Ms and pastel swirls is pretty forgiving, but I’ve picked up a few tricks that always make my bark turn out picture-perfect (and a couple of lessons learned the hard way):
- Use Good-Quality Chocolate: The base flavor really shines, so go for the best white chocolate chips you can find. Cheap white chips can taste waxy or greasy. Ghirardelli, Guittard, and Trader Joe’s are all solid choices.
- Don’t Overheat: Melt chocolate slowly. Rushing this step leads to scorched, grainy chocolate—ask me how I know. If you see it thicken or seize, add a tiny bit of shortening and stir patiently.
- Work Quickly with Swirls: Have all your pastel colors melted and ready before you start pouring. The chocolate sets fast, so prep is your friend here.
- Keep Add-Ins Handy: Pour and swirl the chocolate, then top with candy right away. If you wait too long, the toppings won’t stick and will fall off when you break the bark.
- Chill to Set: Fridge time is a must for clean breaks and snappy texture. Room temperature works if your kitchen is cool, but in warm spring kitchens, always chill.
- Cut or Snap? For crisp edges, use a sharp knife warmed in hot water and dried off. For rustic, chunky pieces, just snap with your hands—kids love this step!
- Humidity Alert: On rainy days or humid afternoons, chocolate can sweat. Store finished bark with silica gel packs or in a dry spot to avoid sticky tops.
- Clean Tools ASAP: Melted candy hardens fast, so soak bowls and utensils in hot water right after use to save yourself scrubbing later.
And here’s a personal confession: I once tried to make bark without lining the tray (don’t ask why). Big mistake! It stuck like glue, and I had to chisel it off in sad little crumbs. Parchment paper is your best friend—don’t skip it, even if you’re feeling rebellious.
Variations & Adaptations
The beauty of this Easter candy bark recipe is how customizable it is. Whether you have dietary needs, seasonal preferences, or just want to use up leftover candy, there’s a version for everyone. Here are a few of my favorite twists:
- Gluten-Free: Use gluten-free white chocolate chips and double-check your candy mix-ins. M&Ms are typically gluten-free, but always verify labels.
- Vegan/Dairy-Free: Swap in dairy-free white chocolate (like Enjoy Life), vegan candy melts, and allergy-friendly candy. Try adding nuts, seeds, or freeze-dried fruit for crunch.
- Nutty Crunch: Add 1/2 cup (60g) toasted chopped almonds, cashews, or pecans with the candy toppings. The salty crunch is a surprising hit!
- Fruity Fun: Mix in 1/2 cup (60g) dried cherries or cranberries for a sweet-tart kick. These pair especially well with the creamy chocolate and pastel swirls.
- Seasonal Swaps: For other holidays, swap pastel colors for red and green (Christmas), orange and black (Halloween), or red and pink (Valentine’s Day). The base technique works year-round.
- Allergy-Friendly: Skip M&Ms and use allergy-friendly candies, or load up on sprinkles and marshmallows for color and fun.
Personally, I love adding a handful of crushed pretzels to the top—it gives the bark a salty-sweet edge that balances all the sugar. If you want to try a layered look, spread a dark chocolate base, chill until just set, then pour the white chocolate and swirl on top before adding your candy. Every batch is a new adventure, and the kids love inventing their own combinations. Don’t be afraid to get creative!
Serving & Storage Suggestions
This Easter candy bark is best served chilled or at cool room temperature, broken into rustic shards or cut into neat squares for a more polished look. Arrange on a pastel platter or tuck pieces into cellophane bags with a ribbon for easy gifting—perfect for Easter baskets, teacher gifts, or party favors.
For parties, I like to pile the bark in a big mound on a cake stand surrounded by extra Easter candy for that over-the-top, Instagram-worthy effect. It also makes a great companion to a cup of tea or coffee, or as a bright spot on a dessert buffet. Pair with fresh fruit or salty snacks like pretzels to balance the sweetness.
To store, place the bark in an airtight container with parchment between layers. It will keep in the fridge for up to two weeks, or at cool room temperature for several days if your kitchen isn’t too warm. For longer storage, freeze in a zip-top bag for up to two months—just thaw in the fridge overnight before serving. The colors stay vibrant, and the flavors even seem to meld a bit more with time.
If you find the chocolate gets a little soft at room temp, just pop the pieces back in the fridge for a few minutes to firm up. Honestly, I think the bark tastes best cold, straight from the fridge on a sunny spring afternoon!
Nutritional Information & Benefits
This Easter candy bark recipe is definitely a treat, but it’s nice to know what you’re enjoying. Each piece (assuming 24 pieces per batch) has about 120 calories, 6g fat, 16g carbs, and 12g sugar. The white chocolate offers a little calcium, and if you add nuts or dried fruit, you’ll sneak in some fiber and healthy fats, too.
As for dietary concerns, the standard recipe is gluten-free if you use certified gluten-free mix-ins. It does contain dairy, so use vegan chips and candy for a dairy-free version. Potential allergens include milk, soy (in chocolate), and possibly nuts (in some candies or if you add them as a topping).
While this isn’t a health food, I’ve always believed that a little joy—in the form of pastel swirls and crunchy M&Ms—is good for the soul. As always, moderation is key, and sharing with friends and family makes every sugary bite worthwhile.
Conclusion
To sum it all up, this Easter candy bark recipe with M&Ms and pastel swirls is the kind of easy, joyful treat everyone needs in their repertoire. It’s endlessly customizable, comes together in a flash, and never fails to spark smiles (and maybe a little nostalgia, too). Whether you’re making it with kids, gifting to friends, or just treating yourself, it’s a surefire way to bring color and sweetness to any spring day.
Don’t be afraid to make it your own—swap in your favorite candies, change up the colors, or add a secret ingredient that makes it uniquely yours. I keep coming back to this recipe every year because it’s equal parts fun and delicious, and I hope it becomes a tradition in your kitchen, too.
If you try this Easter candy bark, I’d love to hear your variations and see your creations! Drop a comment below, share your photos, or pass this recipe along to a fellow candy lover. Here’s to colorful treats and happy memories—happy Easter, friends!
Frequently Asked Questions
Can I make Easter candy bark ahead of time?
Absolutely! You can make the bark up to a week in advance and store it in the fridge or even freeze it for longer. Just keep it airtight to prevent moisture from getting in.
Can I use milk or dark chocolate instead of white chocolate?
Yes, you can use milk or dark chocolate for the base, or even create a layered effect by combining them. The pastel swirls look extra striking on a white background, but any chocolate works.
What if I don’t have pastel candy melts?
No problem! You can color white chocolate with oil-based food coloring, or just use plain melted chocolate for a classic look. The bark will still be delicious and fun to eat.
How do I keep the chocolate from seizing or turning grainy?
Melt chocolate slowly in short bursts and stir often. If it gets too thick, add a small amount of vegetable shortening or coconut oil and stir until smooth. Avoid any water or steam near the chocolate.
Is this recipe safe for people with nut allergies?
This recipe is nut-free as written, but always check your candy labels. Some M&Ms or sprinkles are processed in facilities with nuts. For allergies, use safe brands and skip any nut toppings.
Pin This Recipe!
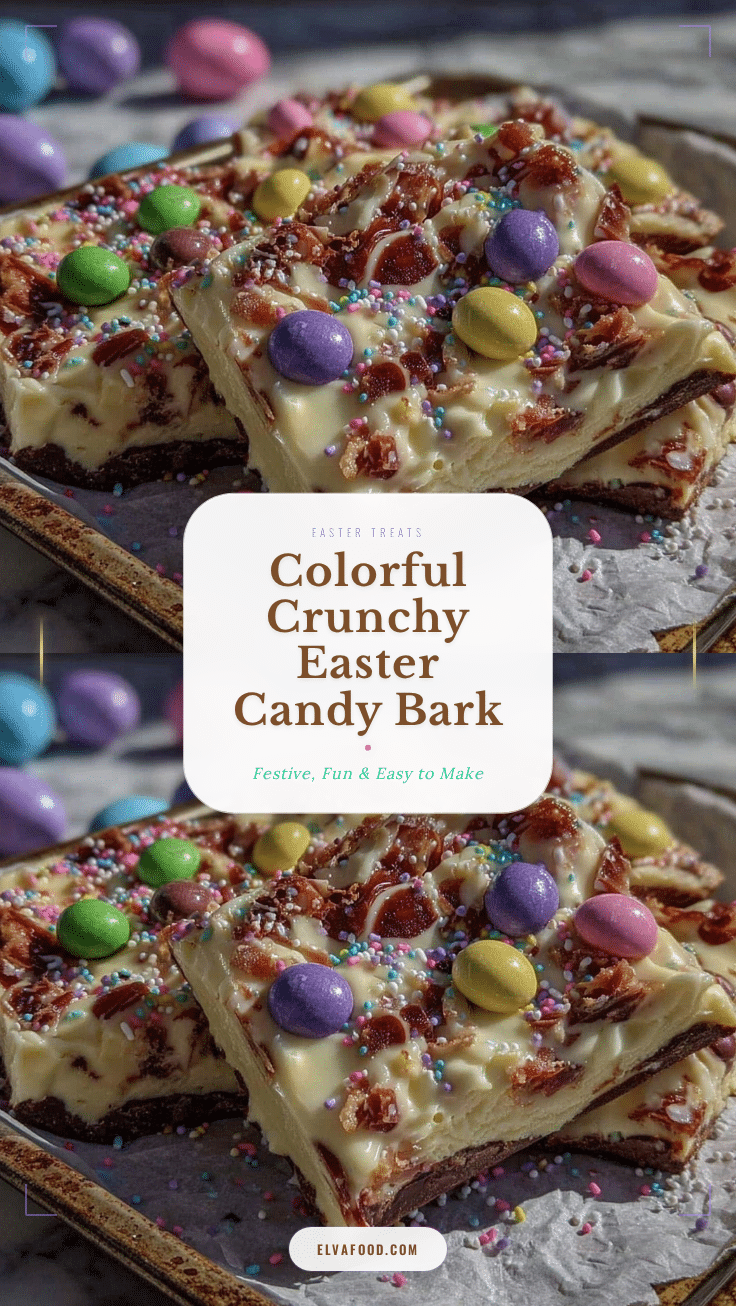
Easter Candy Bark Recipe Easy M&Ms Pastel Swirl Treats
This festive Easter candy bark features creamy white chocolate, pastel swirls, and crunchy M&Ms for a cheerful, easy-to-make treat. Perfect for spring gatherings, gifting, or a fun kitchen project with kids.
- Prep Time: 10 minutes
- Cook Time: 5 minutes
- Total Time: 30 minutes
- Yield: 24 pieces 1x
- Category: Dessert
- Cuisine: American
Ingredients
- 12 oz white chocolate chips
- 4 oz semisweet chocolate chips (optional, for marbling)
- 1/2 cup pastel candy melts (pink)
- 1/2 cup pastel candy melts (yellow)
- 1/2 cup pastel candy melts (blue)
- 1–2 tsp vegetable shortening or coconut oil (for candy melts)
- 1 cup Easter M&Ms
- 2 tbsp pastel sprinkles (jimmies or nonpareils, optional)
- 1/2 cup mini marshmallows (optional)
Instructions
- Line a rimmed baking sheet (about 13×9 inches) with parchment paper, leaving an overhang for easy lifting.
- Prepare all toppings (M&Ms, sprinkles, marshmallows) so they’re ready to use.
- In a microwave-safe bowl, melt white chocolate chips in 30-second bursts, stirring after each, until smooth (about 1.5–2 minutes).
- If using, melt semisweet chocolate chips in a separate bowl using the same method.
- Pour melted white chocolate onto the lined baking sheet and spread into an even layer about 1/4-inch thick. If using semisweet chocolate, drizzle over the white chocolate and swirl with a knife for a marbled effect.
- In three separate bowls, melt each color of pastel candy melts with 1/2–1 tsp vegetable shortening or coconut oil per bowl. Microwave in 20-second bursts, stirring until smooth.
- Drizzle each melted pastel color over the white chocolate base. Use a toothpick or skewer to swirl the colors together for a marbled effect.
- While chocolate is still wet, sprinkle M&Ms, sprinkles, and mini marshmallows evenly over the top. Gently press larger toppings so they stick.
- Transfer tray to the fridge for 20–30 minutes, or until chocolate is completely firm.
- Lift bark from tray using parchment overhang. Break into shards or cut into squares. Store in an airtight container in a cool place or fridge until ready to serve.
Notes
Use good-quality white chocolate for best flavor. Work quickly when swirling colors and adding toppings, as chocolate sets fast. For allergy-friendly or vegan versions, use dairy-free chips and candies. Store bark in an airtight container in the fridge for up to two weeks or freeze for longer storage.
Nutrition
- Serving Size: 1 piece (about 1/24
- Calories: 120
- Sugar: 12
- Sodium: 25
- Fat: 6
- Saturated Fat: 3.5
- Carbohydrates: 16
- Fiber: 0.5
- Protein: 1
Keywords: Easter, candy bark, M&Ms, pastel, chocolate, spring dessert, easy recipe, kid-friendly, party treat, homemade gift