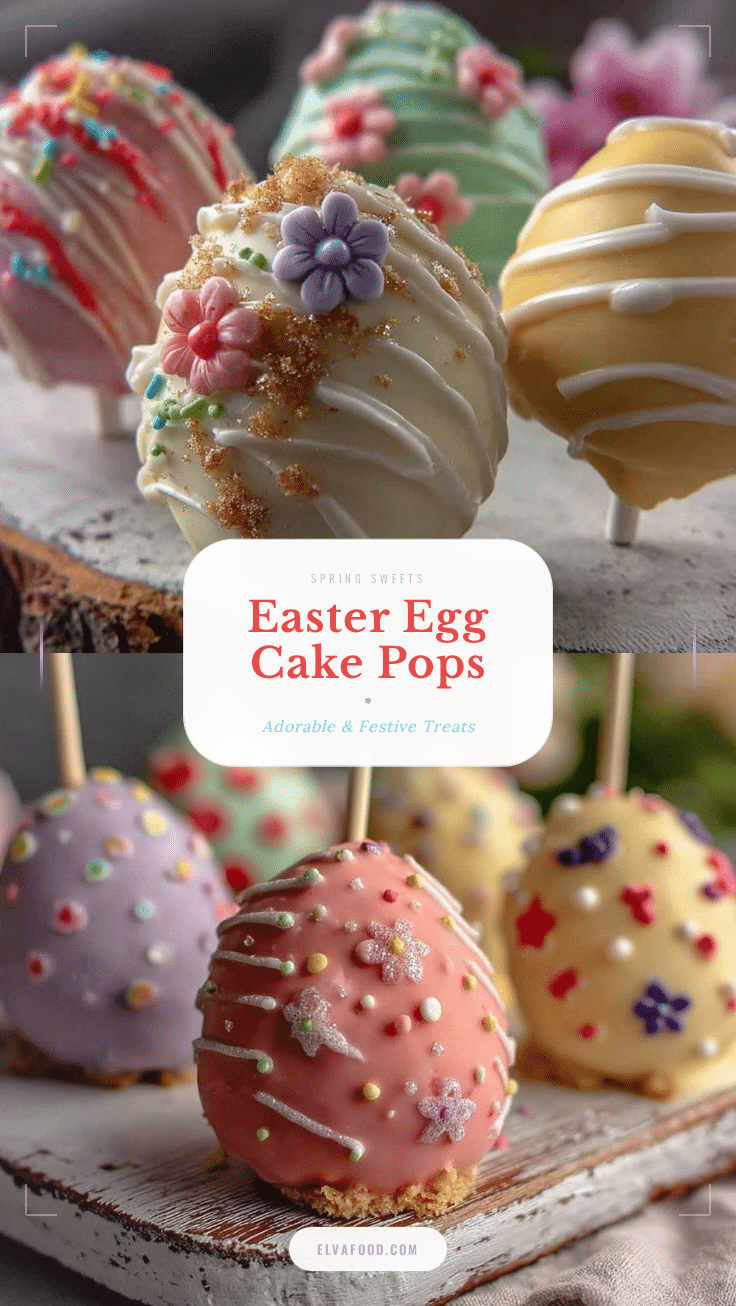
Picture this: a burst of pastel colors, sweet vanilla aroma curling through your kitchen, and a table scattered with cheerful sprinkles and bright candy melts. That’s the magic of making Easter Egg Cake Pops! The first time I tried these, the kitchen looked like a springtime wonderland—tiny hands reaching for the prettiest pops, giggles bouncing off the walls, and a sense of creative chaos that just felt right. I’ll never forget my little niece’s face lighting up as she swirled her cake pop in a pool of pink chocolate—she was covered in sprinkles, and honestly, so was the dog. It was that kind of moment where you pause, take a deep breath, and just grin because you know you’ve stumbled into something truly special.
Growing up, Easter meant pastel eggs, sticky fingers, and chasing cousins around Grandma’s backyard. But when I started making these Easter Egg Cake Pops, it felt like I’d discovered the secret to bottling up that nostalgic, springtime joy in one bite-sized treat. I first made these on a rainy Saturday, trying to recreate the bakery cake pops my kids kept begging for (let’s face it, bakery prices can add up fast). I wish I’d known about this recipe years ago—it’s dangerously easy and oh-so-satisfying!
My family couldn’t stop sneaking these off the cooling rack. Even my husband, who “doesn’t do cute desserts,” kept grabbing them (and I can’t really blame him). Friends rave about how festive they look on a dessert table—perfect for potlucks, kids’ parties, or to brighten up your Pinterest cookie board. There’s just something about these colorful, hand-decorated Easter Egg Cake Pops that feels like a warm hug from spring itself. I’ve tested this recipe more times than I can count (in the name of research, of course), and now it’s a staple for family gatherings, classroom gifts, or whenever you need a little extra cheer. Trust me, you’re going to want to bookmark this one.
Why You’ll Love This Easter Egg Cake Pops Recipe
If you’re searching for a treat that’s as fun to make as it is to eat, these Easter Egg Cake Pops are your answer. Years of spring baking—plus a few sticky kitchen disasters—taught me exactly what works (and what doesn’t). Here’s why this recipe stands out:
- Quick & Easy: You can whip these up in under an hour, making them perfect for busy parents or last-minute party prep.
- Simple Ingredients: No need for a specialty baking store run; you probably have everything in your pantry already.
- Perfect for Celebrations: Ideal for Easter brunch, spring birthdays, classroom parties, or any festivity that needs a pop of color and sweetness.
- Crowd-Pleaser: Kids and adults both go wild for these—seriously, they disappear faster than you’d think.
- Unbelievably Delicious: Moist cake, creamy frosting, a crisp candy shell—each bite is a little celebration in itself.
What makes these Easter Egg Cake Pops different? It’s all in the details. I use a trick I learned from a pro baker: chilling the cake balls just right before dipping, so you get that smooth shell without cracks or drips. My special blend of vanilla cake and cream cheese frosting creates a rich, not-too-sweet flavor that outshines the store-bought kind. Plus, you can let your creativity run wild with colors and decorations—no two pops are ever the same!
This recipe isn’t just another cute dessert—it’s a chance to make something together, to pause and enjoy the little things. Every time I see friends’ eyes light up after the first bite, I know it’s a keeper. Whether you’re impressing guests, making edible gifts, or simply treating yourself, these cake pops deliver comfort and joy with zero stress. They’re the kind of treat you’ll want to make every spring—over and over again.
What Ingredients You Will Need
Let’s keep things simple and delicious. These Easter Egg Cake Pops rely on everyday ingredients that come together to create magic—no fancy baking supplies required! You can even grab a boxed mix if you’re short on time. Here’s what you’ll need:
- For the Cake:
- Vanilla cake mix (15.25 oz / 432 g) – or your favorite homemade vanilla cake recipe
- Eggs (3 large, room temperature)
- Vegetable oil (1/2 cup / 120 ml)
- Water (1 cup / 240 ml)
- For the Frosting:
- Cream cheese (4 oz / 113 g, softened) – adds richness and tang
- Unsalted butter (2 tbsp / 28 g, softened)
- Powdered sugar (1 cup / 120 g)
- Vanilla extract (1 tsp / 5 ml)
- For Dipping and Decorating:
- Candy melts (12 oz / 340 g, assorted pastel colors) – Wilton is my go-to brand for smooth melting
- Vegetable shortening or coconut oil (2 tbsp / 28 g, optional for thinning melts)
- Sprinkles, nonpareils, or sugar pearls (as needed for decorating)
- Cake pop sticks or lollipop sticks (about 24)
Substitution Tips:
- Swap vanilla cake for chocolate, lemon, or carrot cake—whatever says “spring” to you!
- Use store-bought frosting in a pinch, but homemade has better flavor.
- Dairy-free? Use vegan butter and dairy-free cream cheese for the frosting.
- No candy melts? White chocolate chips with a little coconut oil work, but the color payoff isn’t as bold.
Ingredient Notes:
- For the smoothest pops, use softened ingredients and let your cake cool completely before mixing.
- If you’re using homemade cake, aim for a light, moist crumb (a little underbaked is better than dry).
- Sprinkles and colors are up to you—let your imagination (and your pantry) guide the way!
Honestly, these are the kind of ingredients you’ll want to keep on hand all spring. They’re just that fun and versatile.
Equipment Needed
You don’t need a bakery’s arsenal to make perfect Easter Egg Cake Pops. Here’s what’s essential (plus a few handy alternatives):
- Mixing bowls – at least two, one for cake, one for frosting
- Hand mixer or stand mixer – makes blending a breeze, though a sturdy whisk works in a pinch
- Baking pan (9×13-inch / 23×33 cm) – for baking your cake base
- Baking parchment or nonstick spray – keeps cleanup easy
- Cookie scoop or tablespoon – for portioning cake balls evenly
- Baking sheet lined with parchment – for chilling and shaping
- Microwave-safe bowls – for melting candy melts (glass bowls work best)
- Cake pop sticks – or use sturdy paper straws or even wooden skewers cut to size
- Styrofoam block or a clean egg carton – for drying pops upright (honestly, an upside-down colander works too!)
Personal Tips: I’ve tried using everything from ice cube trays to cardboard boxes for drying—just poke holes and you’re set. If you don’t have a mixer, combine cake and frosting with your hands (it’s messy, but oddly satisfying). For melting candy, a double boiler works but the microwave is faster and less fussy.
Budget-friendly? Most of these tools are already in your kitchen. Don’t sweat the fancy stuff—homemade always tastes better anyway!
How to Make Easter Egg Cake Pops

-
Bake the Cake:
- Preheat your oven to 350°F (175°C). Grease and line a 9×13-inch (23×33 cm) baking pan.
- In a large bowl, combine the cake mix, eggs, oil, and water. Mix until smooth and no dry streaks remain—about 2 minutes with a mixer, or 3 minutes by hand.
- Pour into the prepared pan and bake for 25-28 minutes, or until a toothpick comes out clean. The cake should be golden and springy. Let it cool completely (30-40 minutes).
-
Make the Frosting:
- In a medium bowl, beat softened cream cheese and butter together until creamy and smooth (about 1 minute).
- Add powdered sugar and vanilla. Beat until fluffy and well blended.
-
Crumble and Mix:
- Once the cake is cool, crumble it into fine crumbs using your hands or a fork. Transfer crumbs to a large bowl.
- Add frosting, a few spoonfuls at a time, mixing with a spatula or your hands until the dough holds together when pressed. It should be moist but not sticky—like playdough.
Prep note: Start with less frosting; you can always add more if needed. Too much makes the pops mushy.
-
Shape the Eggs:
- Scoop out portions using a tablespoon or cookie scoop (about 1.5 tbsp / 22 ml each). Roll each into a ball, then gently shape into an oval “egg” by pinching the top and rounding the bottom.
- Place shaped eggs onto a lined baking sheet.
Time saver: Chill the dough for 10 minutes if it’s too soft to shape.
-
Chill:
- Freeze the egg shapes for 20 minutes, or refrigerate for at least 1 hour. This helps them hold up during dipping.
Warning: Don’t skip this! Warm cake pops fall apart in melted chocolate (I’ve learned this the hard way… several times).
-
Melt Candy Melts:
- In microwave-safe bowls, melt candy melts in 30-second bursts, stirring each time, until smooth. If too thick, add a bit of shortening or coconut oil.
-
Insert Sticks:
- Dip the tip of each stick into melted candy, then push halfway into a cake egg. This “glue” keeps the pop secure.
- Chill again for 5-10 minutes until set.
-
Dip and Decorate:
- Dip each pop into melted candy, letting excess drip off. Tap gently on the bowl to smooth the coating.
- Immediately decorate with sprinkles, nonpareils, or drizzle with contrasting color.
- Stand pops upright in a Styrofoam block or egg carton to set.
Sensory cue: The coating should be glossy and smooth, not streaky.
-
Set and Serve:
- Let pops dry completely (about 20 minutes) before serving or packaging. Store in an airtight container at room temperature for up to 3 days.
Troubleshooting:
- If the coating cracks, the pops are too cold—let them warm up a few minutes before dipping.
- Coating won’t stick? Pops are too warm or greasy; chill longer.
- Lopsided eggs? Just reshape gently—imperfection is part of the charm!
And there you have it—your new favorite Easter Egg Cake Pops recipe! (And if you sneak a few during decorating, I won’t tell.)
Cooking Tips & Techniques
Let’s talk about what really makes these Easter Egg Cake Pops come out picture-perfect every time. After a few flops (and lots of “test bites”), I’ve picked up these tricks:
- Chill, Chill, Chill: If the cake eggs are too soft, they’ll fall right off the stick. Don’t rush this step. I learned the hard way—more than once!
- Thin Out Candy Melts: If your melts are too thick, add a teaspoon of shortening or coconut oil at a time. This keeps the coating smooth and easy to work with—no gloopy mess.
- Decorate Quickly: Candy melts set fast. Have your sprinkles ready and work one pop at a time, otherwise the decorations won’t stick.
- Use a Deep Bowl for Dipping: It’s much easier to get a smooth, even coat if you can dunk the pop straight down and out, instead of swirling sideways.
- Don’t Overcrowd the Tray: Leave space between cake pops on your tray, so they don’t stick together while chilling or drying.
- Room Temperature Ingredients: Start with room temp cake and frosting for easiest mixing. Cold cake can make the dough lumpy.
- Practice Makes Perfect: Your first few might look a little wonky—don’t sweat it. They all taste amazing! Even my “ugly” ones get devoured.
Biggest mistake? Skipping chill time. I’ve watched more than one cake pop slide off the stick because I was impatient (and hungry). Another tip: if you’re making these with kids, set up a “decoration station” so everyone can be creative without chaos. And if you’re short on time, bake the cake a day ahead—assembly is a breeze when everything’s ready to go.
For consistent results, I measure out each portion with a tablespoon or cookie scoop. After all, uniform pops mean less fighting over the “big one” later! And if you want the shiniest finish, brush the dried pops lightly with a little coconut oil. They’ll look like they came from a fancy shop, but taste homemade (the best combo, if you ask me).
Variations & Adaptations
One of the best things about this Easter Egg Cake Pops recipe? It’s a blank canvas for your creativity! Here are a few fun twists:
- Chocolate Lovers: Swap the vanilla cake for chocolate, red velvet, or even carrot cake. Use dark or milk chocolate melts for dipping.
- Gluten-Free: Use your favorite gluten-free cake mix and double-check that your candy melts are gluten-free. The texture is just as moist!
- Vegan/Dairy-Free: Use plant-based cake mix, dairy-free frosting, and vegan-friendly candy melts.
- Fruity Swirl: Add a tablespoon of lemon or orange zest to the cake batter for a citrusy twist. Or, mix in a handful of freeze-dried berries for a pop of flavor and color.
- Allergy-Friendly: Nut-free? Use sunflower seed butter-based frosting or coconut yogurt. Always check your sprinkles for hidden allergens.
- Different Shapes: Instead of eggs, shape them as bunnies, chicks, or simple round pops for other occasions.
- Personal Favorite: I love doing a marbled candy melt dip—swirl two colors together before dipping for a tie-dye effect that’s always a hit with kids (and, let’s be honest, grown-ups too).
Want to try a new method? You can also bake the cake as cupcakes, crumble, and proceed as usual for smaller batches. Or, use a cake pop maker for perfectly round pops (though I find hand-rolling makes cuter eggs). There’s really no wrong way—just lots of delicious possibilities.
Serving & Storage Suggestions
These Easter Egg Cake Pops are meant to be shown off! For the best flavor and presentation, here’s what I recommend:
- Serving: Serve at room temperature, arranged in a decorative mug, basket, or on a pastel platter. Add some edible grass or shredded coconut for a “nest” effect.
- Pairings: Perfect alongside coffee, hot cocoa, or a sparkling fruit punch. They also look beautiful on a dessert buffet with other spring treats—think sugar cookies or lemon bars.
- Storage: Store pops upright in an airtight container at room temperature for up to 3 days. If your kitchen is warm, refrigerate to keep the coating firm.
- Freezing: You can freeze undecorated cake eggs (without candy coating) for up to 2 months. Thaw in the fridge before dipping and decorating.
- Reheating: Not needed—these are best enjoyed as-is! If the cake feels a bit firm after chilling, let pops sit at room temperature for 15 minutes before serving.
- Flavor Note: The flavors actually develop and meld after a day, so they’re perfect for making ahead.
Whether boxed up for gifting or piled high for a party, these cake pops are a guaranteed hit. (And if you hide a few for yourself, I totally understand.)
Nutritional Information & Benefits
Here’s a general idea of what you’re enjoying with each Easter Egg Cake Pop (based on a batch of 24):
- Calories: ~140 per pop
- Fat: 6g
- Carbohydrates: 20g
- Sugar: 15g
- Protein: 1g
While these are definitely a treat, you get a little calcium and protein from the cream cheese and eggs. For those watching allergens, it’s easy to make these gluten-free or dairy-free with the right swaps. Always check your ingredient labels if you’re concerned about nuts, gluten, or artificial dyes (especially in sprinkles and candy melts).
My take? Life’s all about balance. These pops bring big smiles and happy memories, and sometimes, that’s the healthiest thing of all.
Conclusion
So, why do I keep coming back to this Easter Egg Cake Pops recipe year after year? It’s simple—they’re easy, festive, and make everyone (from toddlers to grandparents) feel like a kid again. The colors, the creative process, the soft cake inside that crisp shell—it all adds up to pure spring joy.
Don’t be afraid to let your own style shine—swap flavors, play with colors, or try a new sprinkle mix. The best part is making them your own. To me, these cake pops are more than just a dessert; they’re a tradition, a hands-on memory, and a sweet way to celebrate the season.
If you give these a try, I’d love to hear how they turn out! Leave a comment, share your creations on social, or send your own favorite twist. You never know—you might just start a new family tradition.
Happy baking, and may your spring be as sweet and colorful as your cake pops!
Frequently Asked Questions
How far in advance can I make Easter Egg Cake Pops?
You can make them up to 3 days ahead and store at room temperature, or freeze the cake eggs (before coating) for up to 2 months. Just dip and decorate the day you want to serve for best results.
Can I use store-bought cake and frosting?
Absolutely! It saves time and still tastes great. Just make sure the cake isn’t too dry, or the pops might crumble.
What if I don’t have candy melts?
You can use white or milk chocolate chips melted with a bit of coconut oil. The color won’t be as vibrant, but they’ll still taste delicious and look festive with sprinkles.
Can kids help make these cake pops?
Yes! Kids love rolling the eggs and decorating with sprinkles. Just handle the melting and dipping for them, since candy melts can get hot.
How do I keep the cake pops from cracking?
Let the chilled eggs sit out for a few minutes before dipping. If they’re too cold, the sudden temperature change can cause cracks in the candy coating.
Pin This Recipe!
Easter Egg Cake Pops

These festive Easter Egg Cake Pops are a fun, colorful spring treat featuring moist vanilla cake, creamy cream cheese frosting, and a crisp candy shell. Perfect for parties, gifting, or making with kids, they’re easy to customize and guaranteed to bring smiles.
- Prep Time: 30 minutes
- Cook Time: 28 minutes
- Total Time: 1 hour 20 minutes
- Yield: 24 cake pops 1x
- Category: Dessert
- Cuisine: American
Ingredients
- 1 box vanilla cake mix (15.25 oz)
- 3 large eggs, room temperature
- 1/2 cup vegetable oil
- 1 cup water
- 4 oz cream cheese, softened
- 2 tbsp unsalted butter, softened
- 1 cup powdered sugar
- 1 tsp vanilla extract
- 12 oz candy melts, assorted pastel colors
- 2 tbsp vegetable shortening or coconut oil (optional, for thinning melts)
- Sprinkles, nonpareils, or sugar pearls (as needed for decorating)
- Cake pop sticks or lollipop sticks (about 24)
Instructions
- Preheat oven to 350°F (175°C). Grease and line a 9×13-inch baking pan.
- In a large bowl, combine cake mix, eggs, oil, and water. Mix until smooth (2 minutes with mixer or 3 minutes by hand).
- Pour batter into prepared pan and bake for 25-28 minutes, until a toothpick comes out clean. Let cake cool completely (30-40 minutes).
- In a medium bowl, beat cream cheese and butter until creamy (about 1 minute). Add powdered sugar and vanilla; beat until fluffy.
- Crumble cooled cake into fine crumbs. Add frosting a spoonful at a time, mixing until dough holds together when pressed (moist but not sticky).
- Scoop out portions (about 1.5 tbsp each), roll into balls, then shape into oval ‘egg’ shapes. Place on lined baking sheet.
- Freeze egg shapes for 20 minutes or refrigerate for at least 1 hour.
- Melt candy melts in microwave-safe bowls in 30-second bursts, stirring until smooth. Add shortening or coconut oil if needed to thin.
- Dip tip of each stick into melted candy, then insert halfway into each cake egg. Chill again for 5-10 minutes until set.
- Dip each pop into melted candy, letting excess drip off. Tap gently to smooth coating. Immediately decorate with sprinkles or drizzle with contrasting color.
- Stand pops upright in a Styrofoam block or egg carton to set. Let dry completely (about 20 minutes) before serving or packaging.
- Store in an airtight container at room temperature for up to 3 days.
Notes
Chill cake eggs thoroughly before dipping to prevent cracking. Thin candy melts with shortening or coconut oil for a smoother coating. Decorate quickly, as candy melts set fast. Use a deep bowl for dipping for even coverage. Pops can be made ahead and stored for up to 3 days. For gluten-free or vegan adaptations, use appropriate cake mix and frosting substitutes.
Nutrition
- Serving Size: 1 cake pop
- Calories: 140
- Sugar: 15
- Sodium: 90
- Fat: 6
- Saturated Fat: 3
- Carbohydrates: 20
- Protein: 1
Keywords: Easter, cake pops, spring dessert, kid-friendly, party treats, pastel, vanilla cake, cream cheese frosting, candy melts, easy recipe