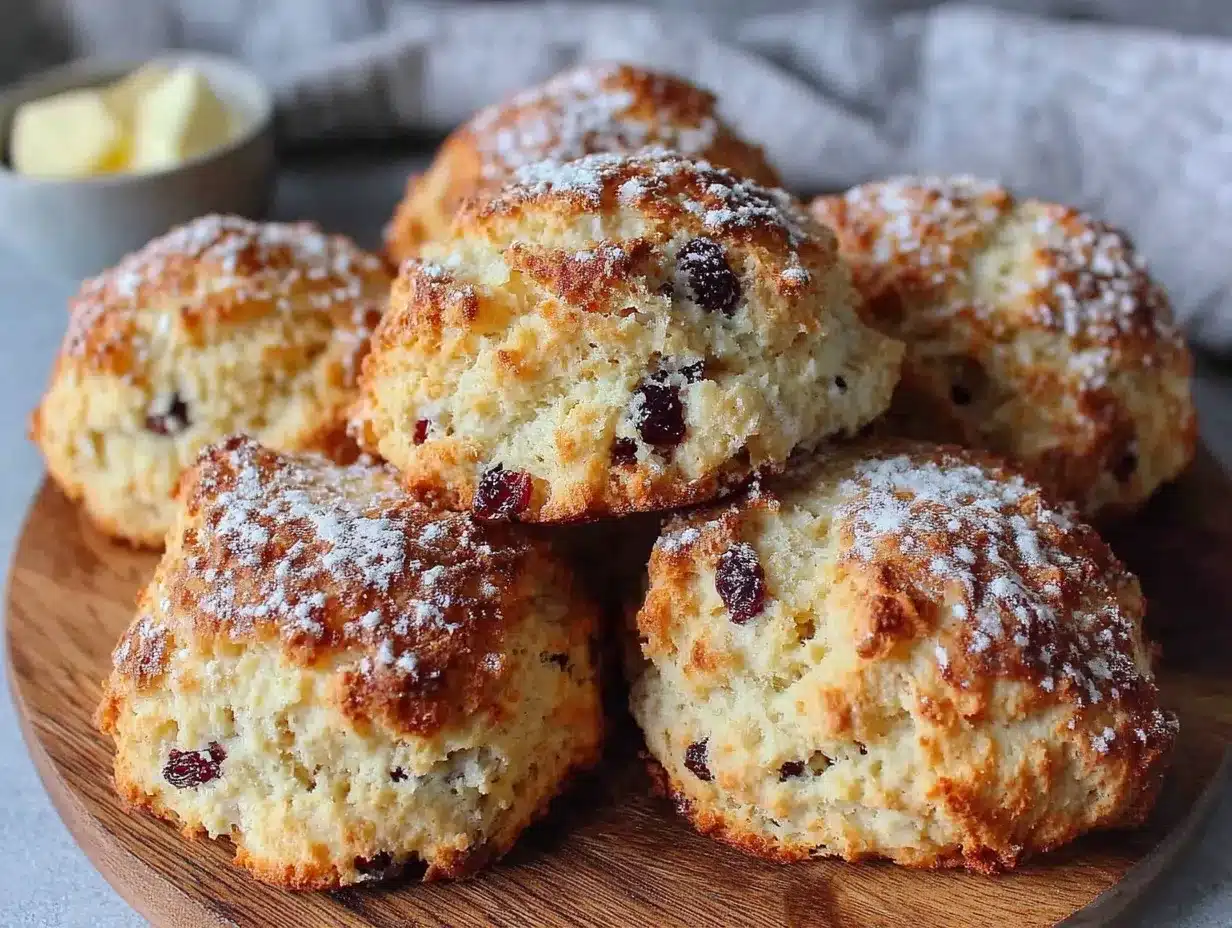
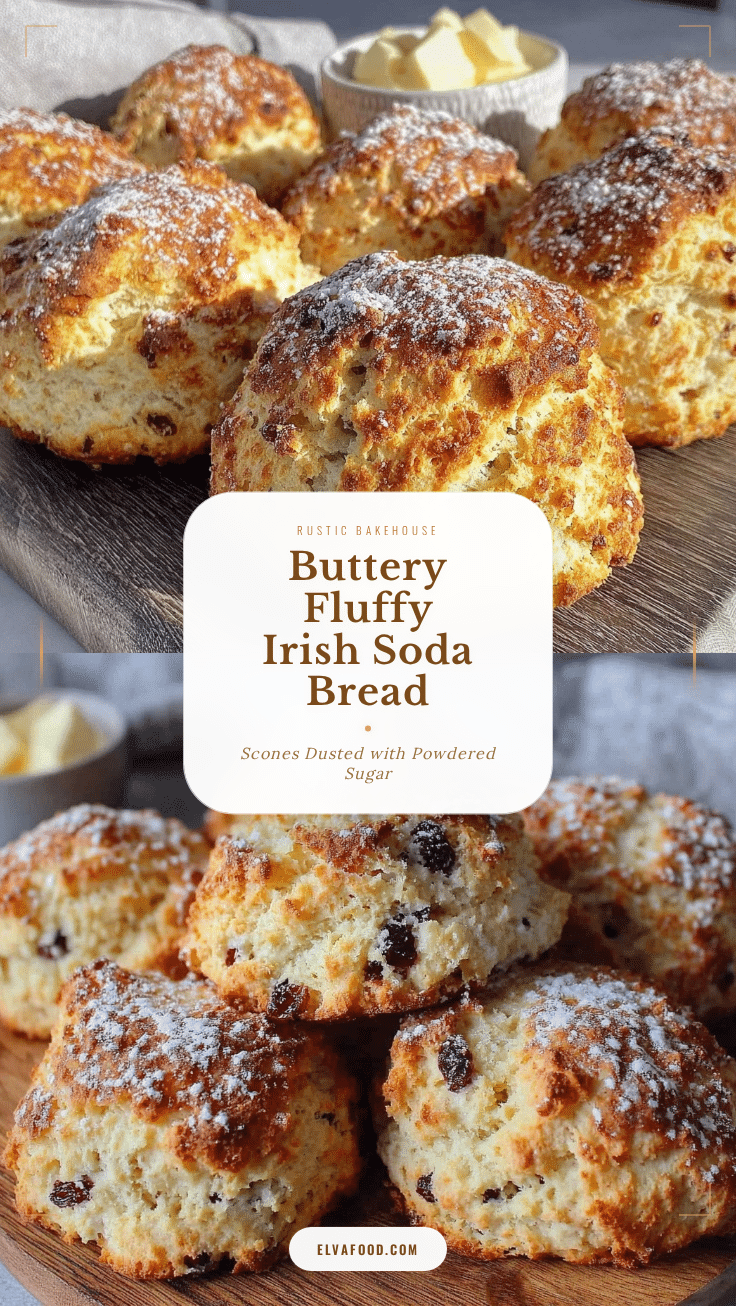
Imagine this: you pull a tray of freshly baked Irish soda bread scones out of the oven, and the kitchen fills with the warm, homey scent of tangy buttermilk, sweet currants, and that toasty, just-baked magic. The golden tops are gently cracked, the edges crisp, and inside—oh, inside—it’s all fluffy, tender crumb that practically begs for a slather of creamy butter or a drizzle of honey. I’ll be honest, I’ve lost count of how many times these scones have saved my morning (or, let’s face it, turned a rainy afternoon into a cheerful treat).
The first time I made these fluffy Irish soda bread scones, I was homesick for my grandmother’s kitchen. She used to whip up soda bread on a whim, no recipe cards in sight, just a dash of this and a handful of that. I remember hovering by the oven, the anticipation almost unbearable, and sneaking a warm wedge before it even cooled. That first bite—tangy, soft, and just sweet enough—was the kind of moment where you pause, take a deep breath, and just smile because you know you’re onto something truly special. I’ve tweaked her method over the years (in the name of research, of course), and these scones are now the staple at our family brunches and the treat I gift to friends “just because.”
My kids can’t resist them—they’ll sneak one off the cooling rack if I turn my back for even a second. I wish I’d discovered how easy it was to make bakery-style Irish soda bread scones with buttermilk and currants years ago. They’re perfect for lazy weekend breakfasts, potlucks, or just brightening up your Pinterest board with a little rustic charm. The best part? They come together in a snap, with ingredients you probably have on hand. Every batch feels like a warm hug, and trust me, you’re going to want to bookmark this one for every comfort-food craving.
Why You’ll Love This Irish Soda Bread Scones Recipe
Let’s get right to it—these Irish soda bread scones aren’t just another scone recipe you’ll scroll past. I’ve baked (and eaten) a lot of scones in my time, and here’s what makes these different. Through plenty of trial-and-error (and a fair share of flour on my shirt), I’ve landed on a recipe that’s as reliable as your favorite cozy sweater.
- Quick & Easy: Mix, shape, and bake—all in under 40 minutes. Perfect for those last-minute cravings or when you’ve got unexpected company.
- Simple Ingredients: No wild goose chases for ingredients—you’ll likely find everything in your pantry and fridge.
- Perfect for Any Occasion: These scones shine at brunches, afternoon teas, holiday mornings, or as a comforting treat with coffee.
- Crowd-Pleaser: Kids, grown-ups, and even picky eaters love the fluffy texture and sweet-tangy flavor. (I’ve watched a whole plate disappear in minutes at a family picnic!)
- Unbelievably Delicious: Buttermilk makes them extra tender, and those little bursts of currants in every bite? Pure magic.
What sets this recipe apart? It’s all about the buttermilk. Buttermilk gives these scones a soft crumb and that signature Irish soda bread tang without fussing over yeast or complicated steps. I also use a gentle mixing method so the scones stay fluffy and never tough—no heavy, dry wedges here. And the currants? They add just the right pop of sweetness (though raisins or dried cranberries work, too).
You know that feeling when you take a bite and everything else melts away for a second? That’s what these scones deliver—comfort food that’s speedy, manageable, and a little nostalgic. They’re the kind of recipe you make for friends, but end up keeping a few back for yourself (no shame!). Whether you’re aiming to impress or just need a pick-me-up, these Irish soda bread scones with buttermilk and currants will absolutely do the trick.
What Ingredients You Will Need
This Irish soda bread scones recipe brings together humble, wholesome ingredients for fabulous results. Most of these are pantry staples (so you may not even need a grocery run), and there’s plenty of room for easy swaps and additions. Here’s what you’ll need:
- All-Purpose Flour (2 1/2 cups / 310g) – The backbone of your scones. Regular, unbleached flour works great. For a heartier bite, you can swap in up to 1/2 cup of whole wheat flour.
- Granulated Sugar (1/4 cup / 50g) – Just enough to sweeten the dough without overpowering it. If you like a less-sweet scone, reduce slightly.
- Baking Soda (1 teaspoon / 5g) – This is the “soda” in soda bread! Reacts with buttermilk for that classic rise and tender crumb.
- Baking Powder (1 teaspoon / 5g) – Gives the scones a little extra lift and fluffiness.
- Salt (1/2 teaspoon / 3g) – Balances the sweetness and brings out all the flavors. I like using fine sea salt.
- Unsalted Butter (1/3 cup / 75g, cold and cubed) – Cold butter creates flaky layers. If using salted butter, reduce added salt slightly.
- Buttermilk (1 cup / 240ml, cold) – The secret to that signature tang and soft texture. If you don’t have buttermilk, use whole milk with 1 tablespoon of lemon juice stirred in and left to sit for 5 minutes.
- Egg (1 large, room temperature) – Helps bind the dough and adds richness. If you’re egg-free, you can skip this and add an extra 2 tablespoons of buttermilk, though the crumb will be a bit more delicate.
- Currants (2/3 cup / 80g, dried) – Little bursts of sweetness. Swap for raisins, golden raisins, or dried cranberries if you prefer. I love the Sun-Maid brand for currants—they’re reliably plump and not too sticky.
- Optional: Coarse Sugar for Topping (about 1 tablespoon / 12g) – For a sparkly, crunchy finish on top. Turbinado sugar works nicely.
Ingredient Tips:
- For gluten-free scones, use a cup-for-cup gluten-free flour blend (I’ve had good luck with King Arthur’s blend here).
- For dairy-free, swap butter with cold coconut oil and buttermilk with unsweetened almond milk plus lemon juice.
- Want to add citrus zest? Orange or lemon zest (about 1 teaspoon) brightens things up, especially in spring or summer.
- If you’re out of currants, don’t stress! Chopped dried apricots, cherries, or even mini chocolate chips all work in a pinch.
Equipment Needed
You don’t need anything fancy to whip up these Irish soda bread scones. In fact, one of the best things about this recipe is how low-tech it is! Here’s what you’ll need (plus a few workarounds and tips):
- Mixing Bowl: A large bowl for combining all your ingredients. Glass or stainless steel both work great. I use my old glass Pyrex—it’s sturdy and easy to clean.
- Pastry Cutter or Fork: For cutting the cold butter into the flour. No pastry cutter? Two table knives or even your fingertips will do the trick (just work quickly so the butter stays cold).
- Measuring Cups and Spoons: Accurate measurements make for fluffier scones. If you have a kitchen scale, even better for precision.
- Baking Sheet: Standard half-sheet pan lined with parchment paper for easy cleanup. If you don’t have parchment, lightly flour or grease the baking sheet.
- Bench Scraper or Knife: For dividing the dough into wedges. A butter knife works in a pinch.
- Pastry Brush (optional): For brushing the tops with buttermilk or egg wash. You can use a clean finger or back of a spoon if you’re brush-less.
- Cooling Rack: Helps the scones cool evenly, but I’ve also used a clean dish towel if I’m out of space.
Maintenance Tips: If you have wooden utensils or a pastry board, give them a quick rub with mineral oil every few months to keep them in good shape. Most of these tools are budget-friendly—you don’t need high-end gadgets for perfect scones!
Preparation Method
-
Preheat and Prep:
Set your oven to 400°F (200°C). Line a baking sheet with parchment paper or lightly dust it with flour. (This keeps those scones from sticking and helps with even browning!) -
Mix Dry Ingredients:
In a large bowl, whisk together 2 1/2 cups (310g) all-purpose flour, 1/4 cup (50g) sugar, 1 teaspoon (5g) baking soda, 1 teaspoon (5g) baking powder, and 1/2 teaspoon (3g) salt. Make sure everything’s evenly combined—no clumps! -
Add Cold Butter:
Drop in 1/3 cup (75g) cold, cubed butter. Use a pastry cutter, two forks, or your hands to cut the butter into the flour until it resembles coarse crumbs—pea-sized bits are perfect. (Work quickly here, so the butter stays cold. If your kitchen’s warm, chill the bowl for a few minutes first.) -
Add Currants:
Stir in 2/3 cup (80g) dried currants. Toss them in the flour mixture so they’re evenly distributed and don’t clump up. -
Mix Wet Ingredients:
In a separate bowl, whisk together 1 cup (240ml) cold buttermilk and 1 large egg (room temperature). Pour wet mixture over the dry ingredients. -
Combine & Form Dough:
Gently stir with a spatula or wooden spoon until a shaggy dough forms. Don’t overmix—just until the flour is moistened. The dough will look a bit scruffy, and that’s good! -
Knead Lightly:
Turn the dough out onto a floured surface. With floured hands, knead the dough 4-5 times, just enough to bring it together. (Too much kneading = tough scones.) -
Shape & Cut:
Pat the dough into a circle about 1 inch (2.5cm) thick. Use a bench scraper or sharp knife to cut into 8 wedges. For round scones, use a biscuit cutter or glass, reforming scraps as needed. -
Prepare for Baking:
Arrange scones on the prepared baking sheet, leaving a little space between each. Brush tops with a little extra buttermilk or a beaten egg, and sprinkle with coarse sugar if you like a crunchy finish. -
Bake:
Bake in preheated oven for 18-22 minutes, until scones are golden and a toothpick inserted in the center comes out clean. (Keep an eye on them—ovens can run hot!) -
Cool & Enjoy:
Transfer scones to a cooling rack. Let them cool for 10 minutes—if you can wait that long! Serve warm with butter, jam, or honey.
Troubleshooting: If scones spread too much, the butter may have been too soft—try chilling the cut dough for 10 minutes before baking. If they seem dry, make sure you’re measuring flour lightly (spooned and leveled, not packed!).
Cooking Tips & Techniques
Here’s where years of scone-making (and the occasional flop) come in handy! These Irish soda bread scones are forgiving, but a few tricks can mean the difference between so-so and totally irresistible.
- Keep Ingredients Cold: Butter and buttermilk should be straight from the fridge. Cold butter creates steam pockets for that fluffy texture—if things get too warm, pop the dough in the fridge for 10 minutes.
- Don’t Overwork the Dough: Mixing and kneading too much makes scones tough. Stop as soon as everything’s just combined. Rustic, lumpy dough is your friend!
- Use Parchment Paper: Prevents sticking and helps with even browning. Plus, cleanup’s a breeze.
- Space Scones Out: Leave room on the tray—crowding leads to uneven baking and soft sides. If you want crisp edges, don’t let them touch.
- Test for Doneness: Scones should be golden and sound hollow when tapped on the bottom. If in doubt, a toothpick should come out clean (a few moist crumbs are okay).
- Personal Oops Moment: Once I forgot the baking soda… and got pale, flat scones. Always double-check your leaveners before mixing!
- Multitasking Tip: While the scones bake, tidy up and set out butter, jams, or extras so you’re ready to serve them warm.
- Consistency Secret: Use a kitchen scale for flour and currants if you can—makes a big difference in texture.
Stick to these tips and you’ll have fluffy, bakery-style Irish soda bread scones every single time—no soggy bottoms, no tough bites, just pure comfort!
Variations & Adaptations
Irish soda bread scones are the ultimate blank canvas. Here are some of my favorite ways to make them your own:
- Gluten-Free: Swap all-purpose flour with your favorite 1:1 gluten-free flour blend. Texture stays light, and the flavor is still spot-on. (My neighbor with celiac swears by this adaptation!)
- Dairy-Free: Use coconut oil or vegan butter in place of regular butter, and substitute buttermilk with unsweetened almond milk plus a tablespoon of lemon juice. The scones will be a bit more delicate, but still delicious.
- Seasonal Flavors: In spring, add 1 teaspoon of lemon zest and replace currants with dried cherries. For fall, use orange zest and dried cranberries, plus a pinch of cinnamon.
- Chocolate Chip Scones: Swap currants for mini chocolate chips for a kid-friendly twist. My own kids beg for this version!
- Nutty Variation: Mix in 1/4 cup of chopped walnuts or pecans for crunch and even more flavor.
- Egg-Free: Skip the egg and add 2 extra tablespoons of buttermilk. The scones will be a touch more crumbly but still hold together nicely.
Honestly, you can have a lot of fun here—try a savory version with cheddar and chives, or toss in a handful of fresh berries in summer (just pat the dough gently if it gets sticky). I’ve even replaced half the flour with oat flour for a rustic breakfast scone. Don’t be afraid to play around—just stick to the basic ratios, and you’ll be golden!
Serving & Storage Suggestions
These fluffy Irish soda bread scones are best enjoyed fresh from the oven, still a little warm and inviting. I love serving them on a pretty plate with curls of salted butter, a little jar of berry jam, or even a drizzle of honey. For a true Irish-inspired treat, pair them with strong black tea or rich, creamy coffee.
Serving Temperature: Warm is best, but they’re still tasty at room temp. If you’re making them for brunch, bake them right before guests arrive for maximum wow factor.
Perfect Pairings: These scones go great with scrambled eggs, smoked salmon, or a simple fruit salad for a light meal. For special occasions, try serving with clotted cream and lemon curd—so fancy, but so easy!
Storage Tips: Store leftover scones in an airtight container at room temperature for up to 2 days. They freeze beautifully—just wrap individually and pop in a freezer bag. To reheat, thaw at room temp or warm in a 300°F (150°C) oven for 8-10 minutes. (Microwave works in a pinch, but the oven keeps them crisp.)
Flavor Note: The tangy flavor deepens after a day, so don’t be shy about making them ahead. Just toast lightly before serving to revive that bakery-fresh texture.
Nutritional Information & Benefits
Each Irish soda bread scone (based on 8 scones per batch) has an estimated:
- Calories: ~210
- Fat: 6g
- Carbohydrates: 35g
- Protein: 4g
- Sugar: 10g
Health Benefits: Buttermilk is lower in fat than cream and adds calcium and probiotics. Currants bring a touch of fiber and natural sweetness, and you can easily adjust the sugar to taste. To make these scones even more wholesome, use whole wheat flour for extra fiber or add a spoonful of ground flaxseed.
Allergens: Contains gluten, dairy, and eggs (unless using the adaptations above). For nut-free, skip any added nuts. Personally, I love that these scones satisfy my sweet tooth without weighing me down, and they’re so easy to tweak for different diets.
Conclusion
There’s just something special about a batch of fluffy Irish soda bread scones with buttermilk and currants. They’re simple, deeply comforting, and come together faster than you’d think. Every bite is a little taste of tradition—a nod to cozy kitchens, family stories, and the kind of baking that never goes out of style.
Don’t be afraid to experiment (try those variations!), and make these scones your own. Whether you’re baking for loved ones or just treating yourself, I hope this recipe brings as much joy to your table as it has to mine. If you give it a try, let me know in the comments—did you swap in cranberries? Add a little orange zest? I’d love to hear your twists and see your bakes. Happy baking, and may your kitchen always smell this good!
FAQs About Fluffy Irish Soda Bread Scones with Buttermilk & Currants
Can I use raisins instead of currants in this recipe?
Absolutely! Raisins, golden raisins, or even dried cranberries work well. Just chop larger pieces if needed so every bite gets a little sweetness.
What if I don’t have buttermilk?
No worries—mix 1 cup (240ml) whole milk with 1 tablespoon of lemon juice or vinegar, let it sit for 5 minutes, and use as you would buttermilk. The tangy flavor and texture will be almost the same.
How do I make these scones gluten-free?
Use a 1:1 gluten-free flour blend in place of regular flour. The texture will be slightly different but still light and fluffy. Make sure your baking powder and baking soda are gluten-free, too!
Can I freeze these scones?
Definitely! Let them cool completely, wrap individually, and freeze in a zip-top bag for up to 2 months. To serve, thaw and warm in the oven for best results.
Why are my scones tough or dry?
That usually happens from overmixing or overbaking. Mix the dough gently, just until combined, and keep an eye on the baking time. Using cold butter and buttermilk also helps keep them tender.
Pin This Recipe!
Irish Soda Bread Scones

These easy, fluffy Irish soda bread scones are made with tangy buttermilk and sweet currants for a comforting, bakery-style treat. They come together quickly with simple pantry ingredients and are perfect for breakfast, brunch, or an afternoon snack.
- Prep Time: 15 minutes
- Cook Time: 20 minutes
- Total Time: 35 minutes
- Yield: 8 scones 1x
- Category: Breakfast, Brunch, Snack
- Cuisine: Irish
Ingredients
- 2 1/2 cups all-purpose flour (310g)
- 1/4 cup granulated sugar (50g)
- 1 teaspoon baking soda (5g)
- 1 teaspoon baking powder (5g)
- 1/2 teaspoon salt (3g)
- 1/3 cup unsalted butter, cold and cubed (75g)
- 1 cup buttermilk, cold (240ml)
- 1 large egg, room temperature
- 2/3 cup dried currants (80g)
- Optional: 1 tablespoon coarse sugar for topping (12g)
Instructions
- Preheat oven to 400°F (200°C). Line a baking sheet with parchment paper or lightly dust with flour.
- In a large bowl, whisk together flour, sugar, baking soda, baking powder, and salt until well combined.
- Add cold, cubed butter and cut into the flour using a pastry cutter, two forks, or your hands until the mixture resembles coarse crumbs with pea-sized bits.
- Stir in dried currants, tossing to distribute evenly.
- In a separate bowl, whisk together cold buttermilk and egg. Pour wet mixture over dry ingredients.
- Gently stir with a spatula or wooden spoon until a shaggy dough forms. Do not overmix.
- Turn dough onto a floured surface and knead lightly 4-5 times, just until it comes together.
- Pat dough into a circle about 1 inch thick. Cut into 8 wedges or use a biscuit cutter for rounds.
- Arrange scones on the prepared baking sheet, leaving space between each. Brush tops with extra buttermilk or beaten egg and sprinkle with coarse sugar if desired.
- Bake for 18-22 minutes, until golden and a toothpick inserted in the center comes out clean.
- Transfer scones to a cooling rack and let cool for 10 minutes before serving.
Notes
For gluten-free scones, use a 1:1 gluten-free flour blend. For dairy-free, substitute butter with coconut oil and buttermilk with almond milk plus lemon juice. Do not overmix the dough for best texture. Scones freeze well; reheat in the oven for best results. Add citrus zest or swap currants for other dried fruit or chocolate chips for variations.
Nutrition
- Serving Size: 1 scone
- Calories: 210
- Sugar: 10
- Sodium: 250
- Fat: 6
- Saturated Fat: 4
- Carbohydrates: 35
- Fiber: 1
- Protein: 4
Keywords: Irish soda bread scones, buttermilk scones, currant scones, easy scone recipe, fluffy scones, breakfast, brunch, St. Patrick's Day, traditional Irish baking