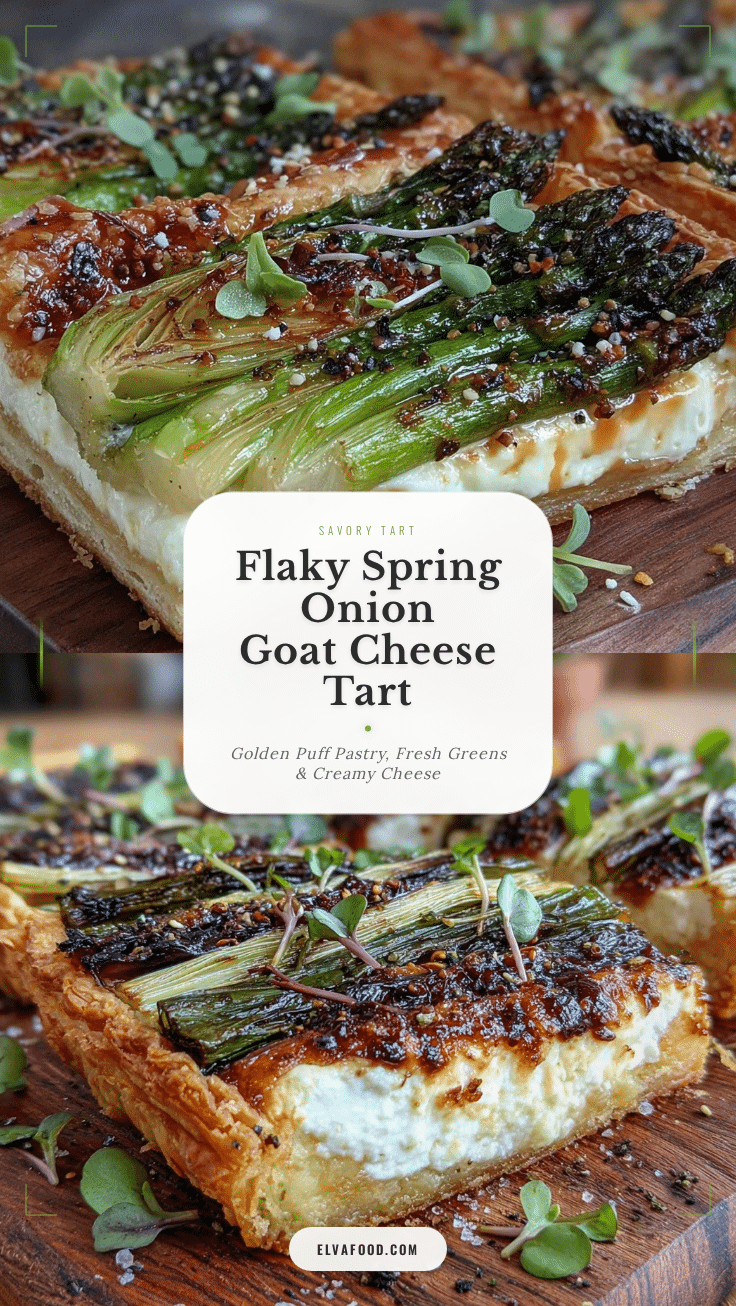
Just imagine it for a second: buttery layers of puff pastry turning golden and crisp in your oven, their edges curling up in the most tempting way. The scent of sweet spring onions, mellowed and caramelized, weaves through the air while tangy goat cheese melts into creamy rivulets. It’s the kind of aroma that makes you wander into the kitchen, even if you weren’t hungry five minutes ago. The first time I pulled this Spring Onion Goat Cheese Tart out of the oven, I had to pause and just take it all in—steam rising, cheese bubbling, and those little flecks of green onions making everything look like a painting.
This recipe isn’t just a brunch treat for me—it’s a little slice of nostalgia. When I was knee-high to a grasshopper, my grandma used to make savory tarts with whatever veggies were in season, and I’d sneak bites straight from the cooling rack (she always pretended not to notice). Years later, after a Saturday spent rummaging through the farmers’ market, I found myself staring at a bunch of impossibly fresh spring onions and a block of goat cheese, and—well, this tart practically invented itself. I wish I’d known how easy it would become to recreate that feeling of cozy, rustic comfort right in my own kitchen.
My family can’t resist it. I’ve caught my kids picking off the crispy pastry edges before I can even slice it, and my partner claims it’s the reason brunch at home beats any café. Friends have asked for the recipe after one bite, and honestly, I can’t blame them. This tart is dangerously easy, pretty enough for Pinterest (seriously, it’s a showstopper), and delivers pure, nostalgic comfort in every bite. It’s perfect for potlucks, lazy weekend brunches, or when you just need something to brighten your day. I’ve tested it more times than I can count (all in the name of research, naturally), and now it’s a staple for family gatherings, gifting, and—let’s face it—those moments when you just want a warm, savory hug on your plate. Bookmark this one; you’re going to want to make it again and again.
Why You’ll Love This Spring Onion Goat Cheese Tart Recipe
There are plenty of savory tarts out there, but this Spring Onion Goat Cheese Tart with Puff Pastry has earned its place in my kitchen rotation for some pretty convincing reasons. Whether you’re an experienced home cook or just want something impressive for brunch, here’s why you’ll be reaching for this recipe time and again:
- Quick & Easy: With ready-made puff pastry, this tart comes together in under an hour (including prep and baking). That means you can decide to make it on a whim—even on a busy morning!
- Simple Ingredients: You don’t need fancy cheeses or rare vegetables; spring onions, goat cheese, and some pantry basics are all you need. Odds are you’ve already got most of it in your fridge.
- Perfect for Brunch (or Lunch!): It’s just the right balance of light and satisfying, making it ideal for brunch spreads, spring picnics, or even a lunch with a crisp green salad.
- Crowd-Pleaser: Kids, grown-ups, and even picky eaters can’t resist the flaky pastry and creamy filling. It’s always a hit at family gatherings or as a potluck contribution.
- Unbelievably Delicious: The contrast of crisp pastry, soft onions, and tangy-smooth goat cheese is pure comfort food magic. It’s the kind of recipe that makes you close your eyes after the first bite.
What sets this tart apart from other recipes is the attention to texture and flavor—using a really good, all-butter puff pastry (I love Dufour brand), lightly caramelizing the onions for extra sweetness, and crumbling in just the right amount of goat cheese for a creamy tang. It’s not just another version of an onion tart; it’s the one I keep coming back to because it’s so foolproof and memorable.
I’ll be honest, I’ve tried plenty of shortcuts and swaps, but nothing beats the simplicity of this combo. It’s comfort food, but lighter—no heavy cream, no fussy crust. Instead, it’s all about fresh, seasonal ingredients, baked to perfection. You get that brunch-cafe vibe at home, minus the crowds and the bill. If you want to impress guests (or just treat yourself) without breaking a sweat, this tart is your new go-to. Trust me, it’s the kind of recipe you’ll pass down or share with friends, and it’s always better the second (and third) time you make it.
What Ingredients You Will Need
This Spring Onion Goat Cheese Tart recipe uses simple, everyday ingredients that work together to create bold flavor and an irresistibly flaky texture—without any fuss. You can easily find everything at a standard grocery store, and a few smart substitutions make it flexible for all sorts of kitchens.
- For the Tart Base:
- Puff pastry sheet, thawed (1 sheet, about 8-9 oz / 225-250g)—I love using all-butter brands like Dufour or Trader Joe’s for the best flavor and flakiness. If you need a dairy-free version, look for vegan puff pastry (Jus-Rol makes a good one).
- All-purpose flour (just a dusting, for rolling out the pastry)
- Egg, 1 large (for egg wash—gives that beautiful golden finish)
- For the Topping:
- Spring onions (a.k.a. green onions or scallions), 4-5 whole, sliced thin (both the white and most of the green parts; they add a gentle onion flavor and lovely color)
- Goat cheese (chèvre), 4 oz / 115g, crumbled—choose a creamy, mild variety for easy spreading. If you like a stronger flavor, use a tangier aged goat cheese.
- Olive oil, 1 tablespoon (for sautéing the onions)
- Fresh thyme leaves, 1 teaspoon (optional, but highly recommended for subtle herbal notes)
- Salt and black pepper, to taste
- For Finishing:
- Honey, 1 teaspoon (optional, for drizzling—adds a hint of sweetness that brings out the tang in the goat cheese)
- Extra thyme or chives, finely chopped (for garnish; adds a touch of green and a fresh hit of flavor)
Ingredient Tips: If you can’t find spring onions, substitute with thinly sliced leeks or shallots. For a vegetarian tart, it’s already meatless; for dairy-free, swap in a dairy-free spreadable cheese and vegan pastry. In summer, toss in a handful of fresh herbs or a few cherry tomatoes. I’ve tried goat cheese mixed with a little ricotta for extra creaminess—it works beautifully! And if you want a gluten-free version, use a gluten-free puff pastry like Schär.
Equipment Needed
- Baking sheet (or rimmed sheet pan): This is your main surface for baking the tart—any sturdy sheet will do. If yours is a bit warped (like mine), just rotate it halfway for even browning.
- Parchment paper: Prevents sticking and makes cleanup a breeze. If you’re out, a silicone baking mat works too.
- Rolling pin: For gently smoothing out the puff pastry. A wine bottle works in a pinch (been there, done that).
- Sharp knife or pizza cutter: For scoring the pastry border and slicing the finished tart. I like a small paring knife for control.
- Small skillet or frying pan: For sautéing the spring onions—nothing fancy, just something nonstick if possible.
- Pastry brush: For the egg wash. If you don’t have one, use a folded paper towel.
- Measuring spoons and cups: For accuracy, especially with the olive oil and herbs.
- Mixing bowl: To toss the onions with oil, if you prefer to mix off the heat.
Personal note: I’ve used everything from fancy nonstick pans to budget-friendly thrift store finds for this tart. Puff pastry is forgiving, but always thaw it in the fridge and keep your tools dry. Cleaning up is a breeze if you line your pan well—trust me, you don’t want to be scraping off melted cheese later. If you invest in one thing, let it be a heavy-duty baking sheet; mine has lasted for years with just a little TLC and a good wash.
How to Make Spring Onion Goat Cheese Tart with Puff Pastry

-
Prep Your Puff Pastry:
- Take 1 sheet (8-9 oz / 225-250g) of puff pastry out of the freezer and thaw it in the fridge for about 2-3 hours, or on the counter for 30-40 minutes if you’re in a hurry. Don’t let it get too soft—it should still feel cool and slightly firm to the touch.
-
Preheat and Line:
- Preheat your oven to 400°F (200°C). Line a baking sheet with parchment paper for easy release and cleanup.
-
Roll Out the Pastry:
- On a lightly floured surface, gently roll the pastry into a rectangle (about 10 x 12 inches / 25 x 30 cm). Don’t press too hard—you want to keep those flaky layers! Transfer to your lined baking sheet.
-
Score a Border:
- Using a sharp knife, score a 1/2-inch (1 cm) border around the tart, being careful not to cut all the way through. This step helps the edges puff up and frame the filling. Prick the center of the pastry with a fork a few times to stop it from puffing too much in the middle.
-
Prepare the Spring Onions:
- Wash and thinly slice 4-5 spring onions (white and green parts). Heat 1 tablespoon olive oil in a small skillet over medium heat. Add the onions with a pinch of salt and sauté for 3-4 minutes until just softened and fragrant. Don’t let them brown—gentle heat is key for sweetness.
-
Spread the Filling:
- Crumble 4 oz (115g) goat cheese evenly across the center of the pastry (inside the scored border). Scatter the sautéed spring onions over the cheese. Sprinkle with 1 teaspoon fresh thyme leaves (if using), and a few cracks of black pepper.
-
Brush with Egg Wash:
- Beat 1 large egg with a splash of water. Brush the mixture over the scored border for a shiny, golden finish. Don’t skimp—this gives the tart its pretty edge!
-
Bake:
- Bake for 20-25 minutes, until the edges are deeply golden brown and the cheese is soft and melty. Start checking at the 18-minute mark. If the center puffs up, gently press it down with the back of a spoon.
-
Finish and Garnish:
- Let the tart cool for 3-5 minutes. Drizzle with 1 teaspoon honey if you like a sweet-savory touch, and sprinkle with extra herbs for color and flavor.
-
Slice and Serve:
- Cut into squares or strips with a sharp knife or pizza cutter. Serve warm or at room temperature—both are delicious!
Troubleshooting Tips: If your pastry is too soft to work with, pop it back in the fridge for 10 minutes. If your tart gets too brown before the time is up, tent it loosely with foil. And if your cheese looks oily, just blot with a paper towel before serving—no harm done!
Cooking Tips & Techniques
Making a Spring Onion Goat Cheese Tart with puff pastry isn’t hard, but a few smart moves can make all the difference between good and “wow, you made this?!” Here’s what I’ve learned (sometimes the hard way):
- Keep the Pastry Cold: Puff pastry puffs best when it starts cold and hits a hot oven. If it gets too soft while you’re prepping, just chill it for 5-10 minutes. I’ve tried to rush it and ended up with a soggy bottom—lesson learned.
- Don’t Overload the Tart: It’s tempting to pile on extra cheese or onions, but too much can weigh the pastry down and prevent proper puffing. Stick to the measurements for perfect flakiness.
- Sauté, Don’t Fry: Gently cook the spring onions just until soft, not browned. This coaxes out their sweetness without overpowering the tart. High heat will make them bitter—trust me, I’ve been there.
- Score the Border: Lightly scoring the edge creates a bakery-style frame that keeps the filling in place and looks fancy with zero extra effort.
- Egg Wash Edges Only: If you brush egg wash over the center, it can get soggy. Stick to just the border—this makes it glossy and crisp.
- Rotate the Pan: Some ovens have hot spots (mine sure does). For even browning, rotate your baking sheet halfway through.
- Multitasking: While the onions cook, you can roll out the pastry and prep the cheese. This keeps things moving and gets you to brunch faster!
- Troubleshooting: If your tart center puffs up, poke it gently with a fork to let the steam escape. It will settle right down.
Once you’ve made this tart once or twice, you’ll find your own groove. It’s a forgiving recipe, but the little things—like keeping everything cold and not overfilling—make it bakery-worthy every time. Don’t stress over perfection; rustic is part of the charm.
Variations & Adaptations
The beauty of this Spring Onion Goat Cheese Tart is how flexible it is. You can riff on the base recipe to match your tastes, dietary needs, or whatever veggies are in your fridge. Here are a few of my favorite twists:
- Dietary Swaps: For a gluten-free version, use gluten-free puff pastry (like Schär). For dairy-free, swap the goat cheese for a vegan alternative and check your pastry ingredients.
- Seasonal Veggies: In summer, toss on halved cherry tomatoes or thinly sliced zucchini before baking. In fall, add caramelized leeks or mushrooms for an earthier flavor.
- Different Cheeses: If goat cheese isn’t your thing, try creamy ricotta, crumbled feta, or even grated Gruyère for a nuttier vibe. Mixing goat cheese with ricotta adds mildness and creaminess.
- Allergen-Friendly: For nut allergies, make sure your cheese and puff pastry are processed in nut-free facilities (labels matter!).
- Vegan Option: Go fully plant-based with vegan puff pastry and a cashew-based cheese spread (Miyoko’s is a good brand). Sautéed onions and a sprinkle of nutritional yeast amp up the flavor.
- Personal Favorite: I sometimes add a handful of cooked, crumbled bacon or prosciutto for a brunch treat—just scatter it over the cheese before baking. It’s a crowd-pleaser at my house!
You can also make mini tarts by cutting the pastry into smaller squares, perfect for appetizers. Or add a pinch of crushed red pepper for a little heat. Don’t be afraid to play around—this tart loves a little creativity.
Serving & Storage Suggestions
This Spring Onion Goat Cheese Tart is best served slightly warm or at room temperature. I love to pair it with a crisp green salad dressed in lemon vinaigrette, or a bowl of fresh fruit for brunch. If you’re hosting, a pitcher of iced herbal tea or a glass of sparkling wine makes it feel extra special.
For presentation, slice the tart into neat squares or long strips. Scatter extra fresh herbs over the top just before serving for a burst of color and freshness. Sometimes I even add a light drizzle of honey or balsamic glaze right before bringing it to the table—it’s a simple touch that makes everyone ooh and aah.
Leftovers keep well in the fridge, tightly wrapped, for up to 3 days. To reheat, pop slices in a 350°F (175°C) oven for 8-10 minutes until the pastry is crisp again. I don’t recommend microwaving, as it makes the crust soft. You can also freeze the tart (baked and cooled), wrapped in foil and plastic, for up to a month. Reheat from frozen in a hot oven for 15-20 minutes. Honestly, the flavors deepen overnight—so sneaking a slice for breakfast isn’t a bad idea!
Nutritional Information & Benefits
Here’s a rough estimate per serving (assuming 6 servings):
- Calories: 240
- Protein: 7g
- Fat: 15g (mostly from cheese and olive oil)
- Carbohydrates: 18g
- Sugar: 2g
Spring onions are rich in Vitamin K and antioxidants, while goat cheese provides calcium, protein, and is often easier to digest than cow’s milk cheese. Puff pastry isn’t exactly health food, but using all-butter versions gives you a little more natural fat and flavor. For gluten-free or low-lactose diets, the substitutions above make it accessible. Allergens include dairy, gluten (unless using substitutes), and egg (in the wash). I find that treating this tart as a special brunch treat—paired with lots of veggies—makes it fit right into a balanced, happy life.
Conclusion
This Spring Onion Goat Cheese Tart with Puff Pastry really brings together everything I love about brunch food: it’s easy, pretty, and downright crave-worthy. Whether you stick to the classic combo or riff with your own twists, you’ll end up with a tart that’s flaky, flavorful, and ready to impress. I keep coming back to this recipe because it’s adaptable for any season and always disappears fast at the table.
If you try this tart, don’t be shy—make it your own! Add your favorite herbs, swap in different cheeses, or sneak in whatever veggies are calling your name at the market. I love seeing readers’ versions and hearing how it fits into your family traditions or special moments. So leave a comment below, share your photo on Pinterest, or let me know what you think. Here’s to more cozy brunches, more flaky pastry, and more moments that feel like a warm hug. Happy baking!
Frequently Asked Questions
Can I make this tart ahead of time?
Yes! You can assemble the tart up to the baking step, cover, and refrigerate for several hours. Bake just before serving for freshest results. Leftovers reheat well in the oven, too.
What’s the best way to store leftovers?
Wrap cooled tart slices tightly and refrigerate for up to 3 days. Reheat in a 350°F (175°C) oven for 8-10 minutes to restore crispness.
Can I use regular onions instead of spring onions?
Absolutely. Thinly slice a small sweet onion or shallot and sauté gently. The flavor will be a bit stronger, but still delicious.
Is there a way to make this tart gluten-free?
Yes! Use gluten-free puff pastry (like Schär brand) and check that your cheese and other ingredients are gluten-free. The method stays the same.
Can I freeze the tart?
You bet. Bake, cool, and slice the tart. Wrap well and freeze for up to a month. Reheat from frozen in a hot oven until crisp and heated through.
Pin This Recipe!
Spring Onion Goat Cheese Tart

This easy savory tart features buttery puff pastry topped with caramelized spring onions and tangy goat cheese. It’s a showstopper brunch dish that’s quick to make, crowd-pleasing, and perfect for any season.
- Prep Time: 15 minutes
- Cook Time: 25 minutes
- Total Time: 40 minutes
- Yield: 6 servings 1x
- Category: Brunch
- Cuisine: American
Ingredients
- 1 sheet puff pastry (8–9 oz), thawed
- All-purpose flour, for dusting
- 1 large egg (for egg wash)
- 4–5 spring onions (green onions/scallions), thinly sliced (white and green parts)
- 4 oz goat cheese, crumbled
- 1 tablespoon olive oil
- 1 teaspoon fresh thyme leaves (optional)
- Salt and black pepper, to taste
- 1 teaspoon honey (optional, for drizzling)
- Extra thyme or chives, finely chopped (for garnish)
Instructions
- Thaw puff pastry in the fridge for 2-3 hours or on the counter for 30-40 minutes until cool and slightly firm.
- Preheat oven to 400°F (200°C). Line a baking sheet with parchment paper.
- On a lightly floured surface, roll out the pastry into a rectangle (about 10 x 12 inches). Transfer to the lined baking sheet.
- Score a 1/2-inch border around the pastry with a sharp knife, being careful not to cut all the way through. Prick the center with a fork a few times.
- Wash and thinly slice spring onions. Heat olive oil in a small skillet over medium heat. Add onions with a pinch of salt and sauté for 3-4 minutes until softened but not browned.
- Crumble goat cheese evenly over the center of the pastry. Scatter sautéed onions over the cheese. Sprinkle with thyme leaves (if using) and black pepper.
- Beat the egg with a splash of water. Brush the egg wash over the scored border of the pastry.
- Bake for 20-25 minutes, until edges are golden brown and cheese is soft and melty. Check at 18 minutes and gently press down the center if it puffs up.
- Let tart cool for 3-5 minutes. Drizzle with honey if desired and sprinkle with extra herbs.
- Slice into squares or strips and serve warm or at room temperature.
Notes
Keep puff pastry cold for best results. Don’t overload with toppings to ensure proper puffing. Sauté onions gently for sweetness. Rotate the pan halfway through baking for even browning. For gluten-free or dairy-free, use appropriate substitutes. Leftovers reheat best in the oven, not microwave.
Nutrition
- Serving Size: 1/6 of tart
- Calories: 240
- Sugar: 2
- Sodium: 320
- Fat: 15
- Saturated Fat: 8
- Carbohydrates: 18
- Fiber: 1
- Protein: 7
Keywords: spring onion tart, goat cheese tart, puff pastry brunch, savory tart, easy brunch recipe, vegetarian tart, spring onions, goat cheese, puff pastry