Third time in two weeks and I finally stopped overthinking the blue layer. The first batch of my Red White and Blue Layered Labor Day Trifle looked like a sad, bleeding watercolor painting—blueberries had sunk, red layer bled into the white, and honestly, it tasted fine but looked like a science experiment gone wrong. By attempt number two, I realized the trick wasn’t more gelatin or fancier equipment. It was patience. And a little bit of strategic layering. By the third go, my husband walked into the kitchen, stopped mid-step, and said, “Wait, you made that?” That’s the moment I knew this dessert had earned its spot at every summer gathering from here on out. This isn’t just another pretty layered dessert—it’s the one that makes people pull out their phones before they even grab a fork. And honestly? That’s exactly what you want when you’re showing up to a cookout or hosting your own backyard bash.
The best part about this red white and blue trifle is how forgiving it actually is once you understand the rhythm. It looks like you spent hours fussing over every detail, but really, it’s just smart assembly and a few simple tricks. I’ve tested this with store-bought angel food cake and homemade, with fresh berries and frozen, with instant pudding and from-scratch custard. Every version worked, but I’m sharing the one that consistently gets the biggest reaction—the one where people take a bite, look at the layers, and ask if you cater. That’s the kind of compliment you carry around for the rest of the summer.
Why You’ll Love This Recipe
- No-Bake Wonder : No oven required, which means your kitchen stays cool even on the hottest Labor Day weekend. Just assemble and chill.
- Patriotic Perfection : The natural red, white, and blue layers come together beautifully without artificial food coloring. Fresh strawberries and blueberries do all the heavy lifting.
- Make-Ahead Magic : This trifle actually tastes better after a few hours in the fridge. You can assemble it the night before your party and just pull it out when guests arrive.
- Crowd-Sized Portions : A large trifle dish serves 12-16 people easily. Perfect for potlucks, block parties, and family reunions.
- Customizable Layers : Swap out cake types, pudding flavors, or fruit combinations without changing the structure. It’s a template for summer dessert creativity.
I’ve made this for three different gatherings now and every single time, someone asks for the recipe before they’ve even finished their first serving. There’s something about those clean, defined layers that makes people think you’re a pastry chef. Let me tell you—I am not a pastry chef. I’m just someone who figured out that chilling each layer before adding the next makes all the difference. This red white and blue trifle is the dessert equivalent of showing up in a perfectly tailored dress that you actually found on clearance. It looks expensive and complicated, but you know the secret.
What Ingredients You Will Need
This recipe relies on simple, grocery-store ingredients that come together to create something far greater than the sum of their parts. The key is quality and preparation—fresh berries, good vanilla, and a little patience.
- 1 store-bought angel food cake (about 10-12 ounces), cut into 1-inch cubes — I prefer the bakery section cakes over the boxed ones for better texture, but boxed works fine in a pinch
- 2 pounds fresh strawberries, hulled and sliced ¼-inch thick — look for bright red, fragrant berries with no soft spots; if strawberries aren’t in season, frozen sliced strawberries (thawed and drained) work surprisingly well
- 2 pints fresh blueberries — smaller berries hold up better in layers and distribute more evenly; avoid any that look shriveled or mushy
- 2 packages (3.4 ounces each) instant vanilla pudding mix — Jell-O brand gives the creamiest result, but store brands work too; do not use cook-and-serve pudding for this recipe
- 4 cups cold whole milk — whole milk creates a richer, thicker pudding; 2% works but won’t be as luscious; avoid skim milk as the pudding won’t set properly
- 2 cups heavy whipping cream — must be cold for best whipping results; look for cream with at least 36% milk fat
- ¼ cup powdered sugar — sifted to avoid lumps in the whipped cream
- 1 teaspoon vanilla extract — pure vanilla extract makes a noticeable difference; imitation vanilla will taste artificial in the whipped cream layer
- ¼ cup strawberry jam or preserves — warmed slightly for easier spreading; seedless jam gives a smoother finish, but I actually prefer the texture of preserves here
- Fresh mint leaves for garnish (optional but gorgeous)
For the berry maceration, you’ll also want 2 tablespoons granulated sugar and 1 tablespoon fresh lemon juice. This step draws out the natural juices and creates a light syrup that soaks into the cake layers beautifully. Don’t skip it—it’s the difference between a dry trifle and one that makes people close their eyes when they eat it.
Equipment Needed
- Large trifle dish (4-quart capacity, about 10-12 cups) — glass is best so the layers show through; a clear glass bowl works if you don’t have a traditional trifle dish
- Electric mixer (stand mixer or hand mixer) — for whipping the cream to stiff peaks; a whisk and strong arm work but take significantly longer
- Large mixing bowls (at least 3) — one for pudding, one for whipped cream, one for macerating berries
- Rubber spatula — for folding and spreading layers without disturbing what’s underneath
- Sharp chef’s knife and cutting board — for slicing strawberries and cubing cake
- Measuring cups and spoons
- Small saucepan — for warming the jam if needed
- Pastry brush (optional) — for brushing jam onto cake layers
If you don’t own a trifle dish, don’t run out and buy one just for this recipe. A large glass salad bowl or even a wide-mouth glass vase (food-safe, of course) will show off the layers just as well. I’ve made this in a 9×13 glass baking dish before and it still looked stunning—just wider and shorter. The key is transparency so those red white and blue layers can shine through.
Preparation Method
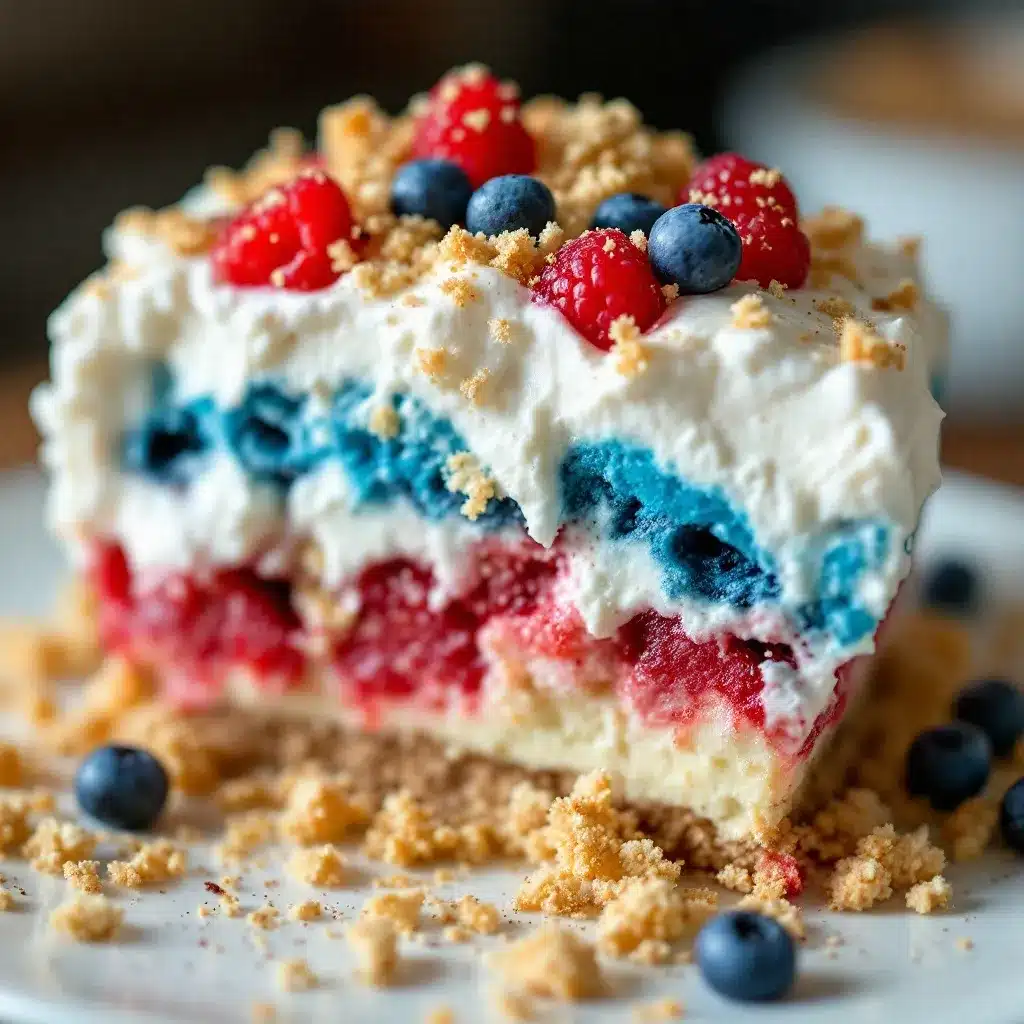
Step 1: Macerate the Berries
In a medium bowl, combine the sliced strawberries with 1 tablespoon of granulated sugar and the lemon juice. In a separate bowl, combine the blueberries with the remaining 1 tablespoon of sugar. Let both sit at room temperature for 15-20 minutes, stirring gently once or twice. The sugar draws out the berries’ natural juices, creating a light syrup that will soak into the cake layers. Don’t skip this step—it’s what gives the trifle that perfect, not-too-dry texture.
Step 2: Make the Pudding
In a large bowl, whisk together both packages of instant vanilla pudding mix with 4 cups of cold whole milk. Whisk vigorously for about 2 minutes until the mixture thickens. It will seem thin at first, then suddenly tighten up. Let it sit for 5 minutes to fully set. Cover with plastic wrap pressed directly onto the surface to prevent a skin from forming, then refrigerate while you prepare the other components.
Step 3: Whip the Cream
In a chilled bowl, combine 2 cups of heavy whipping cream, ¼ cup of sifted powdered sugar, and 1 teaspoon of vanilla extract. Beat on medium-high speed until soft peaks form, about 3-4 minutes, then increase speed slightly and beat until stiff peaks hold their shape. Be careful not to over-whip or you’ll end up with butter. You want the cream to be billowy and smooth, not grainy.
Step 4: Fold Pudding and Cream Together
Gently fold about one-third of the whipped cream into the prepared pudding until fully combined. This lightens the pudding and makes it easier to spread. Then fold in the remaining whipped cream in two additions, being careful not to deflate the mixture. You want a smooth, airy, mousse-like consistency. Set aside about ½ cup of the plain whipped cream for the top layer if you want extra decoration later.
Step 5: Prepare the Cake
Cut the angel food cake into 1-inch cubes. If the cake seems very dry, you can lightly brush the cubes with a little milk or simple syrup, but the macerated berry juices usually provide enough moisture. Spread the cubes out on a baking sheet in a single layer while you work—this prevents them from sticking together.
Step 6: Warm the Jam
In a small saucepan over low heat, warm the strawberry jam until it becomes loose and spreadable, about 30 seconds. You can also microwave it in a small bowl for 15-20 seconds. Set aside to cool slightly while you start layering.
Step 7: Assemble the First Layer
Spread a thin layer of the pudding-cream mixture (about ½ cup) on the bottom of your trifle dish. This creates a sticky base that keeps the first cake layer from shifting. Arrange half of the angel food cake cubes in an even layer over the pudding. Don’t press them down—just scatter them evenly. Drizzle half of the strawberry juices from the macerated berries over the cake cubes.
Step 8: Add the Red Layer
Spoon the macerated strawberries evenly over the cake layer. Use a slotted spoon to leave most of the excess juice behind in the bowl—you want the berries, not a pool of liquid. Drizzle about half of the warmed strawberry jam over the strawberries in a zigzag pattern. This adds concentrated strawberry flavor and helps the red layer stand out visually.
Step 9: Add the White Layer
Carefully spread half of the remaining pudding-cream mixture over the strawberry layer. Use a spatula to spread it gently to the edges without disturbing the berries underneath. The key here is to go slowly and let the mixture flow naturally rather than forcing it. Smooth the top as evenly as possible.
Step 10: Repeat the Cake Layer
Add the remaining angel food cake cubes in an even layer over the white pudding layer. Drizzle the remaining strawberry juices (from the blueberry bowl this time) over the cake. Then drizzle the remaining warmed strawberry jam in a zigzag pattern.
Step 11: Add the Blue Layer
Spoon the macerated blueberries evenly over the cake layer. Again, use a slotted spoon to leave excess juice behind. Spread the blueberries into an even layer, pressing gently to nestle them into the cake.
Step 12: Top with Remaining White Layer
Spread the remaining pudding-cream mixture over the blueberries, smoothing the top with a spatula. If you reserved some plain whipped cream, you can pipe or dollop it on top for extra visual interest. The top should be smooth and even, with no berries peeking through.
Step 13: Chill and Set
Cover the trifle loosely with plastic wrap and refrigerate for at least 4 hours, but overnight is better. This resting time allows the flavors to meld, the cake to absorb the berry juices, and the layers to set firmly. A well-chilled trifle slices cleanly and holds its shape when served.
Step 14: Garnish and Serve
Just before serving, arrange a few fresh strawberries, blueberries, and mint leaves on top for that show-stopping presentation. The contrast of the fresh fruit against the creamy white top is what makes people gasp. Serve directly from the trifle dish using a large spoon that reaches all the way to the bottom, ensuring everyone gets a bit of every layer.
Cooking Tips & Techniques
Chill Between Layers for Clean Lines
The single most important tip for achieving those gorgeous, defined layers is to chill the trifle for 15-20 minutes after adding each major layer. I know it feels tedious, but it prevents the colors from bleeding into each other. The first time I made this, I rushed through assembly and ended up with a pinkish-purple mess. Now I pop the dish in the fridge while I prepare the next component, and the difference is night and day.
Drain Your Berries Well
Macerated berries release a lot of liquid. If you dump everything in without draining, your trifle will be soupy. Use a slotted spoon to transfer the berries, and reserve the juice for drizzling over the cake layers only. The cake soaks up the juice beautifully, but the pudding layer doesn’t need extra liquid.
Room Temperature Ingredients for Pudding
Instant pudding actually sets better when the milk is cold straight from the fridge. Don’t let the milk warm up before mixing. For the whipped cream, though, everything should be cold—bowl, beaters, and cream. Warm cream won’t whip properly.
Don’t Overmix the Pudding-Cream Mixture
When folding the whipped cream into the pudding, stop as soon as you don’t see white streaks. Overmixing deflates the air you just whipped in, resulting in a dense, heavy trifle instead of a light, airy one. A few small lumps are fine—they’ll disappear during chilling.
Use a Serrated Knife for Cake
Angel food cake is delicate and squishes easily under a regular chef’s knife. A serrated knife with a gentle sawing motion gives you clean cubes without crushing the cake. If you don’t have one, tear the cake into rough chunks instead—it looks rustic but works perfectly.
Variations & Adaptations
Berry Swap
Not a fan of strawberries? Use raspberries for the red layer instead. They’re a bit tarter, which balances the sweetness of the pudding beautifully. For the blue layer, blackberries work as a substitute, though they’re technically purple. The flavor is still fantastic.
Cake Alternatives
Angel food cake is classic, but pound cake, vanilla sponge cake, or even lemon loaf cake work wonderfully. If you’re gluten-free, use a gluten-free vanilla cake or ladyfingers. The texture will be slightly different, but the structure holds up. I’ve even used leftover mini lemon blueberry cheesecakes crumbled into chunks for a decadent twist—absolutely incredible.
Dairy-Free Version
Substitute the whole milk with full-fat oat milk or coconut milk (from a carton, not a can) for the pudding. Use coconut cream or a store-bought dairy-free whipped topping instead of heavy cream. The texture won’t be quite as rich, but the flavor is still delicious and the layers look just as stunning.
Different Pudding Flavors
Vanilla is classic, but cheesecake-flavored instant pudding adds a tangy note that pairs beautifully with the berries. White chocolate pudding makes the dessert even sweeter and more indulgent. For a lighter option, sugar-free vanilla pudding works perfectly without sacrificing texture.
Grilled Fruit Version
For a smoky summer twist, grill the strawberries and blueberries for 2-3 minutes before macerating them. The char adds a depth of flavor that’s unexpected and incredible. I tried this on a whim last July and it’s become my secret-weapon version for adult gatherings. Pair it with a creamy homemade horchata for a truly memorable summer spread.
Serving & Storage Suggestions
Serve this trifle chilled, straight from the refrigerator. The layers are most defined when the dessert is cold, and the flavors are brightest after at least 4 hours of resting. I like to let it sit at room temperature for about 10 minutes before serving—just enough to take the chill off without compromising the structure.
For presentation, a large glass trifle dish is ideal because guests can see the layers before you even scoop. If you’re bringing this to a potluck, assemble it in a disposable clear plastic container with a lid. It travels well and the lid protects the top during transport. Just add the fresh fruit garnish after you arrive.
Storage
Cover the trifle tightly with plastic wrap or a lid and refrigerate for up to 3 days. The flavor actually improves after day one as the cake absorbs more berry juice and the pudding sets completely. After day three, the cake starts to break down and the berries release more liquid, so it’s best enjoyed within 48 hours of assembly.
Freezing
I don’t recommend freezing this trifle. The texture of the pudding and cream becomes grainy upon thawing, and the berries release too much liquid. If you have leftovers, enjoy them within a few days or repurpose the components—the cake-berry mixture makes an excellent base for a quick parfait.
Reheating
This is a cold dessert, so no reheating needed. However, if you’ve stored it for a day or two, you might notice some liquid separation at the bottom. Simply stir the top layer gently before serving to redistribute the moisture. It’s normal and doesn’t affect the flavor.
Nutritional Information & Benefits
Per serving (based on 12 servings): Approximately 380 calories, 18g fat, 48g carbohydrates, 5g protein, 32g sugar, 2g fiber. These values are estimates and will vary based on specific ingredients and portion sizes.
This red white and blue trifle isn’t health food, but it does offer some nutritional bright spots. Strawberries and blueberries are packed with antioxidants, vitamin C, and fiber. The berries provide natural sweetness, which means you can reduce the added sugar in the pudding layer if you prefer a less sweet dessert. Angel food cake is lower in fat than most cakes, and using whole milk adds calcium and protein to the pudding layer.
For a lighter version, use sugar-free pudding mix, skim milk, and a store-bought light whipped topping. You’ll save about 100 calories per serving without sacrificing the visual impact. The berries do most of the heavy lifting for flavor anyway.
If you’re serving this to a crowd with dietary restrictions, note that this recipe contains dairy and gluten (from the cake). For a gluten-free version, use a gluten-free angel food cake or vanilla cake. For dairy-free, follow the substitutions listed in the variations section. Always check labels on pudding mixes and whipped toppings for hidden allergens.
Conclusion
This Show-Stopping Red White and Blue Layered Labor Day Trifle is the kind of dessert that makes you look like a hero without requiring you to actually be one. It’s forgiving, adaptable, and absolutely gorgeous—the perfect combination for a holiday weekend when you want to impress without stress. Whether you’re hosting a backyard barbecue, heading to a block party, or just celebrating the end of summer with family, this trifle delivers every single time.
I love this recipe because it captures everything I want from a summer dessert: it’s cold, creamy, fruity, and visually stunning. The first time I brought it to a cookout, I watched three different people take photos before they even tasted it. Then they tasted it and went back for seconds. That’s the kind of reaction you can’t fake, and it’s the reason I keep coming back to this recipe year after year.
Now I want to hear from you! Have you tried making a layered trifle before? What’s your favorite fruit combination for summer desserts? Drop a comment below and let me know how your red white and blue trifle turns out—I read every single one and love seeing your creations. Don’t forget to share this recipe with a friend who loves patriotic desserts, and pin it for next year’s Labor Day celebration!
Frequently Asked Questions
Can I make this trifle a day ahead of time?
Absolutely! In fact, I recommend it. Making this trifle 24 hours in advance allows the flavors to meld and the layers to set perfectly. Just hold off on adding the fresh fruit garnish until right before serving. The trifle will look and taste even better after an overnight rest in the fridge.
Why did my layers bleed together?
Layer bleeding usually happens when the pudding-cream mixture isn’t thick enough or when you add the layers too quickly. Make sure your pudding is fully set before folding in the whipped cream, and chill the trifle for 15-20 minutes between each major layer. Also, drain your macerated berries well—excess liquid is the number one cause of bleeding layers.
Can I use frozen berries instead of fresh?
Yes, but with one important adjustment. Thaw frozen berries completely and drain them thoroughly before using. Frozen berries release more liquid than fresh, so you’ll need to be extra careful about draining. I recommend using frozen berries only if fresh ones aren’t available, and expect a slightly softer texture in the final dessert.
How do I get clean, defined layers when serving?
Use a large, flat-bottomed serving spoon and push straight down through all the layers before scooping outward. This gives each person a perfect cross-section of the trifle. If you scoop from the side, you’ll only get one or two layers. A trifle server or a wide spatula works even better than a regular spoon.
Can I use homemade pudding instead of instant?
You can, but the texture won’t be quite the same. Homemade pudding is thinner than instant pudding, which means it won’t hold the layers as firmly. If you prefer homemade, cook it until it’s very thick, then cool it completely before folding in the whipped cream. You may need to add an extra tablespoon of cornstarch to achieve the right consistency for layering.
Pin This Recipe!
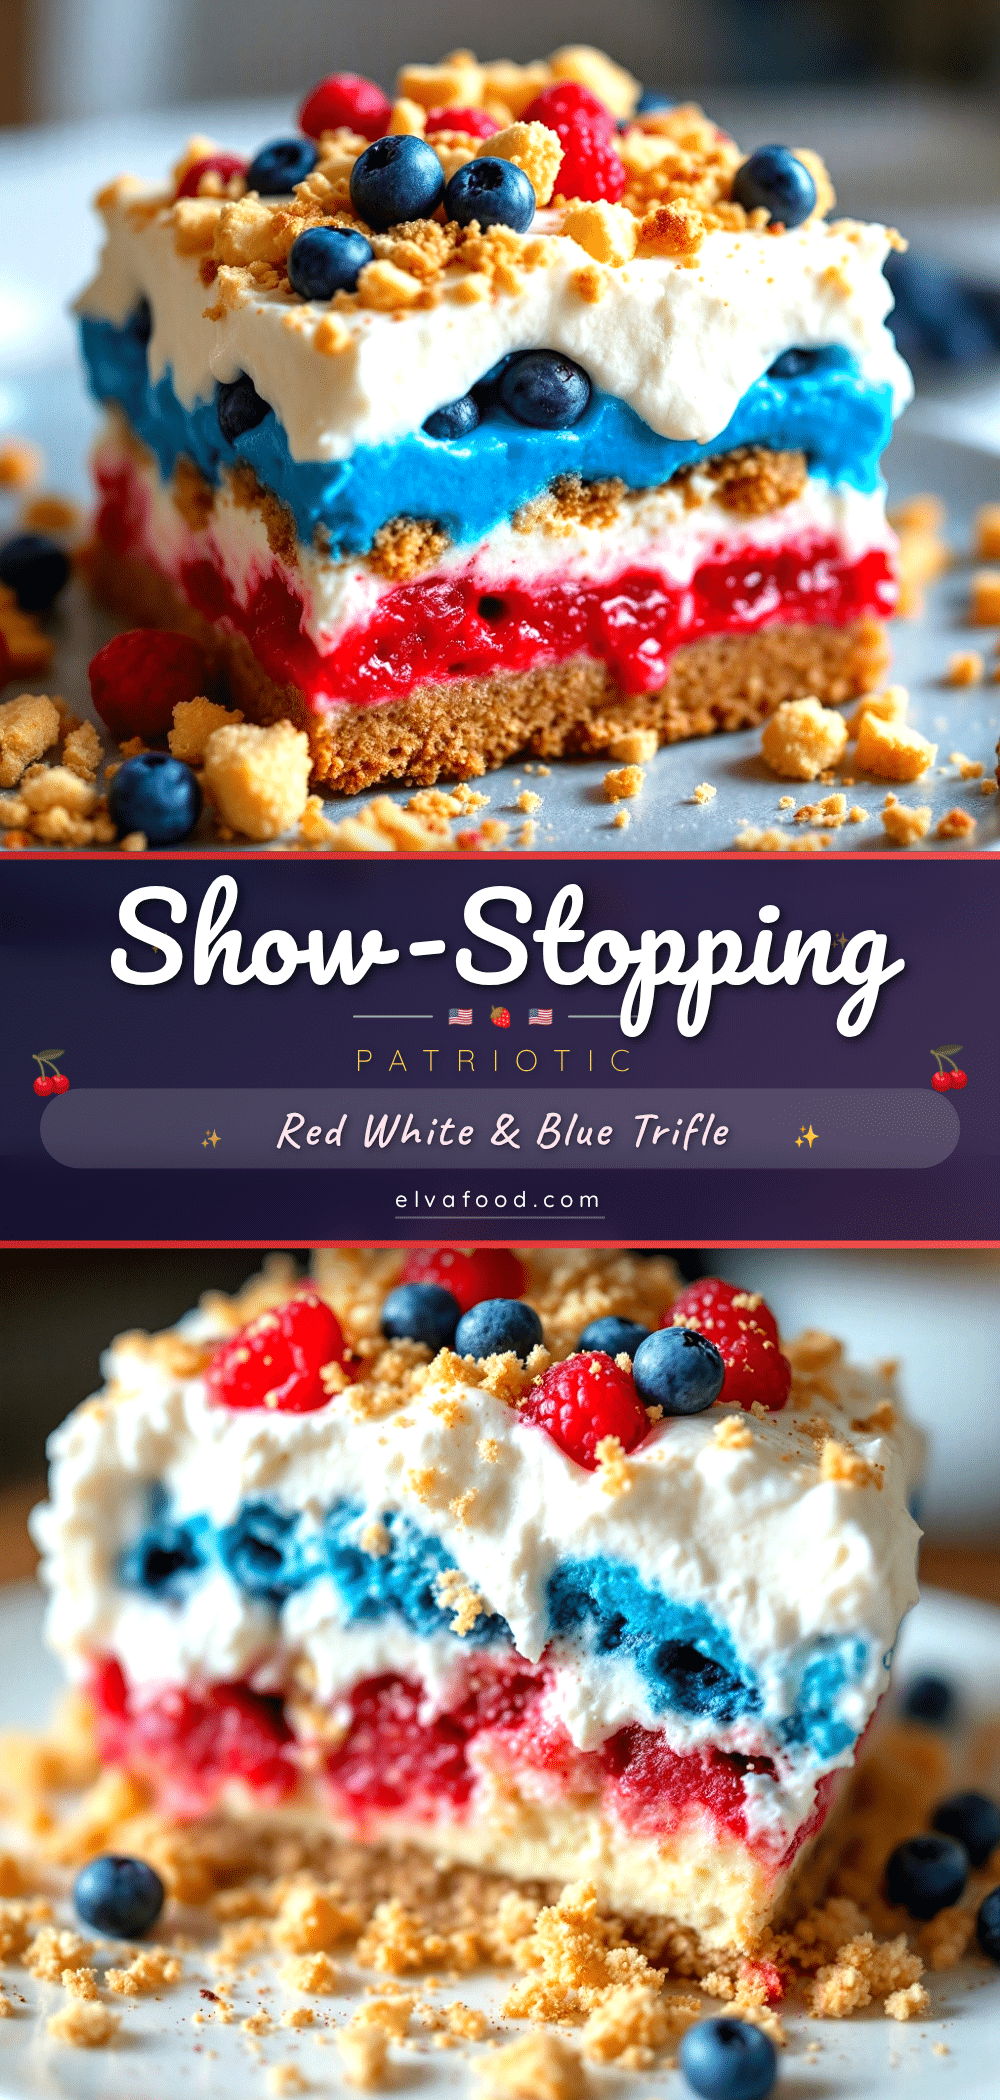
Show-Stopping Red White and Blue Layered Labor Day Trifle
A stunning no-bake trifle with layers of angel food cake, fresh strawberries, blueberries, and creamy vanilla pudding. Perfect for patriotic celebrations and summer gatherings.
- Prep Time: 30 minutes
- Cook Time: 0 minutes
- Total Time: 4 hours 30 minutes (includes chilling)
- Yield: 12 servings 1x
- Category: Dessert
- Cuisine: American
Ingredients
- 1 store-bought angel food cake (about 10–12 ounces), cut into 1-inch cubes
- 2 pounds fresh strawberries, hulled and sliced ¼-inch thick
- 2 pints fresh blueberries
- 2 packages (3.4 ounces each) instant vanilla pudding mix
- 4 cups cold whole milk
- 2 cups heavy whipping cream
- ¼ cup powdered sugar, sifted
- 1 teaspoon vanilla extract
- ¼ cup strawberry jam or preserves, warmed
- Fresh mint leaves for garnish (optional)
- 2 tablespoons granulated sugar
- 1 tablespoon fresh lemon juice
Instructions
- Macerate the Berries: In a medium bowl, combine sliced strawberries with 1 tablespoon granulated sugar and lemon juice. In a separate bowl, combine blueberries with remaining 1 tablespoon sugar. Let both sit at room temperature for 15-20 minutes, stirring gently once or twice.
- Make the Pudding: In a large bowl, whisk together both packages of instant vanilla pudding mix with 4 cups cold whole milk. Whisk vigorously for about 2 minutes until thickened. Let sit for 5 minutes to fully set. Cover with plastic wrap pressed onto the surface and refrigerate.
- Whip the Cream: In a chilled bowl, combine heavy whipping cream, sifted powdered sugar, and vanilla extract. Beat on medium-high speed until soft peaks form, about 3-4 minutes, then beat until stiff peaks hold their shape.
- Fold Pudding and Cream Together: Gently fold about one-third of the whipped cream into the prepared pudding until combined. Fold in remaining whipped cream in two additions until smooth and airy. Set aside about ½ cup plain whipped cream for top decoration if desired.
- Prepare the Cake: Cut angel food cake into 1-inch cubes. Spread cubes out on a baking sheet in a single layer.
- Warm the Jam: In a small saucepan over low heat, warm strawberry jam until loose and spreadable, about 30 seconds. Set aside to cool slightly.
- Assemble the First Layer: Spread a thin layer (about ½ cup) of pudding-cream mixture on the bottom of a trifle dish. Arrange half of the cake cubes in an even layer. Drizzle half of the strawberry juices over the cake.
- Add the Red Layer: Spoon macerated strawberries evenly over the cake layer using a slotted spoon. Drizzle about half of the warmed strawberry jam over the strawberries.
- Add the White Layer: Carefully spread half of the remaining pudding-cream mixture over the strawberry layer. Smooth the top.
- Repeat the Cake Layer: Add remaining cake cubes in an even layer. Drizzle remaining strawberry juices (from blueberry bowl) over the cake, then remaining warmed jam.
- Add the Blue Layer: Spoon macerated blueberries evenly over the cake layer using a slotted spoon. Spread into an even layer.
- Top with Remaining White Layer: Spread remaining pudding-cream mixture over the blueberries, smoothing the top. Pipe or dollop reserved plain whipped cream on top if desired.
- Chill and Set: Cover loosely with plastic wrap and refrigerate for at least 4 hours, preferably overnight.
- Garnish and Serve: Just before serving, arrange fresh strawberries, blueberries, and mint leaves on top. Serve directly from the trifle dish.
Notes
Chill between layers for clean lines. Drain berries well to avoid soupy trifle. Use cold milk for pudding and cold cream for whipping. Don’t overmix the pudding-cream mixture. Use a serrated knife for cutting angel food cake. Trifle can be made a day ahead; add fresh fruit garnish just before serving.
Nutrition
- Serving Size: 1 serving (based on
- Calories: 380
- Sugar: 32
- Sodium: 320
- Fat: 18
- Saturated Fat: 11
- Carbohydrates: 48
- Fiber: 2
- Protein: 5
Keywords: red white and blue trifle, labor day dessert, patriotic dessert, no-bake dessert, berry trifle, angel food cake trifle, summer dessert


