“You really think strawberries and cream cheese can dance together without baking?” my skeptical friend asked when I first whipped up these creamy no-bake strawberry cheesecake bars. Honestly, I wasn’t sure either. It started as a lazy Sunday experiment — no oven, no fuss, just a craving for something sweet and fresh. The kitchen smelled faintly of vanilla and crushed graham crackers, with a hint of strawberry jam warming up on the counter. I wasn’t aiming for perfection, just something quick and satisfying.
But as I lifted that first forkful, the smooth, velvety cheesecake layer combined with the bright, fruity strawberry topping surprised both of us. It wasn’t just good; it was a little moment of magic. The crust held just enough crunch, the filling was luscious without being too heavy, and that strawberry layer? Pure summer in every bite. Since then, these cheesecake bars have become my go-to dessert — especially on days when the oven feels like too much work.
There’s something quietly special about how easy this recipe comes together. No complicated steps, no need to time the oven perfectly, just a reliable, creamy dessert that everyone seems to ask about whenever it’s on the table. I guess that’s why I keep coming back to it — it turns simple ingredients into a treat that feels like a small celebration. So, if you’ve been searching for a dessert that’s both effortless and indulgent, these creamy no-bake strawberry cheesecake bars might just be your new favorite.
Why You’ll Love This Recipe
Having tested countless cheesecake recipes over the years, I can honestly say this one stands out for a bunch of reasons. It’s a real crowd-pleaser that doesn’t require standing by the oven or fiddling with tricky techniques.
- Quick & Easy: Ready in under 30 minutes, perfect for busy weeknights or last-minute dessert cravings.
- Simple Ingredients: No exotic or hard-to-find items — just basics you probably have on hand.
- Perfect for Any Occasion: Whether it’s a casual get-together or a summer barbecue, these bars fit right in.
- Crowd-Pleaser: Kids and adults alike can’t seem to get enough, making it a reliable hit.
- Unbelievably Delicious: The creamy texture combined with sweet-tart strawberries hits that comfort-food sweet spot.
What really sets this recipe apart is the way the cheesecake filling is whipped to a light, airy creaminess without any baking. I use a touch of sour cream in the mix for just the right tang, which balances the sweetness beautifully. And instead of a plain graham cracker crust, I like to add a pinch of cinnamon to add warmth without overpowering the fresh strawberry topping.
Honestly, this isn’t just another strawberry cheesecake bar — it’s the version that makes you pause mid-bite, savoring each mouthful. It feels like a little treat you can whip up anytime without stress. If you appreciate easy desserts that taste like you spent hours, this recipe will quickly become a staple in your rotation.
What Ingredients You Will Need
This recipe uses simple, wholesome ingredients to deliver bold flavor and a satisfyingly creamy texture without any fuss. Most of these are pantry staples, with fresh strawberries adding that seasonal touch.
- For the Crust:
- 1 ½ cups (150g) graham cracker crumbs (I prefer the honey-flavored kind for extra sweetness)
- 5 tablespoons (70g) unsalted butter, melted (use salted if that’s what you have, but reduce salt elsewhere)
- 1 tablespoon granulated sugar
- ½ teaspoon ground cinnamon (optional but recommended for warmth)
- For the Cheesecake Layer:
- 16 ounces (450g) cream cheese, softened (Philadelphia brand works great for smoothness)
- ⅔ cup (130g) granulated sugar
- 1 teaspoon pure vanilla extract
- ½ cup (120ml) sour cream (adds a subtle tang and creaminess)
- 1 cup (240ml) heavy whipping cream, cold (for whipping to lightness)
- For the Strawberry Topping:
- 2 cups (300g) fresh strawberries, hulled and sliced (use frozen if out of season; thaw and drain)
- ¼ cup (50g) granulated sugar
- 1 tablespoon lemon juice (brightens the strawberry flavor)
- 1 teaspoon cornstarch (to thicken the topping slightly)
If you need a gluten-free option, almond flour or gluten-free graham cracker crumbs work well for the crust. For a dairy-free twist, swap cream cheese and sour cream with coconut cream-based alternatives and use coconut milk for whipping, though the texture will be a bit different.
Equipment Needed
- 9×9-inch (23x23cm) square baking pan — lined with parchment paper for easy removal
- Mixing bowls — one large for the crust, one medium for the cheesecake filling, and a small one for the strawberry topping
- Electric mixer or stand mixer with a whisk attachment — essential for whipping the cream to soft peaks
- Measuring cups and spoons — accuracy helps keep the texture just right
- Rubber spatula — great for folding ingredients together gently
- Small saucepan — for gently cooking the strawberry topping
If you don’t have a stand mixer, a hand mixer will do fine. When I first made this, I used a sturdy whisk and a lot of arm power — it works, but it’s definitely more tiring! For budget-friendly options, silicone spatulas and glass mixing bowls make cleanup easier without breaking the bank.
Preparation Method
- Prepare the crust: Preheat your oven to 350°F (175°C) if you want a slightly firmer crust, though this recipe works well even if you skip baking. Combine graham cracker crumbs, sugar, and cinnamon in a bowl. Pour in melted butter and stir until the crumbs are evenly coated and look like wet sand. Press firmly into the bottom of your lined pan. If baking, bake for 8-10 minutes, then cool completely. If no baking, chill the crust in the fridge while you prepare the filling.
- Make the strawberry topping: In a small saucepan, combine sliced strawberries, sugar, lemon juice, and cornstarch. Cook over medium heat, stirring frequently, until the mixture thickens and the strawberries soften, about 5-7 minutes. Remove from heat and let cool completely. This step is crucial — warm topping can melt your cheesecake layer and ruin the texture.
- Prepare the cheesecake filling: In a large bowl, beat the softened cream cheese with sugar and vanilla extract until smooth and creamy. Add sour cream and mix until well combined. In a separate chilled bowl, whip the heavy cream to soft peaks. Gently fold the whipped cream into the cream cheese mixture in batches, using a spatula. Take care not to overmix — you want to keep that airy texture.
- Assemble the bars: Spread the cheesecake filling evenly over the cooled crust. Smooth the top with a spatula. Spoon the cooled strawberry topping over the cheesecake layer, spreading gently. For a marbled effect, you can lightly swirl the topping into the cheesecake layer but don’t overdo it.
- Chill and set: Refrigerate the assembled bars for at least 4 hours or overnight. This allows the filling to firm up and the flavors to meld beautifully.
- Serve: Once set, lift the bars out of the pan using the parchment paper edges and cut into squares. Use a sharp knife dipped in hot water for cleaner cuts. Serve chilled and enjoy the creamy, fruity goodness.
Pro tip: If your cream cheese isn’t soft enough, zap it in the microwave for 10 seconds at a time. Too cold cream cheese can cause lumps, and no one wants that in their cheesecake bars.
Cooking Tips & Techniques
Getting that perfect creamy texture in no-bake cheesecake bars can be a little tricky if you’re new to it. Here’s what I’ve learned:
- Softening cream cheese: This step is non-negotiable. Cold cream cheese leads to lumps and frustration. I usually leave mine out for about 30 minutes before mixing.
- Whipping cream: Use cold heavy cream and chilled bowls for best volume. Whip until soft peaks form — that means the cream holds shape but still looks silky. Overwhipping can cause it to turn grainy, so watch closely.
- Folding technique: When combining whipped cream with cream cheese, fold gently with a spatula. Stirring too hard deflates the air you just whipped in, resulting in a dense filling.
- Strawberry topping consistency: The cornstarch is vital for thickening the topping so it doesn’t run off the bars. Stir constantly while cooking to avoid lumps.
- Cutting bars: Chill thoroughly before slicing. A warm filling will make messy cuts. For clean edges, wipe your knife between slices or dip it in hot water.
One time, I forgot to chill the filling overnight and cut into the bars too soon. The filling oozed out, and it was basically a cheesecake milkshake. Lesson learned — patience pays off!
Variations & Adaptations
This recipe is surprisingly flexible, so you can tweak it to fit your taste or dietary needs:
- Berry Swap: Instead of strawberries, try blueberries, raspberries, or a mixed berry topping. I once made a raspberry swirl version that was a hit at a brunch party.
- Chocolate Twist: Add a layer of melted dark chocolate between the crust and cheesecake filling for a richer dessert experience.
- Vegan/Dairy-Free: Use dairy-free cream cheese, coconut cream, and plant-based whipped topping. Keep in mind the texture will be a bit different but still delightful.
- Gluten-Free Crust: Swap graham crackers for gluten-free crumbs or crushed nuts like almonds or pecans.
- Flavor Boosters: Add a tablespoon of lemon zest to the cheesecake filling for a citrus punch or fold in finely chopped fresh mint for a refreshing touch.
For a quicker alternative, you can skip cooking the strawberry topping and simply mash fresh strawberries with a bit of sugar and lemon juice — though this topping won’t be as thick or glossy.
Serving & Storage Suggestions
These creamy no-bake strawberry cheesecake bars are best served chilled, straight from the fridge. The cool temperature keeps the filling firm and refreshing. I like to serve them on a simple white plate to let the vibrant red strawberry topping pop.
Pair these bars with light, fresh sides like a bowl of mixed berries or a cup of herbal tea to balance the richness. They also make a lovely finish to a cozy meal — maybe after something hearty like Irish lamb stew or alongside a crisp spring vegetable salad.
Store leftovers in an airtight container in the refrigerator for up to 4 days. You can freeze the bars for up to 2 months, but be sure to thaw them slowly in the fridge to preserve texture. Reheat is not recommended since it’s a no-bake cheesecake, but letting them sit at room temperature for 10 minutes before serving helps soften the texture slightly.
Flavors deepen after a day, making these bars even better the next day. I often make them a day ahead when hosting — saves time and tastes fantastic.
Nutritional Information & Benefits
Each serving of these cheesecake bars (assuming 12 servings) contains approximately:
| Calories | 280-300 kcal |
|---|---|
| Fat | 18g |
| Carbohydrates | 25g |
| Protein | 4g |
The recipe uses fresh strawberries, which are a great source of vitamin C and antioxidants. Using sour cream adds beneficial probiotics and tang, while cream cheese provides calcium and protein. If you swap to almond flour crust, you’ll get a boost of healthy fats and fiber.
Note: This dessert does contain dairy and gluten (unless modified), so it’s not suitable for those with allergies or intolerances unless substitutions are made.
From a balanced eating perspective, this recipe offers a nice sweet treat with some nutritional value from real ingredients — a welcome break from overly processed desserts.
Conclusion
These creamy no-bake strawberry cheesecake bars are exactly the kind of dessert that feels like a little victory in the kitchen — easy, delicious, and surprisingly impressive. Whether you’re whipping them up for unexpected guests or a quiet night in, they deliver that perfect mix of creamy richness and bright fruitiness without the hassle of baking.
Feel free to make this recipe your own by swapping berries, adding flavor twists, or trying dairy-free versions. I love how forgiving and flexible it is, which means you can always count on it to turn out well.
Personally, I always keep the ingredients on hand because I never know when a craving will hit. And when it does, this recipe is ready to bring a little sweetness and comfort to any day.
If you try it out, I’d love to hear how you made it yours — leave a comment below or share your variations!
FAQs
Can I use frozen strawberries for the topping?
Yes, just thaw them completely and drain any excess liquid before cooking the topping. This helps prevent a watery cheesecake bar.
How long do these no-bake cheesecake bars last in the fridge?
They keep well for up to 4 days when stored in an airtight container.
Is it possible to make these bars without sour cream?
You can substitute sour cream with Greek yogurt or omit it, but the tang and creaminess might be slightly less pronounced.
Can I make these bars ahead of time?
Absolutely! In fact, chilling them overnight improves the texture and flavor, making them even more delicious.
What if I don’t have an electric mixer?
You can whisk the cream by hand, but it will take more time and effort to reach soft peaks. Using room temperature cream cheese is even more important in this case to avoid lumps.
Pin This Recipe!
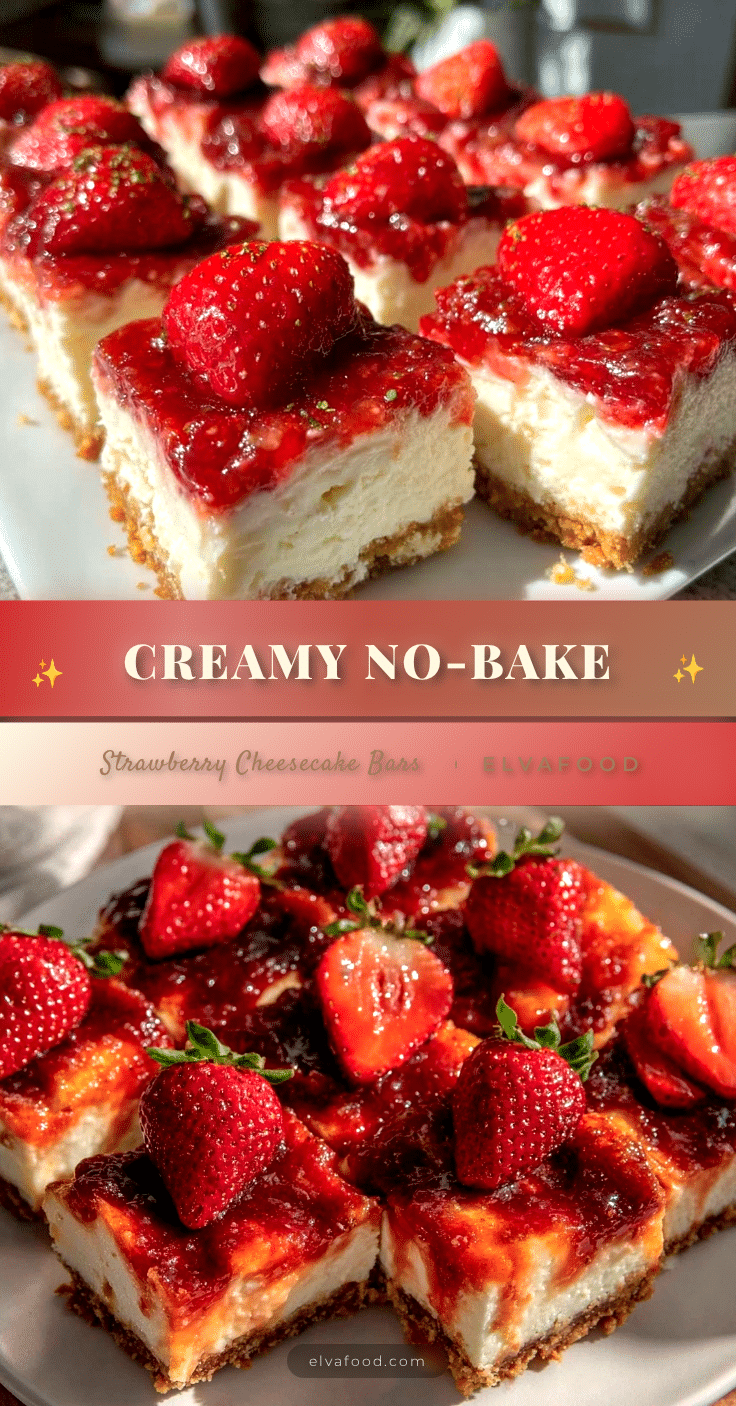
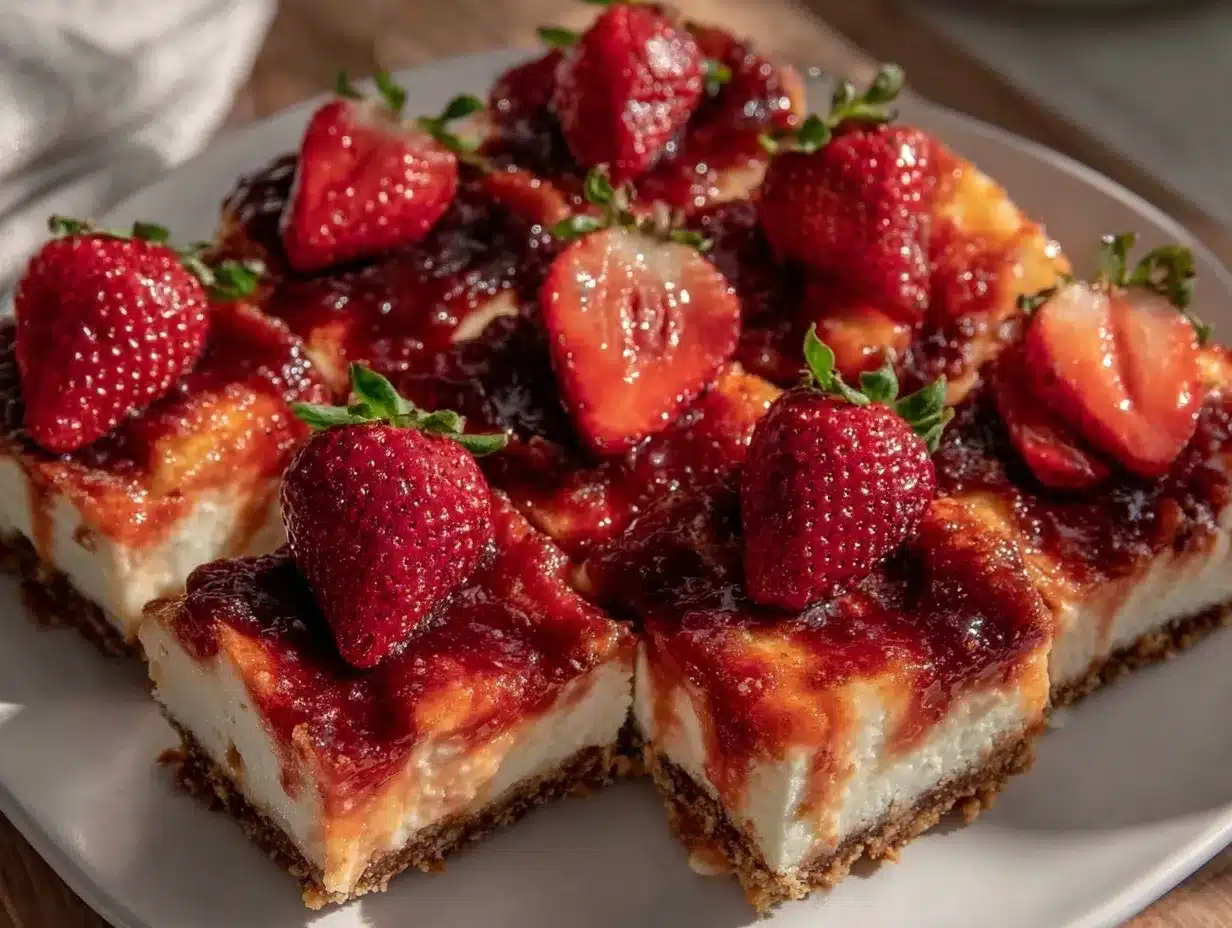
Creamy No-Bake Strawberry Cheesecake Bars
A quick and easy no-bake dessert featuring a crunchy graham cracker crust, light and airy cream cheese filling, and a sweet-tart strawberry topping. Perfect for any occasion and ready in under 30 minutes.
- Prep Time: 15 minutes
- Cook Time: 10 minutes
- Total Time: 4 hours 25 minutes
- Yield: 12 servings 1x
- Category: Dessert
- Cuisine: American
Ingredients
- 1 ½ cups (150g) graham cracker crumbs
- 5 tablespoons (70g) unsalted butter, melted
- 1 tablespoon granulated sugar
- ½ teaspoon ground cinnamon (optional)
- 16 ounces (450g) cream cheese, softened
- ⅔ cup (130g) granulated sugar
- 1 teaspoon pure vanilla extract
- ½ cup (120ml) sour cream
- 1 cup (240ml) heavy whipping cream, cold
- 2 cups (300g) fresh strawberries, hulled and sliced
- ¼ cup (50g) granulated sugar
- 1 tablespoon lemon juice
- 1 teaspoon cornstarch
Instructions
- Prepare the crust: Combine graham cracker crumbs, sugar, and cinnamon in a bowl. Pour in melted butter and stir until evenly coated. Press firmly into the bottom of a lined 9×9-inch pan. Optionally bake at 350°F for 8-10 minutes or chill in the fridge if not baking.
- Make the strawberry topping: In a small saucepan, combine sliced strawberries, sugar, lemon juice, and cornstarch. Cook over medium heat, stirring frequently, until thickened and strawberries soften, about 5-7 minutes. Remove from heat and cool completely.
- Prepare the cheesecake filling: Beat softened cream cheese with sugar and vanilla until smooth. Mix in sour cream. In a separate chilled bowl, whip heavy cream to soft peaks. Gently fold whipped cream into cream cheese mixture in batches.
- Assemble the bars: Spread cheesecake filling evenly over the cooled crust. Spoon cooled strawberry topping over the filling, spreading gently. Optionally swirl topping lightly for a marbled effect.
- Chill and set: Refrigerate for at least 4 hours or overnight to firm up and meld flavors.
- Serve: Lift bars out using parchment paper edges, cut into squares with a sharp knife dipped in hot water, and serve chilled.
Notes
Softening cream cheese before mixing is essential to avoid lumps. Use cold heavy cream and chilled bowls for best whipping results. Fold whipped cream gently to maintain airy texture. Chill bars thoroughly before slicing for clean cuts. Warm strawberry topping can ruin cheesecake texture, so cool completely before assembling.
Nutrition
- Serving Size: 1 bar (1/12th of rec
- Calories: 290
- Fat: 18
- Carbohydrates: 25
- Protein: 4
Keywords: no-bake cheesecake, strawberry cheesecake bars, easy dessert, summer dessert, creamy cheesecake, no oven dessert