“Hey, wait—do you see that star right there?” My friend nudged me, pointing at the night sky through the kitchen window as I was rolling out fondant for a birthday cake I was making on a whim. Honestly, I was skeptical about making a galaxy-themed cake, let alone one honoring the Gemini constellation. I mean, fondant and I have a love-hate relationship, and celestial designs always seemed a little too fancy for my weekend baking sessions. But that evening, the sparkly twinkle of stars paired with Gemini’s twin stars gave me an idea I couldn’t shake.
It started as a last-minute plan—birthday cake for a friend who was born under Gemini, and me with a box of fondant colors and way too much curiosity. The first try wasn’t perfect; the fondant cracked, the stars looked like a toddler’s scribbles, and I questioned if I should just call it quits. But something about the swirls of deep purples and blues, the sparkle dust, and the constellation pattern kept me going. By the third attempt, I realized this wasn’t just some pretty cake. It was a conversation starter, a piece of edible art, and honestly, a bit of magic on a plate.
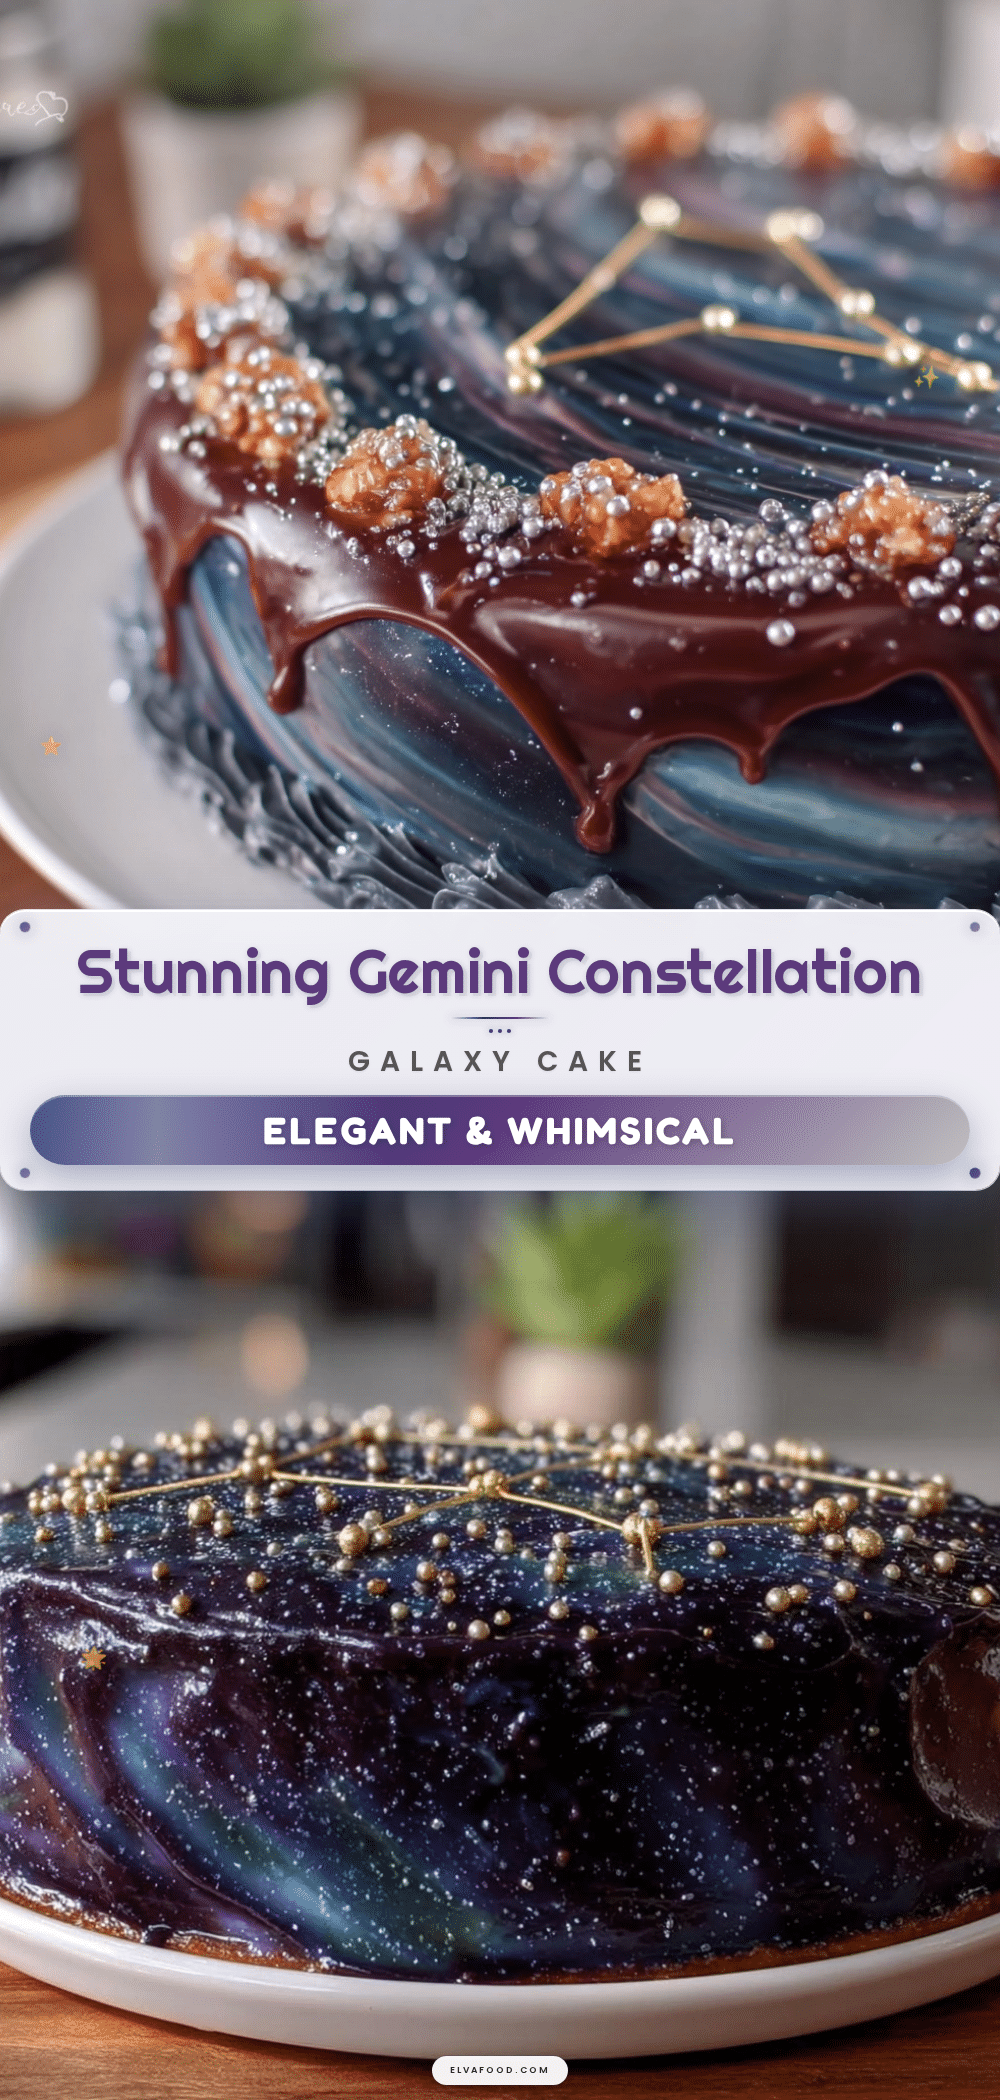
The Perfect Gemini Constellation Cake with Stunning Galaxy Fondant became more than a project; it turned into a little obsession. The blend of dark cosmos shades with shimmering stars is the kind of cake that makes people pause and say, “Wow.” It’s not just about the look either—the cake itself is moist, tender, and layered with creamy filling that balances the bold design beautifully.
What stuck with me was how approachable this cake actually is if you break it down step-by-step (which I’m about to do). So, if you’re eyeing a stunning galaxy cake that also honors the twins of the zodiac, this recipe might just become your go-to for birthdays or any night when you want a cake that’s as special as the stars.
Why You’ll Love This Recipe
After making this Gemini constellation cake several times, I’m confident it’s a winner for anyone who loves a show-stopping dessert without the fuss of complicated baking tricks. Here’s why this recipe stands out:
- Quick & Easy: The cake layers come together in about 45 minutes, making it perfect for last-minute celebrations or when you just can’t resist a creative baking fix.
- Simple Ingredients: You probably have most of these in your pantry already, from all-purpose flour to cocoa powder and basic fondant colors.
- Perfect for Celebrations: Whether it’s a birthday, astrology-themed party, or just a night to impress, this cake fits the bill beautifully.
- Crowd-Pleaser: I’ve seen kids and adults alike get excited over the galaxy design—and then love the moist, flavorful cake inside.
- Unbelievably Delicious: The tender crumb combined with smooth buttercream filling is a texture dream that keeps people coming back for more.
- Unique Artistic Twist: The galaxy fondant isn’t just a flat color—it’s a blend of blues, purples, and blacks, with edible shimmer dust creating that cosmic glow. Plus, the hand-painted Gemini constellation adds a personal, artsy touch that makes it stand apart from typical star cakes.
This isn’t just another fondant cake; it’s a blend of creativity and flavor that’s approachable for home bakers. Honestly, it’s the kind of cake that makes you close your eyes savoring the first bite and thinking, “I nailed this.” If you enjoy making magical party treats or experimenting with bold colors like in my favorite creamy homemade horchata, this cake will fit right into your baking adventures.
What Ingredients You Will Need
This recipe uses simple, wholesome ingredients to deliver a moist, flavorful cake and a stunning galaxy fondant finish without fuss. Most ingredients are pantry staples, and the fondant colors can be swapped or adjusted depending on your palette.
- For the Cake:
- 2 ½ cups all-purpose flour (about 312g), sifted
- 2 ½ tsp baking powder
- ½ tsp baking soda
- ½ tsp salt
- 1 cup unsalted butter, softened (227g) (I usually use Land O’Lakes for best texture)
- 1 ¾ cups granulated sugar (350g)
- 4 large eggs, room temperature
- 1 tbsp pure vanilla extract
- 1 cup whole milk (240 ml)
- 2 tbsp cocoa powder (unsweetened, for subtle depth in the cake)
- For the Buttercream Filling:
- 1 cup unsalted butter, softened (227g)
- 4 cups powdered sugar (480g), sifted
- 2 tsp vanilla extract
- 2-3 tbsp heavy cream or milk (for smooth consistency)
- Pinch of salt
- For the Galaxy Fondant:
- 4 cups pre-made white fondant (about 900g)
- Gel food coloring in navy blue, purple, black, and a touch of magenta
- Edible shimmer dust or luster dust in silver and pearl
- Edible white food coloring pen or white gel for constellation details
- Small star-shaped sprinkles (optional, for extra sparkle)
Pro tip: For a truly smooth fondant surface, I like to use Satin Ice fondant, which rolls out evenly and tastes better than many alternatives. If you want to keep it dairy-free, swap the butter and milk in the cake and frosting with plant-based alternatives—just watch the consistency of your buttercream.
Seasonal twist? Instead of classic buttercream, try a light cream cheese frosting for a tangier contrast. If you’re feeling adventurous, mini lemon blueberry cheesecakes are also a stellar pairing for anyone craving fruity freshness alongside the rich cake.
Equipment Needed
- Two 8-inch (20 cm) round cake pans – non-stick or lined with parchment paper for easy release
- Stand mixer or hand mixer – to whip the buttercream and batter smoothly
- Rolling pin – essential for working the fondant evenly
- Fondant smoother – highly recommended for that flawless galaxy finish; a clean plastic card can work as a budget-friendly substitute
- Offset spatula – for spreading frosting evenly between layers and around the cake
- Pastry brush or small paintbrush – for applying shimmer dust and painting constellation details
- Mixing bowls – several sizes for different tasks
- Measuring cups and spoons – precise measurements matter, especially with baking powder and soda
From my experience, using a stand mixer makes the buttercream ultra-fluffy, but if you only have a hand mixer, that works fine too—just mix a bit longer. For fondant, a silicone mat helps prevent sticking and makes rolling out smoother. I’ve tried both disposable and reusable mats, and reusable ones save money in the long run.
Preparation Method

- Preheat and prep pans: Set your oven to 350°F (175°C). Grease two 8-inch round cake pans and line the bottoms with parchment paper. This prevents sticking and ensures clean edges. (10 minutes prep)
- Mix dry ingredients: In a medium bowl, sift together the flour, baking powder, baking soda, salt, and cocoa powder. Sifting is key to avoid lumps and get a light texture. (5 minutes)
- Cream butter and sugar: In a large bowl, beat the softened butter and granulated sugar until pale and fluffy—about 4-5 minutes on medium speed. This air incorporation helps the cake rise nicely. (5 minutes)
- Add eggs and vanilla: Beat in eggs one at a time, mixing well after each addition. Then add vanilla extract. The batter may look a bit curdled at this point; it’s normal. (3 minutes)
- Alternate adding dry ingredients and milk: With mixer on low, add half the dry mixture, then half the milk. Repeat with the remaining dry and milk, mixing just until combined. Overmixing can make the cake tough. (4 minutes)
- Divide and bake: Pour batter evenly into the prepared pans. Smooth tops with an offset spatula. Bake for 28-32 minutes, or until a toothpick inserted comes out clean. Rotate pans halfway through baking for even cooking. (30 minutes)
- Cool layers: Let cakes cool in pans for 10 minutes, then turn out onto wire racks to cool completely. Cooling fully prevents frosting from melting. (At least 1 hour)
- Make buttercream: Beat softened butter until creamy. Gradually add powdered sugar, then vanilla, salt, and cream. Beat on high for 5-6 minutes until fluffy and spreadable. (10 minutes)
- Assemble cake: Level cake tops if needed. Place one layer on a cake board or plate, spread a thick layer of buttercream, then top with the second cake layer. Apply a thin crumb coat over the whole cake and chill for 20 minutes. (20 minutes)
- Prepare galaxy fondant: Divide fondant into portions and tint with gel colors using gloves. Roll and gently fold colors together to create a marbled galaxy effect. Roll out to about ⅛ inch (3 mm) thickness on a clean mat. (20 minutes)
- Cover cake with fondant: Carefully lift fondant over cake, smoothing with a fondant smoother to avoid air bubbles. Trim excess at the base. (10 minutes)
- Add shimmer and constellation: Lightly brush edible shimmer dust for that cosmic glow. Use a white edible pen or gel to paint the Gemini constellation, connecting stars with thin lines. Add star sprinkles if desired. (15 minutes)
- Final touches: Chill the cake for 30 minutes to set everything before serving.
Pro tip: If the fondant cracks while covering the cake, don’t panic—warm your hands and gently smooth it out, or patch with a small fondant piece. Also, when mixing colors, less is more to avoid muddy tones. If you want to see a different approach to cake assembly, my Baileys Irish Cream Cheesecake method is a great reference for frosting techniques!
Cooking Tips & Techniques
Working with fondant can be tricky, but a few lessons I learned the hard way might save you some headaches:
- Don’t roll fondant too thin: Around ⅛ inch thickness strikes a balance between flexibility and durability.
- Keep your workspace clean and dry: Fondant picks up dust and crumbs easily, which can ruin the smooth galaxy effect.
- Use gel colors sparingly: Too much liquid food coloring makes fondant sticky. Knead in tiny drops to get vibrant colors without sogginess.
- Crumb coat your cake well: This thin layer of frosting traps crumbs and makes the fondant lay smooth without bumps.
- Allow cake layers to cool completely: Fondant melts and slides on warm cake, so patience is your friend.
- Work quickly but carefully: Fondant can dry out fast; if it becomes stiff, wrap it in plastic wrap to rest before continuing.
- Practice constellation drawing: Sketch lightly with a toothpick before using edible pens to avoid mistakes.
Honestly, the first time I tried painting the constellation, my lines looked like spaghetti—but after a couple of tries, it becomes second nature. Also, multitasking by prepping the buttercream while the cakes bake is a time-saver. If you want to expand your cake decorating skills, the frosting technique I used on my creamy cacio e pepe pasta night (yes, I get artistic in savory cooking too!) inspired me to be bolder with textures.
Variations & Adaptations
This Gemini cake recipe is flexible enough to suit various tastes and dietary needs:
- Vegan version: Use flax eggs (1 tbsp flaxseed meal + 3 tbsp water per egg) and dairy-free butter/milk alternatives. Choose vegan fondant or make your own with powdered sugar and corn syrup.
- Flavor twists: Swap vanilla for almond or lemon extract in the cake and buttercream for a fresh flavor profile.
- Seasonal fruit filling: Add a layer of raspberry or blueberry jam under the buttercream to add a fruity burst and complement the galaxy colors.
- Alternative decorations: Instead of fondant, create the galaxy effect using buttercream swirls and edible glitter for a softer, less structured look.
- Personalized constellations: Adapt the constellation to any zodiac sign or even create a custom star map for special occasions.
One time, I swapped out the classic buttercream for a rich chocolate ganache inside, giving the cake a decadent twist that guests raved about. For a lighter touch, a whipped cream frosting works well, but be mindful as it can be less stable under fondant. If you’re interested in easy noodle dishes to pair with your celebration meal, my easy lo mein noodles recipe is a crowd-pleaser that complements sweet treats like this cake.
Serving & Storage Suggestions
This cake is best served at room temperature, giving the buttercream and cake layers their perfect texture. Let it sit out for 20-30 minutes before slicing to make cutting clean and easy.
Pair it with a simple cup of black tea or a light sparkling beverage to balance the richness. The cosmic theme makes it a stellar centerpiece for astrology parties or birthday brunches.
Store leftover cake covered loosely with plastic wrap or in an airtight cake container in the refrigerator for up to 4 days. Because of the fondant, avoid freezing as it can crack and lose its smooth finish.
When reheating slices, bring them to room temperature naturally—microwaving can make fondant sticky or melt the shimmer dust. Flavors tend to deepen after a day, so if you can wait, the cake tastes even better the next day.
Nutritional Information & Benefits
Each serving (about 1/12 of the cake) contains approximately:
| Calories | 350 kcal |
|---|---|
| Fat | 18g |
| Carbohydrates | 45g |
| Protein | 4g |
| Sugar | 30g |
The cake’s key ingredients provide some nutritional perks: eggs supply protein and essential vitamins, while butter adds fat-soluble vitamins like A and E. Cocoa powder contributes antioxidants, though in modest amounts here.
This cake is gluten-containing and dairy-rich, so it’s not suitable for those with related allergies or intolerances unless substitutions are made. For lower-carb options, you could experiment with almond flour, but that would change texture and taste considerably.
From a wellness perspective, I see this cake as a treat to enjoy mindfully—perfect for moments when you want to celebrate or connect with something meaningful, like the stars themselves.
Conclusion
Making the Perfect Gemini Constellation Cake with Stunning Galaxy Fondant is a rewarding journey from simple ingredients to a cake that feels like a celestial celebration. Whether you’re honoring a Gemini friend or just craving a cake that looks and tastes extraordinary, this recipe balances artistry with ease.
Feel free to tweak colors, flavors, or decoration styles to make it uniquely yours. I love how this cake brings a little wonder into the kitchen, turning a simple baking day into a mini event.
If you try it, I’d love to hear about your constellation creations or any fun variations you dreamed up. Baking is more fun when shared, so drop a comment or photo to keep the cosmic conversation going.
Remember, every cake is a story—may yours shine as bright as the stars above.
FAQs
Can I use homemade fondant for this galaxy cake?
Yes, homemade fondant works well but can be trickier to color smoothly. If you go homemade, make sure it’s well-kneaded and pliable before adding gel colors.
How do I keep the fondant from cracking while covering the cake?
Keep fondant at room temperature and roll it to the right thickness (about ⅛ inch). If it cracks, warm your hands and gently smooth or patch with extra fondant.
Can I prepare this cake a day ahead?
Absolutely! The cake actually tastes better after resting overnight. Just cover it well to keep it fresh and store in the refrigerator.
What if I don’t have a fondant smoother?
A clean plastic card or a flat-edged spatula can substitute for smoothing fondant, though it takes a bit more patience to get a polished finish.
Is the buttercream suitable for piping decorations?
This buttercream is great for spreading and crumb coating, but for intricate piping, you might want a stiffer recipe by adding more powdered sugar or chilling the frosting slightly.
Pin This Recipe!
Perfect Gemini Constellation Cake Recipe Easy Stunning Galaxy Fondant Tutorial
A stunning galaxy-themed cake honoring the Gemini constellation, featuring moist layers, creamy buttercream filling, and a marbled galaxy fondant finish with edible shimmer and constellation details.
- Prep Time: 45 minutes
- Cook Time: 30 minutes
- Total Time: 1 hour 45 minutes
- Yield: 12 servings 1x
- Category: Dessert
- Cuisine: American
Ingredients
- 2 ½ cups all-purpose flour (about 312g), sifted
- 2 ½ tsp baking powder
- ½ tsp baking soda
- ½ tsp salt
- 1 cup unsalted butter, softened (227g)
- 1 ¾ cups granulated sugar (350g)
- 4 large eggs, room temperature
- 1 tbsp pure vanilla extract
- 1 cup whole milk (240 ml)
- 2 tbsp cocoa powder (unsweetened)
- 1 cup unsalted butter, softened (227g) for buttercream
- 4 cups powdered sugar (480g), sifted
- 2 tsp vanilla extract for buttercream
- 2–3 tbsp heavy cream or milk for buttercream
- Pinch of salt for buttercream
- 4 cups pre-made white fondant (about 900g)
- Gel food coloring in navy blue, purple, black, and magenta
- Edible shimmer dust or luster dust in silver and pearl
- Edible white food coloring pen or white gel for constellation details
- Small star-shaped sprinkles (optional)
Instructions
- Preheat oven to 350°F (175°C). Grease two 8-inch round cake pans and line bottoms with parchment paper. (10 minutes prep)
- Sift together flour, baking powder, baking soda, salt, and cocoa powder in a medium bowl. (5 minutes)
- Beat softened butter and granulated sugar in a large bowl until pale and fluffy, about 4-5 minutes on medium speed. (5 minutes)
- Beat in eggs one at a time, mixing well after each addition. Add vanilla extract. Batter may look curdled; this is normal. (3 minutes)
- With mixer on low, alternately add half the dry ingredients and half the milk, then the remaining dry ingredients and milk. Mix just until combined. (4 minutes)
- Divide batter evenly into prepared pans. Smooth tops with offset spatula. Bake 28-32 minutes or until toothpick inserted comes out clean. Rotate pans halfway through. (30 minutes)
- Cool cakes in pans for 10 minutes, then turn out onto wire racks to cool completely. (At least 1 hour)
- Make buttercream: Beat softened butter until creamy. Gradually add powdered sugar, then vanilla, salt, and cream. Beat on high for 5-6 minutes until fluffy and spreadable. (10 minutes)
- Level cake tops if needed. Place one layer on cake board or plate, spread thick layer of buttercream, top with second layer. Apply thin crumb coat over whole cake and chill for 20 minutes. (20 minutes)
- Divide fondant into portions and tint with gel colors using gloves. Roll and gently fold colors together to create marbled galaxy effect. Roll out to about 1/8 inch (3 mm) thickness on clean mat. (20 minutes)
- Carefully lift fondant over cake, smoothing with fondant smoother to avoid air bubbles. Trim excess at base. (10 minutes)
- Lightly brush edible shimmer dust for cosmic glow. Use white edible pen or gel to paint Gemini constellation, connecting stars with thin lines. Add star sprinkles if desired. (15 minutes)
- Chill cake for 30 minutes to set before serving.
Notes
Use Satin Ice fondant for smooth rolling and better taste. For dairy-free, substitute butter and milk with plant-based alternatives and use vegan fondant. Avoid rolling fondant too thin (about 1/8 inch). Keep workspace clean and dry. Use gel colors sparingly to avoid sticky fondant. Crumb coat well to prevent bumps. Allow cake layers to cool completely before fondant application. Fondant cracks can be smoothed with warm hands or patched. Practice constellation drawing lightly before using edible pens. Cake tastes better after resting overnight. Store covered in refrigerator up to 4 days; avoid freezing.
Nutrition
- Serving Size: 1 slice (1/12 of cak
- Calories: 350
- Sugar: 30
- Fat: 18
- Carbohydrates: 45
- Protein: 4
Keywords: Gemini cake, galaxy cake, constellation cake, fondant cake, birthday cake, astrology cake, buttercream, galaxy fondant, star cake