“You *have* to try this cake,” my neighbor said, waving a slice of something bright and festive through the kitchen window. It was mid-June, and honestly, I was knee-deep in what felt like a thousand summer plans. But that slice of Perfect Red White and Blue Layered Jello Poke Cake stopped me right in my tracks.
Turns out, this wasn’t just any dessert. The colors popped like fireworks, and the texture was a surprising mix of creamy and jiggly that somehow worked beautifully together. I didn’t think I was much of a “poking” kind of baker, but the idea of a simple yet show-stopping cake for celebrations — especially around the 4th of July — was irresistible.
That first bite reminded me why sometimes the best recipes come from the most unexpected places (or neighbors with a knack for festive flair). What stuck with me was how easy it was to make but how impressive it looked on the table, bringing a little spark to the simplest gathering. This Red White and Blue Layered Jello Poke Cake quickly became my go-to for any summer celebration that calls for a sweet, patriotic touch—without demanding a full day in the kitchen.
Honestly, it’s the kind of dessert that makes you pause between bites, savoring the perfect blend of nostalgia and fun. It’s not just a cake; it’s a little celebration on its own. And that’s why this recipe has a permanent spot in my summer dessert lineup.
Why You’ll Love This Recipe
After making this Perfect Red White and Blue Layered Jello Poke Cake several times, I can say it’s truly a celebration staple. Here’s why it stands out:
- Quick & Easy: You can whip it up in under an hour, making it ideal for last-minute plans or busy afternoons.
- Simple Ingredients: No need for specialty stores; most ingredients are pantry staples or easy to find at any grocery store.
- Perfect for 4th of July & Summer Parties: The patriotic colors instantly set the right mood for Independence Day or any summer bash.
- Crowd-Pleaser: Kids love it for the fun colors and jiggly texture, and adults appreciate the nostalgic, creamy sweetness.
- Unbelievably Delicious: The poke method allows the jello to seep into the cake, creating a moist, flavorful experience that’s anything but ordinary.
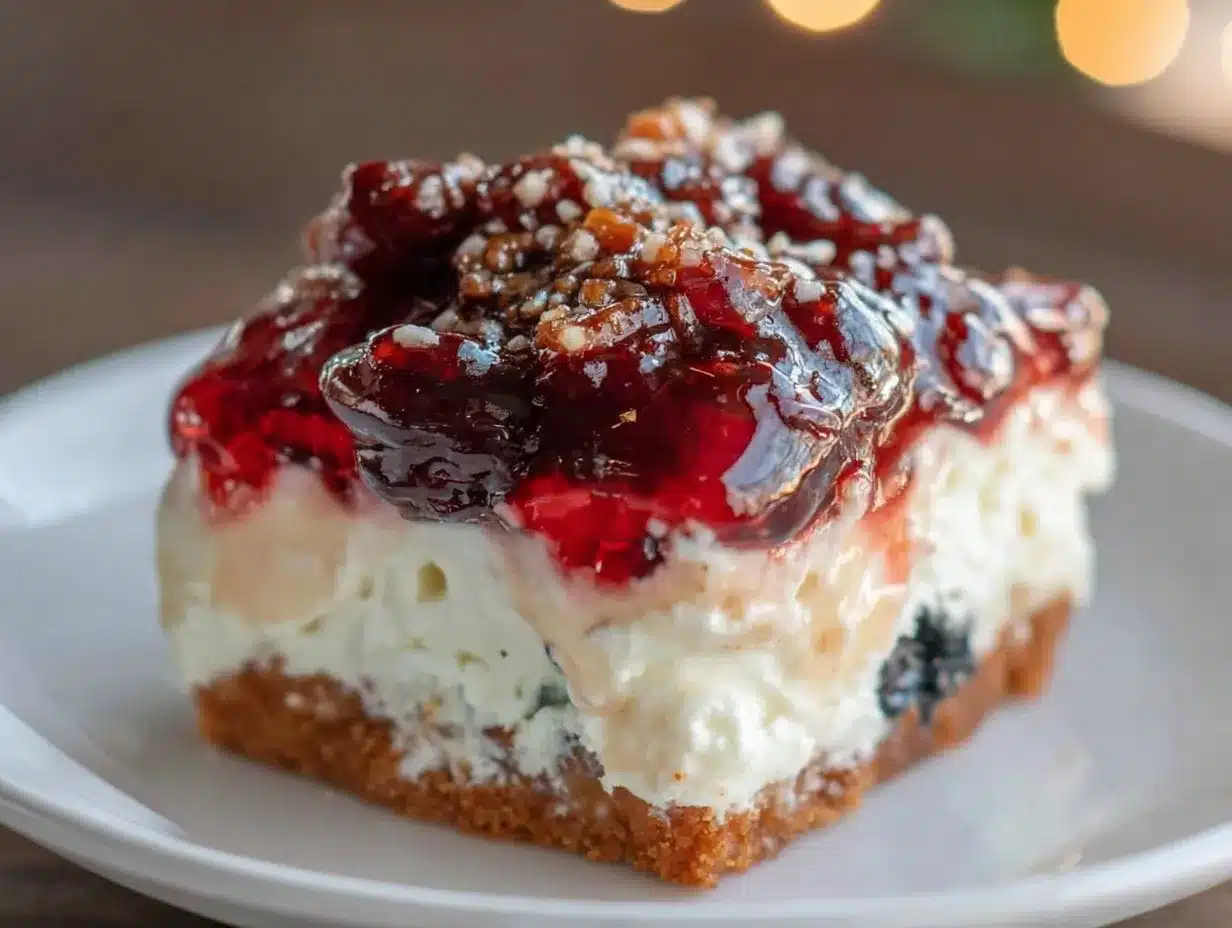
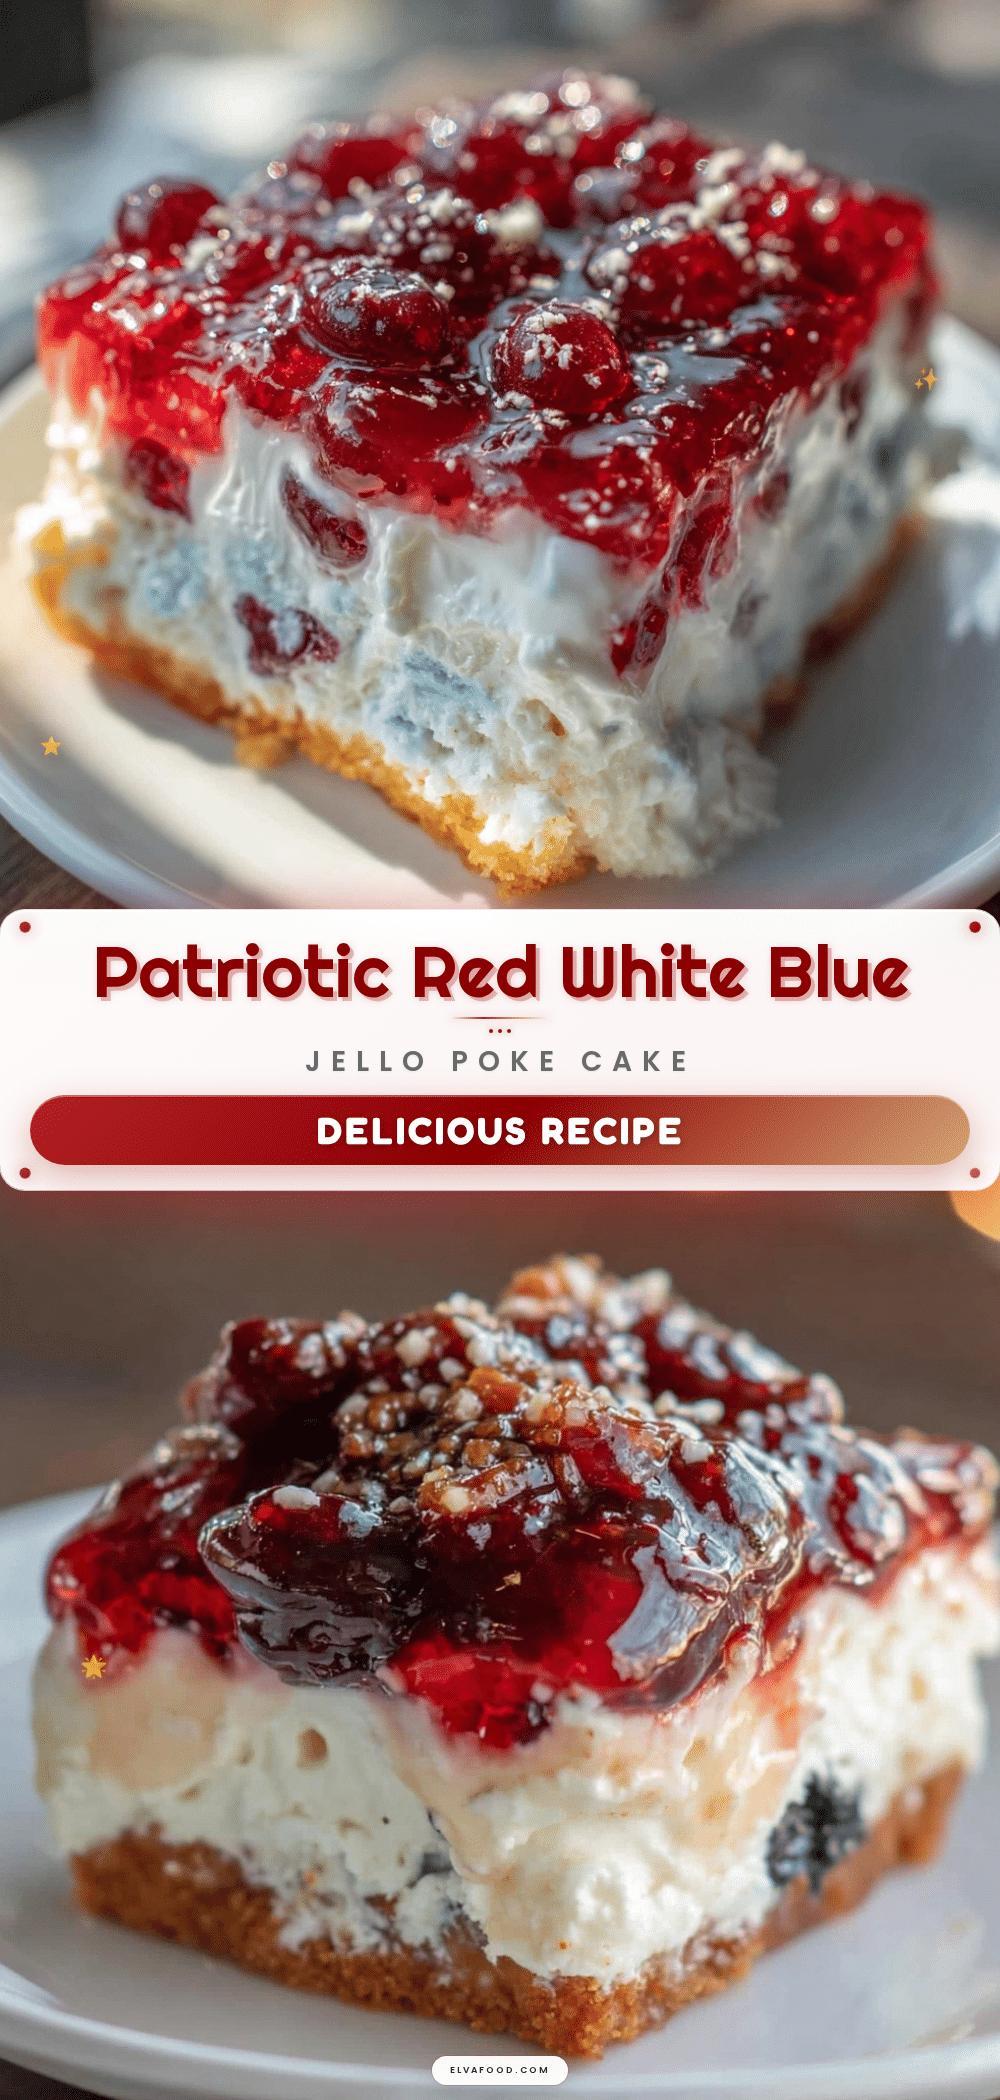
This isn’t just another jello poke cake. The layered effect with red raspberry, white creamy filling, and blue blueberry jello creates a balance of flavors and textures that’s just right. It’s like a homemade fireworks show on your dessert plate—bright, vibrant, and full of personality.
Plus, if you want to impress without stress, this is your recipe. It’s just as suitable for casual family dinners as it is for more festive occasions. Once you try it, you’ll find yourself making it year after year—just like I have.
What Ingredients You Will Need
This recipe uses simple, wholesome ingredients to build layers of bold flavor and satisfying textures without fuss. Most of these are things you probably already have.
- Yellow Cake Mix (about 15.25 oz or 432 g) – A trusty base; I usually pick Duncan Hines for consistent moistness.
- Large Eggs (3, room temperature) – Helps the cake rise nicely and bind ingredients together.
- Vegetable Oil (1/2 cup or 120 ml) – Keeps the cake tender; can substitute with melted coconut oil for a slight twist.
- Water (1 cup or 240 ml) – For cake batter moisture.
- Red Raspberry Jello Powder (3 oz or 85 g) – Adds that vibrant red layer and a tart punch.
- Blueberry Jello Powder (3 oz or 85 g) – For a deep blue layer with a sweet berry flavor.
- Boiling Water (2 cups or 480 ml total) – To dissolve the jello powders fully.
- Sweetened Condensed Milk (14 oz can or 396 g) – Creates the creamy white layer that balances tartness.
- Whipped Topping (8 oz or 226 g, like Cool Whip) – Lightens the filling and adds a fluffy texture.
- Fresh Blueberries and Strawberries (optional, for garnish) – Adds a fresh, juicy touch and makes the presentation pop.
For a gluten-free version, you can swap the cake mix with your favorite gluten-free yellow cake mix. Also, if you want to avoid dairy, try using coconut condensed milk and a dairy-free whipped topping.
Equipment Needed
- 9×13-inch Baking Pan – Ideal size for layering and serving; non-stick or glass works well.
- Mixing Bowls – At least two, for batter and jello preparation.
- Electric Mixer or Whisk – For beating the cake batter smoothly; you can also use a sturdy whisk if needed.
- Measuring Cups and Spoons – For accuracy, especially with liquids and powders.
- Toothpick or Fork – To poke holes in the cake evenly; a fork works just fine.
- Spatula – For folding in whipped topping gently.
- Cooling Rack – Optional, but helpful to cool the cake evenly before poking.
If you don’t have a 9×13-inch pan, a similar-sized baking dish will work, but adjust baking time accordingly. I’ve found that silicone pans can make removal easier, but standard glass pans give a nice even bake. Just be sure to grease the pan well to prevent sticking.
Preparation Method
- Preheat your oven to 350°F (175°C) and grease your 9×13-inch pan lightly with butter or non-stick spray. This ensures the cake doesn’t stick and comes out cleanly.
- Mix the cake batter: In a large bowl, combine the yellow cake mix, 3 large eggs, 1/2 cup (120 ml) vegetable oil, and 1 cup (240 ml) water. Beat on medium speed for about 2 minutes until smooth and well combined.
- Bake the cake: Pour the batter evenly into the prepared pan. Bake for 30-35 minutes or until a toothpick inserted in the center comes out clean. Oven temperatures vary, so start checking at 30 minutes.
- Cool the cake completely: This is key! Let the cake cool for at least an hour on a cooling rack before poking. If it’s warm, the jello will slide off instead of soaking in.
- Prepare red jello: Dissolve the 3 oz (85 g) red raspberry jello powder in 1 cup (240 ml) boiling water. Stir for 2 minutes until fully dissolved. Let it cool slightly but not set.
- Make holes in the cake: Use a fork or toothpick to poke holes all over the cooled cake, about 1 inch apart. This lets the jello seep into the cake for moist, colorful layers.
- Pour the red jello: Slowly pour the red jello over the cake, making sure it seeps into the holes evenly. Refrigerate for 30 minutes to set this layer.
- Create the white layer: Mix the sweetened condensed milk (14 oz/396 g) with the whipped topping (8 oz/226 g). Gently fold together until smooth and creamy. Spread this mixture evenly over the red jello layer.
- Prepare blue jello: Dissolve the 3 oz (85 g) blueberry jello powder in 1 cup (240 ml) boiling water. Stir well and cool slightly.
- Pour the blue jello: Carefully pour the blue jello over the white layer. Refrigerate the entire cake for at least 4 hours, or overnight, to let all layers set beautifully.
- Add fresh berries before serving: Just before slicing, scatter fresh blueberries and sliced strawberries on top for extra color and freshness.
Pro tip: When pouring jello layers, go slowly to avoid disturbing the layer beneath. Using the back of a spoon to gently spread the jello can help keep sharp lines between layers.
Cooking Tips & Techniques
One of the trickiest parts is timing the jello layers so they set properly without mixing. I’ve learned to let the first jello layer chill until it’s just firm, not rock hard, so the white topping sticks well.
Also, cooling the cake completely before poking is a must. I once tried poking a warm cake, and the jello just pooled on top — a messy, disappointing fail!
Using sweetened condensed milk in the white layer gives it a rich, velvety texture that balances the fruity jello perfectly. If you skip this, the cake feels too wobbly or overly sweet.
Multitasking is key here: while the cake bakes and cools, get your jello powders ready so you can pour them promptly. This keeps the layers neat and prevents the cake from drying out.
For consistency, always measure liquids carefully. Jello powders can vary slightly in sweetness and firmness between brands, so I stick with well-known options like Kraft or Jell-O for reliable results.
Variations & Adaptations
This layered jello poke cake is versatile enough to adapt to different tastes and dietary needs.
- Dietary Variation: Use sugar-free jello powders and a sugar-free cake mix for a lighter version without sacrificing flavor.
- Seasonal Twist: Swap the red raspberry and blueberry jello with strawberry and lemon for a summer-inspired citrus flavor that still looks festive.
- Flavor Swap: Try a tropical theme with mango and coconut jello layers, using canned coconut milk in place of sweetened condensed milk.
- Cooking Method: If you prefer, bake the cake in cupcakes for individual servings—poke each one and layer jello accordingly for portable celebration treats.
- Personal Variation: I once added a thin layer of cream cheese frosting between the white and blue jello layers for extra tang and richness. It was a hit at a family picnic!
Allergen-friendly swaps like gluten-free cake mix or dairy-free whipped topping make this recipe accessible without losing its charm.
Serving & Storage Suggestions
Serve this Perfect Red White and Blue Layered Jello Poke Cake chilled. It’s best when cold because the jello layers hold their shape and the cake stays moist.
Presentation-wise, a simple white platter lets the vibrant colors shine. Garnish with fresh berries or a sprig of mint for that extra flair. It pairs beautifully with light beverages like iced tea or sparkling lemonade, especially on warm summer days.
Store leftovers tightly covered in the refrigerator for up to 4 days. The flavors actually deepen overnight, making it even better the next day. Avoid freezing, as the jello texture doesn’t hold up well.
For reheating, honestly, this is a cold dessert best enjoyed as is. Just let it sit out for 10-15 minutes before serving if it’s too chilled for your liking.
Nutritional Information & Benefits
Per serving (based on 12 servings), this poke cake offers approximately:
| Calories | 320 |
|---|---|
| Fat | 12g |
| Carbohydrates | 50g |
| Protein | 4g |
| Sugar | 35g |
The key ingredients like berries and jello add antioxidants and vitamin C, contributing to a small nutritional boost. Using sweetened condensed milk and whipped topping means this isn’t a low-calorie treat, but it’s a festive indulgence worth savoring.
For gluten-free or dairy-free needs, simple substitutions make this cake suitable for many diets, making it inclusive for gatherings. It’s a fun way to enjoy a sweet treat without going overboard on prep or ingredients.
Conclusion
This Perfect Red White and Blue Layered Jello Poke Cake is a celebration staple that feels homemade but looks like it took hours. It’s quick, joyful, and absolutely delicious—a rare combo that makes it a dependable choice for any party or holiday.
What I love most? How you can make it your own with simple twists, yet the core recipe never disappoints. It’s proof that festive food doesn’t have to be complicated to be memorable.
Give it a try, tweak it to your liking, and watch it become a favorite at your next celebration. I’d love to hear how you make it your own—drop a comment or share your version!
Here’s to simple recipes that bring big smiles.
FAQs
Can I make this cake ahead of time?
Absolutely! It actually tastes better after chilling overnight, which lets the jello layers fully set and flavors meld.
What if I don’t have a boxed cake mix?
You can bake your favorite yellow cake recipe from scratch. Just make sure it’s dense enough to hold the jello layers without falling apart.
Can I use fresh fruit inside the cake layers?
It’s best to add fresh fruit as a garnish on top to avoid moisture issues in the cake layers. However, finely chopped berries folded into the batter can work if you prefer.
What’s the best way to poke holes evenly?
Using a fork and spacing pokes about an inch apart works well. You want enough holes for the jello to seep in without making the cake fall apart.
Can I use different jello flavors for other occasions?
Definitely! This recipe adapts well to any jello flavors and color themes, making it versatile for birthdays, holidays, or any celebration.
For a cozy dinner idea to pair with this festive dessert, you might enjoy the hearty Irish Lamb Stew Recipe with Guinness or for a lighter meal, the Fresh Spring Vegetable Frittata is a wonderful choice that balances well with a sweet finish like this cake.
Pin This Recipe!
Perfect Red White and Blue Layered Jello Poke Cake

A quick and easy patriotic dessert featuring layers of red raspberry jello, creamy white filling, and blueberry jello poured into a moist yellow cake, perfect for 4th of July and summer celebrations.
- Prep Time: 15 minutes
- Cook Time: 35 minutes
- Total Time: 5 hours
- Yield: 12 servings 1x
- Category: Dessert
- Cuisine: American
Ingredients
- Yellow Cake Mix (about 15.25 oz)
- 3 Large Eggs (room temperature)
- 1/2 cup Vegetable Oil (120 ml)
- 1 cup Water (240 ml)
- Red Raspberry Jello Powder (3 oz)
- Blueberry Jello Powder (3 oz)
- 2 cups Boiling Water (480 ml total)
- Sweetened Condensed Milk (14 oz can)
- Whipped Topping (8 oz, like Cool Whip)
- Fresh Blueberries and Strawberries (optional, for garnish)
Instructions
- Preheat your oven to 350°F (175°C) and grease your 9×13-inch pan lightly with butter or non-stick spray.
- In a large bowl, combine the yellow cake mix, 3 large eggs, 1/2 cup vegetable oil, and 1 cup water. Beat on medium speed for about 2 minutes until smooth and well combined.
- Pour the batter evenly into the prepared pan. Bake for 30-35 minutes or until a toothpick inserted in the center comes out clean.
- Cool the cake completely on a cooling rack for at least an hour before poking.
- Dissolve the 3 oz red raspberry jello powder in 1 cup boiling water. Stir for 2 minutes until fully dissolved. Let it cool slightly but not set.
- Use a fork or toothpick to poke holes all over the cooled cake, about 1 inch apart.
- Slowly pour the red jello over the cake, making sure it seeps into the holes evenly. Refrigerate for 30 minutes to set this layer.
- Mix the sweetened condensed milk with the whipped topping. Gently fold together until smooth and creamy. Spread this mixture evenly over the red jello layer.
- Dissolve the 3 oz blueberry jello powder in 1 cup boiling water. Stir well and cool slightly.
- Carefully pour the blue jello over the white layer. Refrigerate the entire cake for at least 4 hours, or overnight, to let all layers set.
- Just before slicing, scatter fresh blueberries and sliced strawberries on top for garnish.
Notes
Cool the cake completely before poking holes to prevent jello from sliding off. Pour jello layers slowly to avoid mixing layers. Use well-known jello brands for consistent results. For gluten-free or dairy-free versions, substitute cake mix and toppings accordingly.
Nutrition
- Serving Size: 1 slice (1/12 of cak
- Calories: 320
- Sugar: 35
- Fat: 12
- Carbohydrates: 50
- Protein: 4
Keywords: jello poke cake, 4th of July dessert, layered jello cake, patriotic cake, easy summer dessert, red white and blue cake