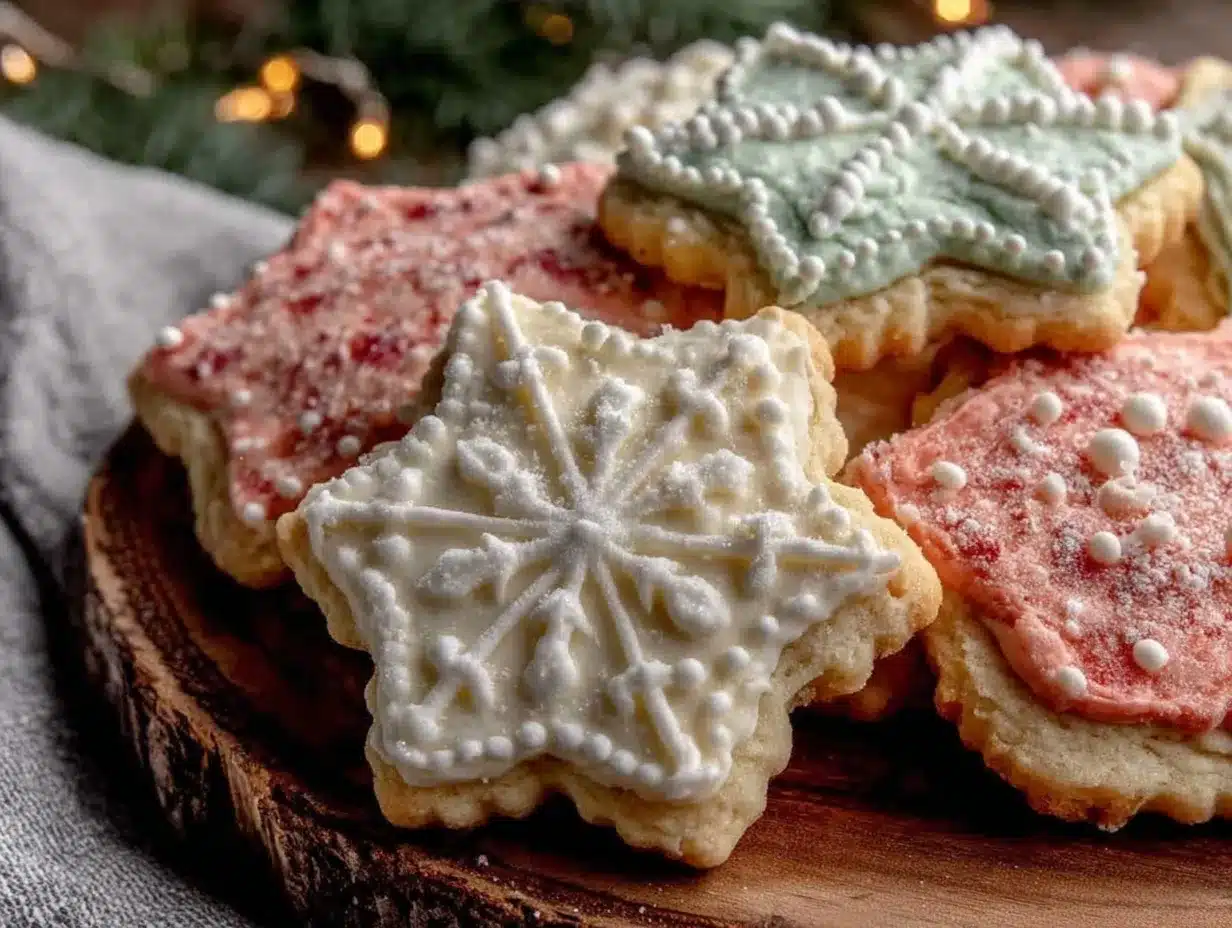
My niece took one bite of these crispy star-shaped sugar cookies with royal icing and immediately asked for a second — without me even offering. I remember watching her eyes light up as the sweet crunch gave way to that smooth, delicate icing, and honestly, it caught me off guard. You know how kids can be picky about sweets, but this reaction was something else. The way the cookie held its crisp edges under the glossy, colorful icing made me realize this recipe was a keeper. I hadn’t expected such a simple cookie to cause that kind of excitement, especially when decorated with that classic royal icing shine that’s just right—not too thick, not too runny.
It wasn’t just the taste; it was the whole experience — the satisfying snap when you bite into the cookie, the subtle vanilla aroma wafting through the kitchen, and the joyful messiness of decorating with icing that still felt like a special moment. Watching someone else enjoy these cookies so wholeheartedly gave me a quiet sort of satisfaction, a gentle nudge that this recipe has a little magic in it. I’ve since made these star-shaped sugar cookies for gatherings and quiet afternoons alike, and they never fail to bring that same spark of delight.
What stuck with me was how approachable the recipe is, yet how impressive the result feels—perfect for anyone who’s ever wanted to make bakery-style sugar cookies that keep their shape and crispness, topped with that smooth royal icing that sets beautifully. No fuss, just joy, and a little sprinkle of whimsy.
Why You’ll Love This Recipe
This crispy star-shaped sugar cookies recipe with royal icing isn’t just another cookie tutorial; it’s one I’ve refined through trial, error, and plenty of taste tests. You can tell when a cookie recipe has been tested enough to nail that crispness without turning rock hard, and this one hits that balance just right.
- Quick & Easy: The dough comes together in about 15 minutes, and the whole batch bakes in under 10—perfect for last-minute baking urges.
- Simple Ingredients: No obscure spices or fancy extracts needed. You likely have everything in your pantry already.
- Perfect for Holiday & Party Baking: Those star shapes and glossy royal icing instantly add a festive touch, whether it’s a birthday, Christmas, or just a sunny afternoon tea.
- Crowd-Pleaser: Kids and adults alike rave about the crisp texture and sweet, smooth icing combo.
- Unbelievably Delicious: The vanilla-spiked cookie dough has a tender crumb that crisps up perfectly, and the royal icing dries with a glossy finish that’s just begging to be nibbled.
What sets this recipe apart is the technique of chilling the dough thoroughly before rolling, which keeps those star points sharp and prevents spreading in the oven. Plus, the royal icing is made with the right consistency to pipe clean edges yet flood the centers smoothly without running off. Honestly, I’ve tried versions that either crack or stay sticky, but this one balances everything for a professional look without the fuss. If you’re interested in a cookie that looks as good as it tastes, this is the recipe you’ll want to keep close.
What Ingredients You Will Need
This recipe uses simple, wholesome ingredients to deliver bold flavor and satisfying crispness without fuss. Most are pantry staples, and the royal icing uses basic ingredients that combine into that iconic glossy finish. Here’s what you’ll need:
- For the cookie dough:
- All-purpose flour, 2 ¾ cups (340g) – provides structure and that tender texture
- Baking powder, 1 teaspoon – helps a little lift without puffiness
- Salt, ½ teaspoon – balances sweetness
- Unsalted butter, 1 cup (226g), softened – for richness and crisp edges (I recommend using a good European-style butter like Kerrygold for flavor)
- Granulated sugar, 1 cup (200g) – sweetness and that slight crunch
- Large egg, 1, room temperature – binder and moisture
- Pure vanilla extract, 1 ½ teaspoons – the star flavor
- For the royal icing:
- Powdered sugar, 3 cups (360g), sifted – smooth sweetness
- Pasteurized egg whites or meringue powder, 3 tablespoons – for that glossy, stiff finish
- Fresh lemon juice, 1 tablespoon – adds just the right tang and helps the icing set
- Water, 2-4 tablespoons – to adjust consistency
- Food coloring gels (optional) – for decorating vibrant stars
If you want to swap flour, almond flour can work for a gluten-free twist, but expect a softer cookie. For dairy-free options, coconut oil solidified can replace butter, though the texture shifts a little. I’ve tried both and prefer butter for the crisp edges, but it’s good to have options. For the icing, meringue powder is a lifesaver if you’re worried about raw egg whites or want longer-lasting icing.
Equipment Needed
- Mixing bowls – a large one for the dough and a medium one for the icing
- Electric mixer (stand or handheld) – makes whipping the butter and icing effortless
- Rolling pin – a smooth, sturdy one helps roll out the dough evenly
- Star-shaped cookie cutters (various sizes help for fun layering)
- Baking sheets lined with parchment paper or silicone mats to prevent sticking
- Cooling racks – to let the cookies crisp up without sweating
- Fine-tipped piping bags or squeeze bottles – for detailed royal icing decoration
- Small bowls or cups for mixing different icing colors
If you don’t have a mixer, a sturdy whisk and some arm power can do the trick, but the texture might not be quite as smooth. For rolling, a silicone rolling mat can help control dough thickness. I’ve found that using parchment paper to roll between layers makes cleanup easier and keeps the dough from sticking, especially with softer batches. Investing in a good piping set is worth it if you plan to decorate regularly, but a zip-top bag with a small snip cut in the corner works in a pinch.
Preparation Method
- Mix dry ingredients: In a medium bowl, whisk together 2 ¾ cups (340g) all-purpose flour, 1 teaspoon baking powder, and ½ teaspoon salt. Set aside.
- Cream butter and sugar: In a large bowl, using an electric mixer on medium speed, beat 1 cup (226g) softened unsalted butter and 1 cup (200g) granulated sugar together until light and fluffy, about 3-4 minutes. It should look pale and slightly aerated.
- Add egg and vanilla: Beat in 1 large room-temperature egg and 1 ½ teaspoons vanilla extract until fully combined. The mixture may look a bit curdled at first, but keep mixing until smooth.
- Incorporate dry ingredients: Gradually add the flour mixture in two or three additions, mixing on low speed after each. Stop mixing as soon as the dough comes together—overmixing can make cookies tough.
- Chill the dough: Divide the dough into two discs, wrap tightly in plastic wrap, and refrigerate for at least 1 hour or overnight. Chilling is key for crisp edges and preventing spreading in the oven.
- Preheat oven and prepare baking sheets: Preheat oven to 350°F (175°C). Line baking sheets with parchment paper or silicone mats.
- Roll out the dough: On a lightly floured surface, roll one disc of dough to about ¼ inch (6 mm) thickness. Keep the other disc chilled until ready to use.
- Cut out stars: Press star-shaped cookie cutters firmly into the dough and transfer cookies carefully to baking sheets, spacing about 1 inch (2.5 cm) apart.
- Bake: Bake for 8-10 minutes, or until edges just start to turn golden. The centers might look slightly soft but will firm up as they cool.
- Cool: Let cookies cool on the baking sheet for 5 minutes, then transfer to wire racks to cool completely before decorating.
- Prepare royal icing: In a clean bowl, beat 3 tablespoons pasteurized egg whites or meringue powder with 3 cups (360g) sifted powdered sugar. Add 1 tablespoon fresh lemon juice and 2-4 tablespoons water to reach piping consistency. Adjust water carefully—it’s better to start thicker and thin as needed.
- Color the icing: Divide icing into small bowls and tint with gel food coloring as desired. Mix gently to avoid bubbles.
- Decorate: Using piping bags or squeeze bottles, outline each cookie first with slightly thicker icing, then flood the center with thinner icing. Let the icing set at room temperature for several hours or overnight to harden fully.
Pro tip: If your dough feels too sticky when rolling, chill it a bit longer or dust lightly with flour. When piping, steady hands come with practice—don’t stress over tiny imperfections. And if your royal icing cracks after drying, it might have been too thick or dried out in the bowl, so keep a damp cloth over unused icing.
Cooking Tips & Techniques
Getting that perfect crispy star-shaped sugar cookie with royal icing takes a few little tricks I’ve learned the hard way. First, patience with chilling is your friend. Skipping that step means your cookies spread and lose those sharp star points, and nobody wants sad rounded stars.
When creaming butter and sugar, beating long enough to get air incorporated makes a huge difference in texture—this is what gives the cookie that delicate crumb. Also, don’t overmix once you add the flour; just combine until no streaks remain.
For the royal icing, consistency is everything. I keep two consistencies on hand: a thicker one for outlines and details, and a thinner one for flooding the centers. A quick dip of your finger in water reveals the difference—thicker icing holds its shape, thinner flows smoothly but isn’t runny. If you’re new to piping, practice on parchment paper before moving to cookies.
A common mistake is adding too much water to the icing—start small and add more gradually. If your icing crusts too quickly in the bowl, cover it tightly with plastic wrap or a damp towel to keep it workable.
Lastly, decorate cookies on a flat surface away from drafts to avoid uneven drying or dust settling. And if you want to speed up drying, a fan on low can help, but don’t rush it too much or the icing might crack.
Variations & Adaptations
This recipe is quite versatile and easy to adjust based on your needs or taste preferences. Here are a few variations I’ve tried and loved:
- Flavor twists: Add a teaspoon of almond extract or lemon zest to the dough for a subtle flavor change that pairs wonderfully with the vanilla base.
- Seasonal shapes: Instead of stars, use cookie cutters shaped like pumpkins for fall or hearts for Valentine’s Day. Same dough, different festive vibe!
- Dietary substitutions: For gluten-free, swap in a 1-to-1 gluten-free flour blend and chill the dough longer as it tends to be softer. For vegan, use coconut oil and an egg replacer like flaxseed meal mixed with water.
- Decorating alternatives: Skip royal icing and dust with cinnamon sugar before baking for a simple cinnamon-sugar crisp cookie. Or try melted chocolate drizzles for a quick glaze.
One personal favorite is mixing a little cocoa powder into half the dough for chocolate star cookies, then decorating with a pale vanilla icing for a contrast. It’s a subtle twist that feels special without complicating the process.
Serving & Storage Suggestions
These crispy star-shaped sugar cookies are best served at room temperature once the royal icing has fully dried. Present them on a festive platter or stack gently with parchment paper between layers to keep the icing intact. They make a lovely addition to any party dessert spread or a sweet treat alongside afternoon tea.
Store cookies in an airtight container at room temperature for up to 5 days. If you plan to keep them longer, freezing works well: layer cookies with parchment paper and freeze in a sturdy container. Thaw at room temperature before serving. Be mindful that humidity affects the crispness and icing texture, so store in a cool, dry place.
Reheating isn’t necessary but if you prefer a slightly softer bite, a quick 5-7 second zap in the microwave can help, just don’t overdo it or the icing will melt.
Nutritional Information & Benefits
Each cookie (assuming about 24 cookies from the recipe) contains approximately 120-140 calories, with moderate sugar and fat content. The use of real butter and egg means these cookies provide some protein and essential fats, but naturally, they’re a treat best enjoyed in moderation.
The royal icing, made with egg whites or meringue powder, adds a bit of protein but largely contributes sweetness. Using fresh lemon juice adds a touch of vitamin C and brightens flavors naturally.
This recipe can be adapted to be gluten-free or dairy-free, making it accessible for various dietary needs. Plus, homemade sugar cookies have the advantage of controlling ingredients and avoiding preservatives or artificial flavors common in store-bought versions.
Conclusion
Crispy star-shaped sugar cookies with royal icing are one of those recipes that deliver both charm and satisfaction. They balance a tender yet crisp bite with the smooth, glossy icing that feels just as fun to decorate as it is to eat. Whether you’re making them for a festive occasion or a simple treat, they bring a sparkle to the table.
I love this recipe because it’s straightforward enough for a novice but rewarding enough for a seasoned baker to enjoy. Plus, the star shape and royal icing offer a little creative playground for decorators of all ages.
If you try these cookies, I’d love to hear how you customize them or what decorating tricks you discover! Sharing your experience keeps the baking spirit alive and well.
FAQs About Crispy Star-Shaped Sugar Cookies with Royal Icing
How do I keep my sugar cookies from spreading too much in the oven?
Chilling the dough for at least an hour before baking helps keep the cookies firm and prevents spreading. Also, avoid over-creaming the butter and sugar and use parchment paper or silicone mats on your baking sheets.
Can I make royal icing without raw egg whites?
Yes! Use meringue powder instead of raw egg whites for a safer and longer-lasting royal icing that still dries hard and shiny.
How do I fix royal icing that’s too runny or too thick?
Add powdered sugar to thicken or a few drops of water to thin. Adjust slowly and test the consistency by dragging a spoon through it—the icing should hold a soft peak for piping.
What’s the best way to store decorated sugar cookies?
Keep them in an airtight container at room temperature, layered with parchment paper to protect the icing. They last about 5 days this way.
Can I prepare the dough or icing ahead of time?
Absolutely! Dough can be made and refrigerated up to 2 days or frozen for longer. Royal icing is best fresh but can be stored in an airtight container in the fridge for 1-2 days; just stir well before use.
Pin This Recipe!

Crispy Star-Shaped Sugar Cookies Recipe with Easy Royal Icing Tutorial

These crispy star-shaped sugar cookies feature a tender crumb with crisp edges and are topped with smooth, glossy royal icing that sets beautifully. Perfect for festive occasions or everyday treats, this recipe balances simplicity with impressive results.
- Prep Time: 15 minutes
- Cook Time: 10 minutes
- Total Time: 1 hour 25 minutes
- Yield: 24 cookies 1x
- Category: Dessert
- Cuisine: American
Ingredients
- 2 ¾ cups (340g) all-purpose flour
- 1 teaspoon baking powder
- ½ teaspoon salt
- 1 cup (226g) unsalted butter, softened
- 1 cup (200g) granulated sugar
- 1 large egg, room temperature
- 1 ½ teaspoons pure vanilla extract
- 3 cups (360g) powdered sugar, sifted
- 3 tablespoons pasteurized egg whites or meringue powder
- 1 tablespoon fresh lemon juice
- 2–4 tablespoons water
- Food coloring gels (optional)
Instructions
- In a medium bowl, whisk together 2 ¾ cups (340g) all-purpose flour, 1 teaspoon baking powder, and ½ teaspoon salt. Set aside.
- In a large bowl, using an electric mixer on medium speed, beat 1 cup (226g) softened unsalted butter and 1 cup (200g) granulated sugar together until light and fluffy, about 3-4 minutes.
- Beat in 1 large room-temperature egg and 1 ½ teaspoons vanilla extract until fully combined.
- Gradually add the flour mixture in two or three additions, mixing on low speed after each. Stop mixing as soon as the dough comes together.
- Divide the dough into two discs, wrap tightly in plastic wrap, and refrigerate for at least 1 hour or overnight.
- Preheat oven to 350°F (175°C). Line baking sheets with parchment paper or silicone mats.
- On a lightly floured surface, roll one disc of dough to about ¼ inch (6 mm) thickness. Keep the other disc chilled until ready to use.
- Press star-shaped cookie cutters firmly into the dough and transfer cookies carefully to baking sheets, spacing about 1 inch (2.5 cm) apart.
- Bake for 8-10 minutes, or until edges just start to turn golden. The centers might look slightly soft but will firm up as they cool.
- Let cookies cool on the baking sheet for 5 minutes, then transfer to wire racks to cool completely before decorating.
- In a clean bowl, beat 3 tablespoons pasteurized egg whites or meringue powder with 3 cups (360g) sifted powdered sugar.
- Add 1 tablespoon fresh lemon juice and 2-4 tablespoons water to reach piping consistency. Adjust water carefully.
- Divide icing into small bowls and tint with gel food coloring as desired.
- Using piping bags or squeeze bottles, outline each cookie first with slightly thicker icing, then flood the center with thinner icing.
- Let the icing set at room temperature for several hours or overnight to harden fully.
Notes
Chill dough for at least 1 hour to prevent spreading and keep star points sharp. Use two consistencies of royal icing: thicker for outlines and thinner for flooding. If dough is sticky, chill longer or dust with flour. Cover unused icing with a damp cloth to prevent drying. Decorate on a flat surface away from drafts. Store cookies in an airtight container at room temperature for up to 5 days or freeze for longer storage.
Nutrition
- Serving Size: 1 cookie
- Calories: 130
- Sugar: 12
- Sodium: 60
- Fat: 7
- Saturated Fat: 4
- Carbohydrates: 18
- Protein: 1
Keywords: sugar cookies, star-shaped cookies, royal icing, holiday cookies, crispy cookies, vanilla cookies, cookie decorating